THE RECIPE LARDER

  • Home
  • Nuts and Bolts, Sauces and Pans
  • Recipes
  • Contact

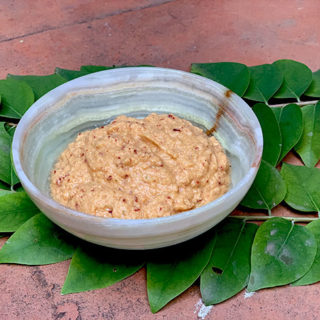
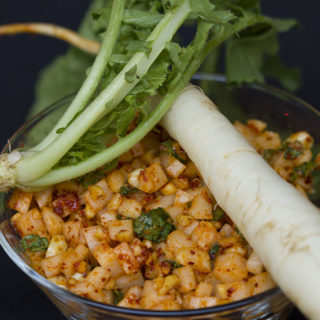
Amla Chutney

July 9, 2019 By appu 2 Comments

Amla Chutney
Print Recipe
A quick, easy and healthy chutney, to serve with - everything!!
  • CourseAppetizer, Breakfast, Side Dish
  • CuisineIndian
Servings Prep Time
100 gms 10 minutes
Passive Time
5 minutes
Servings Prep Time
100 gms 10 minutes
Passive Time
5 minutes
Amla Chutney
Print Recipe
A quick, easy and healthy chutney, to serve with - everything!!
  • CourseAppetizer, Breakfast, Side Dish
  • CuisineIndian
Servings Prep Time
100 gms 10 minutes
Passive Time
5 minutes
Servings Prep Time
100 gms 10 minutes
Passive Time
5 minutes
Ingredients
  • 100 gms amla
  • 1 Green Chilly
  • 1 inch Ginger chopped
  • 2 cloves garlic
  • 1 kashmiri red chilly
  • 1 tbspn Sesame Seeds
  • 1 tbspn Water
  • 1 tspn salt
Servings: gms
Instructions
  1. Add all ingredients to a grinder and grind to a paste
  2. Serve with lunch, dinner, pakodas, snacks, etc.
  3. Refrigerate for up to 4/ 5 days in a closed container
Recipe Notes

Bangalore is always a green and refreshing break for me. This time I was there only for a day, but I took the time to wander around in the garden. My friend Nishi and me saw our Amla tree flourishing with green gorgeous star shaped fruits.

The ones we have growing in our garden are not the traditional variety of Amla. We have a variety called Harpharouri in Hindi, or Malay gooseberry or Tahitian gooseberry. But as tasty and as edible.


You can of course and must use the Amla found in market. No point going on a hunt for this particular kind!

We had met after a long time, so we spent the entire day with each other. It was time for some drinks and snacks, and I must say that the Amla Chutney went well with everything - masala papad, pakodas, rice crisps, chips. We had some of it for dinner too, with our chapatti and veggies.

It's really simple to make. Takes only a few minutes. The only time consuming part would be the de seeding of the Amla. It's healthy. The Amla gives you a shot of Vitamin C (who does'nt need an extra shot of that huh?), the sesame seed has calcium and the chillies build immunity not to mention add a super zest to the whole thing.

Do send me comments. What did you eat it with? How did it taste? 

Cheers and Ciao till we meet again.

Share this Recipe

Filed Under: Chutneys Tagged With: amla, indiangooseberry, Vegan

Lettuce Wedge Salad

November 18, 2016 By appu Leave a Comment

I first had Lettuce Wedge Salad, in London, in a restaurant called Roka. Of course, the restaurant has stayed a favourite, as has this salad. I would always, analyse it, gaze at it in wonder and awe, thinking I will replicate it in some manner. And – I would always forget.

lettuce wedge salad

The fresh crisp lettuce, perfect square wedges of stacked leaves, the immensely flavourful dressing – everything made it a favourite, of ordered a dish.

 lettuce wedge salad

I went on a hunch, (because I was daunted by those perfect square wedges) and bought two fresh heads of lettuce. I had no idea how to cut it. No matter how many times I would visit the salad in my mind’s eye, knife in hand, I could not figure out how to cut it. I have no formal training in cuisine, so these skills are alien to me, till I figure them out.

lettuce wedge salad2

With great trepidation, I cut the salad in half, vertically, root to the top of the head. Then I sank all the four heads in ice water, (more ice, less water) and left it to hydrate for approximately 30 minutes. Let me tell you what happened! The lettuce took in so much water, it took me another 10 minutes to drain it. But the lettuce was happy to have had that water. The leaves were crisp and clean.

Then I randomly chopped here and there, but the wedges were nowhere near perfect. I took a pause and really visualised, and them hit on the right technique.

This is how it is done.

Firstly – try not to use a metal knife. The metal in the knife oxidises the leaves and makes them look soggy.  A plastic or ceramic knife works very well. I had bought a ceramic knife from Japan, Kyocera brand, and was warned that it could lop off my fingers if I am not careful. I use it very sparingly, because hey! I love my digits.

Now then on to the method –

I am going to be showing pics at every step because I am finding it very difficult to explain the process! Words are just not enough.

Chop the lettuce vertically, from the root to the top. (see pic below)

Cut from root to top.

Cut from root to top.

Dunk in ice water, and drain well after 30 minutes.

Now take the chopped side, the side where you can see all the layer of leaves, and place that to your right. (see pic below)

The side which is cut, keep it to your right

The side which is cut, keep it to your right

Then, take three, (if you have a larger head of lettuce then take four or five) long wooden barbecue sticks, (they should be larger than cocktail toothpicks – about 4 to 5 inches long) and leaving an inch from the side of the cut side of the lettuce, poke them at 1 and 1/2 inches interval. This is done 90 Deg from the cut side of the lettuce, and not parallel to the root and cut side of the lettuce. (see pic below)

Stick bbq sticks into the lettuce

Stick bbq sticks into the lettuce

The cutting will happen from the non-cut side of the lettuce. The one which is the root side and on your left. The opposite side of the cut side of the lettuce. (see pic below)

This from where you will cut a large wedge

This from where you will cut a large wedge

Taking your knife and leaving an inch from the uncut side of the lettuce, cut off the part with the toothpick inserts. The toothpick inserts should now be all in a row, and the large wedge should have separated from the main head of lettuce. (see pic below)

how to cut into wedges 2

Slice of the entire strip with the bbq sticks

Slice of the entire strip with the bbq sticks

Now, just lop off individual wedges, seeing that you get as close to a square as possible. (see pic below)

Cut off individual wedges.

Cut off individual wedges.

Trim the wayward leaves, and push the stack of cut lettuce wedge further into the stick.

Garnish, turning it all around.

Garnish well - rotating all sides.

Garnish well – rotating all sides.

Serve Chilled.

Lettuce wedge salad with Japanese sesame oil dressing

Lettuce wedge salad with Japanese sesame oil dressing


Lettuce Wedge Salad
Print Recipe
Crisp, refreshing and immensely flavourful salad. Quick and easy to make, though it looks a bit daunting.
  • CourseSalad
  • CuisineFusion, Japanese
Servings Prep Time
4 people 20 minutes
Passive Time
30 minutes
Servings Prep Time
4 people 20 minutes
Passive Time
30 minutes
Ingredients
  • 2 heads lettuce fresh
For the dressing
  • 6 Tbspn Sesame oil
  • 2 Tbspn light soya sauce
  • 2 Tspn White wine vinegar
  • 1.5 Tspn salt
  • 3.5 Tbspn garlic Minced
  • 2 Red thai , or bird's eye chilly dried or fresh
  • 3/4th Tspn Black Pepper ground
Last garnish
  • 2.5 Tbspn Sesame Seeds Roasted
Servings: people
Instructions
  1. Chop the lettuce vertically, from the root to the top.
    Chop the lettuce vertically, from the root to the top.
  2. Dunk in ice water, and drain well after 30 minutes.
  3. Now take the chopped side, the side where you can see all the layer of leaves, and place that to your right.
    Now take the chopped side, the side where you can see all the layer of leaves, and place that to your right.
  4. Then, take three, (if you have a larger head of lettuce then take four or five) long wooden barbecue sticks, (they should be larger than cocktail toothpicks - about 4 to 5 inches long) and leaving an inch from the side of the cut side of the lettuce, poke them at 1 and 1/2 inches interval. This is done 90 Deg from the cut side of the lettuce, and not parallel to the root and cut side of the lettuce.
    Then, take three, (if you have a larger head of lettuce then take four or five) long wooden barbecue sticks, (they should be larger than cocktail toothpicks - about 4 to 5 inches long) and leaving an inch from the side of the cut side of the lettuce, poke them at 1 and 1/2 inches interval. This is done 90 Deg from the cut side of the lettuce, and not parallel to the root and cut side of the lettuce.
  5. The cutting will happen from the non cut side of the lettuce. The one which is the root side and on your left. The opposite side of the cut side of the lettuce.
    The cutting will happen from the non cut side of the lettuce. The one which is the root side and on your left. The opposite side of the cut side of the lettuce.
  6. Taking your knife and leaving an inch from the uncut side of the lettuce, cut off the part with the toothpick inserts. The toothpick inserts should now be all in a row, and the large wedge should have separated from the main head off lettuce.
    Taking your knife and leaving an inch from the uncut side of the lettuce, cut off the part with the toothpick inserts. The toothpick inserts should now be all in a row, and the large wedge should have separated from the main head off lettuce.
  7. Now, just lop off individual wedges, seeing that you get as close to a square as possible.
    Now, just lop off individual wedges, seeing that you get as close to a square as possible.
  8. Trip the wayward leaves, and push the wedges little further into the bbq stick.
  9. Repeat the same way with the balance left over lettuce head.
  10. if serving later, keep covered, in ice water.
Sesame oil dressing
  1. Mix all the ingredients and give it a good whisk.
Finishing
  1. Rotate the lettuce wedges, and drizzle dressing generously.
  2. Serve Chilled. Garnish with sesame seeds just before serving.
Share this Recipe

Filed Under: Brunch, Dinner, Lunch Tagged With: cermaic knife, lettuce, lettuce wedge salad, light soya sauce, minced garlic, sesame oil. garlic

Hummus Beiruti

July 26, 2016 By appu Leave a Comment

I had Hummus for the first time as an adult. It picked up as a rage, and every party had a bowl of Hummus, with Pita. Then came the Lavash. Crisp flat wheat savouries topped with seeds.

Hummus with Lavash.

Hummus with Lavash.

I had Hummus for the first time some 20 years ago, in a restaurant called Olive. They had the typical platter of Baba Ganoush, Hummus and Tzatziki. At that time – I thought it was made with magic. How could something so tasty, so creamy be so amazing and healthy? When I learnt to make hummus, I was amazed at how easy it was, but I never seemed to like it as much as I liked the ones in a restaurant.

The fact is – I used terrible shortcuts. Sesame instead of Tahini. Sacrilege!! (my logic – Tahini is made out of sesame right??) Too much garlic, not enough creamy texture — blah blah!

I thought I would never be able to replicate the hummus, we have in good Mediterranean restaurants.I love the Hummus Beiruti. Its creamy with a mild tang of spice. Polishing off a small bowl is no big feat.

Hummus Beiruti

Hummus Beiruti

I tried Hummus again, (after my many not so good tries) and this time I used the proper Tahini. Another thing a chef friend of mine suggested was using cold water.

In this recipe, I use a little leftover water after boiling the chickpeas. I like to soak the chickpeas at night, and cook it the next morning and make the Hummus a few hours later. The water left over from cooking the chickpeas and the chickpeas itself are cooled down and refrigerated.

The hard work is soaking and cooking, after that its the quickest recipe you can make.

Serve it with a Rocket and cucumber salad, over toast with Avocado, obviously with Pita and Lavash. So many ways!! Do write in and tell me how you like to present it.

 Hummus


                                                                               Hummus

I made Hummus for my son last evening, thinking he could have it with Avocado. Confidently, I also made a small olive oil, garlic and Sumac drizzle for the top. Failure of failures! – the Avocado was not ripe enough and we had to chuck it. (Once cut it turns black quicker than a piece of charcoal rubbed on a face!) Then he suggested that we caramelise some onions, and top it with the same. Bigger flop. I had no brown sugar with me, and any case something made in a hurry not always turns out good. It was sticky …. basically – a flop!! I was flapping around about what he would eat, but he said the Hummus was good enough to eat on its own.. YAAAY!! Hummus saved the day!

hummus

hummus

hummus


Hummus Beiruti
Print Recipe
A Meditteranean staple, creamy and yummy!
  • CourseAppetizer
  • CuisineMediterranean
Servings Prep Time
4 people 10 minutes
Cook Time Passive Time
15 minutes 12 hours
Servings Prep Time
4 people 10 minutes
Cook Time Passive Time
15 minutes 12 hours
Hummus Beiruti
Print Recipe
A Meditteranean staple, creamy and yummy!
  • CourseAppetizer
  • CuisineMediterranean
Servings Prep Time
4 people 10 minutes
Cook Time Passive Time
15 minutes 12 hours
Servings Prep Time
4 people 10 minutes
Cook Time Passive Time
15 minutes 12 hours
Ingredients
  • 1/2 Cup Chick Peas Soaked over night
  • 2 Tblspn olive oil Virgin if possible
  • 2 Tblspn Yogurt
  • 5 Pods garlic peeled
  • 2 Tblspn Tahini
  • 1 Tblspn Water left over from cooking chick peas cold
  • 2 Tblspn Cold Water
  • 1 Tspn salt
  • 1/2 Tspn Cumin Powder
  • 1/3 Green Chilly Deseeded and chopped
  • 1/2 Tspn lemon juice
Garnish
  • 1 Tspn parsley chopped fine
  • 1/2 Tspn Sesame Seeds Roasted
  • 1 Tblspn olive oil
  • 1/2 Tspn Paprika
  • 1/4 Tspn salt
Servings: people
Instructions
  1. Soak the chick peas over night.
  2. Wash and cook till its soft. It should not disintegrate. It should retain its shape. I like to use a pressure cooker for this.
  3. Drain the water, cool and refrigerate.
  4. Cool chick peas and refrigerate.
  5. After a few hours, add all ingredients in a blender and blend till you get a fine paste. Keep opening the jar and spoon the mixture stuck on the sides back into the jar. PS: if you use the Tecnora brand of mixie (available on amazon) which comes with a very handy stirrer in the jar. While blending, one can keep stirring the mixture, so that it blends easily. You don't have to keep opening the jar.
  6. Once you have the consistency you want, plate it and garnish with olive oil, sesame seeds, parsley and mint leaves.
  7. Serve with Pita, Crisp Pita and Lavash.
  8. NOTE ON TAHINI: When using Tahini, please stir well and take from the bottom of the jar, as the solids settle way down.
Share this Recipe

Filed Under: Cocktail Parties, Sides, Snacks Tagged With: Chick Peas, Lavash, Mediterranean, Vegan, vegetarian

Meet the Author

For the 21 years and some months that I have been alive, there has been this crazy, eccentric, always-charged-up woman with a full-time job of being a mother to 6 (2 children, 4 dogs).

In her spare time she blasts music on her DJ console, reads like a maniac, downloads shows (because God forbid she runs out of something to watch), runs an entire household, and to top it all off, manages a very successful catering business which makes the most delicious food in the entire world. Once you have her food, everything else will taste like stale socks.

This is what you call "Maa ke haath ka khana".

- Kanak

Subscribe to Blog via Email

RECIPE BY CATEGORY

Copyright © 2022 THE RECIPE LARDER