THE RECIPE LARDER

  • Home
  • Nuts and Bolts, Sauces and Pans
  • Recipes
  • Contact

Turkish Eggs

October 25, 2018 By appu Leave a Comment

I did it!! I finally learnt to poach eggs! And I have the very attractive legendary, Nigella Lawson to thank for it!

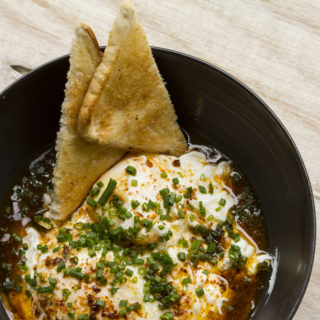
Turkish Eggs.

It’s actually so simple that it’s scary. But trust me, its really easy! I know what you must be thinking!! Nah! you say! I get it! I have no count of the number of eggs reduced to broken yolks and litres of water bubbling with broken scattered albumin! But one look at this recipe, and I can guarantee that you will be willing to try poaching eggs and you will succeed!

turkish poached eggs

This video / recipe will banish all myths about vinegar in the water, or swirling the water into a vortex, or that you need special skills to make this dubious poached egg!

When you break the egg in the water the white will move away. But as it cooks the white remembers it’s DNA and goes up and envelopes the yolk again. It’s quite interesting to note this, and reminds us to  never fail to be amazed by nature and all things natural.

This has become my favourite meal in a bowl. It’s quick, easy (yes! it is!) and super super tasty. Specially when you get to the last part where the egg yolk breaks and mixes with the curds and butter sauce! Then – it just melts in the mouth setting off a palate explosion!

I really have not much more to say in this post because you really have to taste it to know how strangled for words it will leave you!

turkish eggs

Go for it! And message me with pics!!!

Cheers!!


IMPORTANT: Do go through the notes section of the recipe for hacks and tricks!

http://therecipelarder.com/wp-content/uploads/2018/10/Turkish-Eggs-converted-with-Clipchamp-1.mp4


Turkish Eggs
Print Recipe
Soft poached eggs, hung garlicky curd and chilli butter sauce!
  • CourseBrunch, Main Course, Main Dish
  • CuisineMediterranean
Servings Prep Time
1 pax 10 min
Cook Time Passive Time
10 min 4 hours
Servings Prep Time
1 pax 10 min
Cook Time Passive Time
10 min 4 hours
Turkish Eggs
Print Recipe
Soft poached eggs, hung garlicky curd and chilli butter sauce!
  • CourseBrunch, Main Course, Main Dish
  • CuisineMediterranean
Servings Prep Time
1 pax 10 min
Cook Time Passive Time
10 min 4 hours
Servings Prep Time
1 pax 10 min
Cook Time Passive Time
10 min 4 hours
Ingredients
  • 100 gm curds / yoghurt hung for 4-5 hours
  • 1 tspn Minced Garlic
  • 1 tspn salt
  • 2 Eggs chilled
  • 1 tspn lemon juice
  • 500 ml Water (appx)
  • 1/2 tspn Paprika
  • 1/2 tspn spicy chilly flakes (can be reduced)
  • 1 tspn olive oil
  • 1 tbspn Butter
  • 1 tbspn chives finely chopped
  • Toast of your choice
Servings: pax
Instructions
  1. Hang the yoghurt / curds for 3-4 hours
  2. Transfer into a bowl, and add salt and half (ie 1/2 tspn) garlic
  3. Mix well and keep aside
  4. In slow to medium fire, set the water to boil.
  5. While water is heating, break one egg into a seive
  6. Let the extra albumin strain away
  7. Transfer gently to a cup
  8. Add half tspn lemon juice and keep ready
  9. When large bubble break to the surface of the water, reduce the fire and transfer the egg gently into the water.
  10. Poach the egg for 2 to 3 minutes
  11. Gently take it out with a slotted spoon and drain excess water
  12. Transfer on top of the curds
  13. Similarly poach the second egg.
  14. Set a pan on slow fire and, set the butter to melt.
  15. Add balance 1/2 tspn garlic and chilli flakes.
  16. Just before taking off fire add the olive oil
  17. Drizzle over the eggs
  18. Garnish with chives
  19. Enjoy with a point of toast.
Recipe Notes

Notes for perfect poached eggs:

  • The egg should be refrigerated or at least an hour before making the poached eggs.
  • Lemon juice is a must.
  • Do strain the extra egg white, it makes a difference.
  • There is no need to put vinegar in water and to make a swirling vortex. Instead the vortex and swirling water breaks the egg white and makes it into a streamy mess.
  • The water should not be rapidly boiling. If it is bring it down again to a point where large bubbles burst to the surface. Not too many bubbles, just one to three bubbles. This is the right time to slide the egg into the water.
  • Don't be in a hurry and bring up the heat. Let the egg cook slowly over 2 to 3 minutes.
  • Slotted spoon is a must. It helps drain excess water. No one wants hot water over yummy cook curds.


Share this Recipe

Filed Under: Uncategorized Tagged With: butter, butterchillysauce, buttersauce, chillies, chives, easymeal, Eggs, mealin abowl, nigellalawson, oliveoil, poachedeggs, satisfying, softeggs, turksiheggs

Tawa Ka Tikla

July 20, 2017 By appu Leave a Comment

Tawa ka Tikla

This is a classic dish made by Marwaris. It’s healthy, wholesome and extremely satisfying. As a kid, I took it for school lunch almost three times a week. It’s made with whole wheat flour, so – healthy!! Ghee – good fats! Ajwain – great digestive. Whats not to like. And it’s yummylicious to boot!

The name Tawa ka Tikla is derived from the fact that it is made on a tawa (girdle) and there is no roasting on direct fire – like the normal roti’s and chapattis. The other Tikla we make is fried in ghee. Lethally tasty – that one too!

When we were growing up, we had no gas stoves at home. We were as organic as it could get. The food was cooked on a mud stove, and charcoal was used to light the fire. Of course, the kitchen got as black as well -soot, but Oh My! the food that we ate had an aroma which no smoke machine can impart. All fresh, earthy and hearty!

The stove was large and there was additional place around to keep the ready food. All the dal, rice and veggies were kept in that area. It would be hot and therefore kept the food also piping hot. No reheating, no microwave. The chapati was made directly on coal – no smell of gas and no artificial flavours. The cook would dust off the soot, liberally dribble homemade ghee and serve it to us. And nowadays, we crave “wood-fired” pizza!!

My grand mom’s man Friday would clean the stove after every meal with water, washing away all remnants of food, leaving the place clean and shiny. We needed no pest control. The hot stove would allow no cockroaches to roost. The burnt coal was converted to ash, and that was used to wash the vessels. We had to recycle before it became a fancy word.

Once every few months the man Friday, would lovingly renew the stove with fresh mud and fill up the cracks and crevices.

The simple grub was nourishing and rich and healthy. I still maintain that I hated the veggies because it was insipid at it’s best. But that was the fault of the cook and not the system. I have still not eaten that kind of dal and chapati ever again.

My sister still makes this dish – Tawa ka Tikla. I had forgotten all about it until one day I got a longing and craving to eat this ghee laden yummy snack. I could eat only one, but back in school it was a staple and I could polish off a whole lot with pickle, in the name of lunch.

It’s very simple to make. It can be cooled and kept in an airtight container for a week plus.

SOME NOTES:

Enough ghee should be put into the dry ingredients so that the flour when closed into a fist stays intact and does not fall down and disintegrate like powder.

Warm water should be used to make the dough. Add it slowly, making the consistency a bit rubbery. Each flour quality reacts its own way, so a little more or less water might have to use, than specified in the recipe.

Please don’t try to go easy on the ghee. It’s a very indispensable ingredient and if you are following the latest health trends, – then – ghee is a vital and important fat and should be consumed in restrained quantities.

The holes are made, so that the Tikla does not puff up, and gets firm and semi-crisp, as you keep pressing and cooking it.

While rolling the dough, if it’s too sticky and is cracking and breaking up, it means that the dough needs more flour and a dribble of water. Add little at a time according to consistency.

Here is the video

http://therecipelarder.com/wp-content/uploads/2017/07/tawa-tikla-converted-with-Clipchamp.mp4


It’s an excellent and nutritive dish for kids tiffins, to keep as a quick snack. Top it with hummus, a mix of cucumber tomato kachumber, serve it with hot garlic chutney, with dry potato veggie – Just go for it. Dig in!!

I hope you make it and enjoy it. Cheers!

Tawa Ka Tikla
Print Recipe
Made with whole wheat flour, this traditional Marwari dish can take the place of a quick lunch, or a satisfying snack.
  • CourseBreakfast, Brunch, Snack
  • CuisineIndian
Servings Prep Time
12 - 15` pieces 10 minutes
Cook Time
15- 20 minutes
Servings Prep Time
12 - 15` pieces 10 minutes
Cook Time
15- 20 minutes
Ingredients
  • 2 Cups Whole Wheat flour (atta)
  • 1 Tspn salt
  • 1 1/2 Tbspn Ajwain (caraway seeds)
  • 1/3 Cup Ghee (for making the dough)
  • 1/3 Cup Ghee appx - for cooking the tikla
  • 1/2 Cup Plus Filtered water
Servings: pieces
Instructions
  1. Mix all the dry ingredients and give it a good whisk
  2. Heat the ghee mildly. You should be able to dip your finger into it.
  3. Add the ghee, and mix it well
  4. When the dough is held in your fist, it should not disintegrate and should hold for a few seconds.
  5. Once its mixed well, slowly add the water.
  6. Do not add it all at once
  7. Keep adding the water and keep kneading.
  8. The dough should be such that it's easily rollable, and not break when its being rolled.
  9. So if it breaks while rolling add a tspn or so of whole wheat flour and a dribble of water.
  10. This happens because the flour is not consistent in quality. Your flour could be different from mine. It could soak more water or less.
  11. Once the dough is ready, knead it on the counter.
  12. Make small balls and keep aside
  13. Roll each ball, on the counter into a small roti.
  14. Do not make it very thin. The video gives you an estimation.
  15. Once all the rotis are rolled, set the girdle on medium heat.
  16. Keep the ghee ready.
  17. Keep a ladle ready, which can help you press and flip the tikla.
  18. Once the girdle is warm, put the roti on it. You can put as many rotis as you like, as long as there is place for them to be flipped and not bang into each other and break.
  19. Once the girdle down side is semi cooked (see video), flip it.
  20. Add ghee to the top and to the sides (see video)
  21. Poke holes with the same spoon. Do so gently. It just needs some air perforation and does not need to go all the way through totally.
  22. Keep pressing and flipping.
  23. Do so till both sides are caramel brown.
  24. At this point it will be soft. It will harden a little more when it cools down.
  25. Blot on a kitchen towel.
  26. Keep cleaning your girdle intermittently, before cooking another lot, otherwise the left over oil will smoke and char your tikla.
  27. Serve hot, with mirchi (green chilly) ka or nimbu (lemon) ka achaar (pickle)
Share this Recipe

Filed Under: Breakfast, Lunch, Snacks Tagged With: ashes, charcoal, easy food, ghee, Lunch, make and keep, marwari cuisine, mud stove, old culture, old fashioned, organic, rajasthan, recycle, satisfying, snacks, Staple, tawa ka tikla

Meet the Author

For the 21 years and some months that I have been alive, there has been this crazy, eccentric, always-charged-up woman with a full-time job of being a mother to 6 (2 children, 4 dogs).

In her spare time she blasts music on her DJ console, reads like a maniac, downloads shows (because God forbid she runs out of something to watch), runs an entire household, and to top it all off, manages a very successful catering business which makes the most delicious food in the entire world. Once you have her food, everything else will taste like stale socks.

This is what you call "Maa ke haath ka khana".

- Kanak

Subscribe to Blog via Email

RECIPE BY CATEGORY

Copyright © 2021 THE RECIPE LARDER