THE RECIPE LARDER

  • Home
  • Nuts and Bolts, Sauces and Pans
  • Recipes
  • Contact

Soong Dal

March 4, 2019 By appu 1 Comment

It’s that time of the year when Mahabaleshwar beckons, with its myriad sunsets, fresh fragrant strawberries and over powering array of flowers. We had ourselves farm fresh and organic vegetables just off the farm.


Since we do not use fertilisers or pesticides of any kind, we pluck off cherry tomatoes and radish straight from the Canadian pharmacy plants and merrily munch it on the go!

fresh off the farm.

For a day and a half, we were just mom and son! We ate, drank and had some crazy conversations.

We both wanted something a bit healthy for our brain doping lunch, and anyways friends who love this dish have been asking for the recipe. So we decided to make it and blog it.

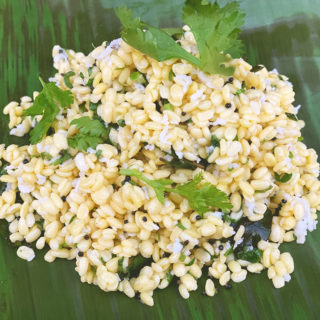
This is a super healthy snack.  I sometimes have it as the lonesome dish for dinner too. It’s super filling, high in protein and very very healthy. It does not sit in your tummy, but leaves you feeling full and satiated. The tangy, spicy flavour makes it soooo very edible and tasty.

I optionally also add finely chopped raw mango (kairi) to it and reduce the lemon a wee bit. You can play around with it as you like. Reduce the spice, increase it (yaay!), add onions, take off the coconut, add a dash of green chutney!!! Just go for it. Not much can destroy this dish!

Add to it a dhokla mix, or to some other chaat item. Serve it mixed with broken idli and podi chutney. Let your creativity flow and do tell me also how you played with it!

Soong dal goes amazingly well with drinks. But serve it chilled. Like – absolutely and totally chilled. If you think of heating it – u might as well eat dal. So DO NOT HEAT this dish!!

Have fun! Cheers!


PS: Here is the video shoot we did for the Soong Dal. It’s very basic and rustic, as is the kitchen in our farm.

http://therecipelarder.com/wp-content/uploads/2019/02/soong-dal-converted-with-Clipchamp.mp4

Soong Dal
Print Recipe
A healthy and tasty snack. Super with drinks.
  • CourseAppetizer, Salad, Side Dish
  • CuisineIndian
Servings Prep Time
4 pax 5 minutes
Cook Time Passive Time
5 minutes 4 hours
Servings Prep Time
4 pax 5 minutes
Cook Time Passive Time
5 minutes 4 hours
Soong Dal
Print Recipe
A healthy and tasty snack. Super with drinks.
  • CourseAppetizer, Salad, Side Dish
  • CuisineIndian
Servings Prep Time
4 pax 5 minutes
Cook Time Passive Time
5 minutes 4 hours
Servings Prep Time
4 pax 5 minutes
Cook Time Passive Time
5 minutes 4 hours
Ingredients
  • 1 Cup Yellow Moong Dal
  • 1 Tspn oil
  • 1/2 Tspn Mustard Seeds
  • 1/4 Tspn Hing
  • 10-15 Curry Leaves
  • 1 Tspn salt
  • 1/4 Cup Coconut grated
  • 2 Tbspn Corriander Leaves finely chopped
  • 1 Tspn Green Chillies (or less/ more - according to taste)
  • 1 Tbspn lemon juice
  • 1 Tbspn Raw Mango (optional) finely chopped (reduce lemon juice)
Servings: pax
Instructions
  1. Wash and soak the yellow moong dal for 4 hours.
  2. Drain the water, rinse the dal and keep on a draining sieve for appx 20 minutes, so that no water is left.
  3. Once the water has drained, get the tadka ready. Keep the moong dal in a mixing bowl.
  4. In a tadka pan, add the oil.
  5. When hot, add the mustard seeds.
  6. When spluttering, add the hing and finally the curry leaves.
  7. All the curry leaves should splatter, so mix it with a spoon once, while still on the fire.
  8. Take off the fire and put it on the moong dal.
  9. Now add the salt, chopped corriander, coconut and green chillies (and optionally the raw mango)
  10. Lastly squeeze in the lemon juice.
  11. Mix well.
  12. Serve completely chilled.
Share this Recipe

Filed Under: Healthy, Sides Tagged With: appetizer, fresh, healthy, indian, lentils, Moondal, protein, protein power, quick, salad, Serve Chilled, snacks, south indian, spicy, tangy, yellow dal, yum

Tawa Ka Tikla

July 20, 2017 By appu Leave a Comment

Tawa ka Tikla

This is a classic dish made by Marwaris. It’s healthy, wholesome and extremely satisfying. As a kid, I took it for school lunch almost three times a week. It’s made with whole wheat flour, so – healthy!! Ghee – good fats! Ajwain – great digestive. Whats not to like. And it’s yummylicious to boot!

The name Tawa ka Tikla is derived from the fact that it is made on a tawa (girdle) and there is no roasting on direct fire – like the normal roti’s and chapattis. The other Tikla we make is fried in ghee. Lethally tasty – that one too!

When we were growing up, we had no gas stoves at home. We were as organic as it could get. The food was cooked on a mud stove, and charcoal was used to light the fire. Of course, the kitchen got as black as well -soot, but Oh My! the food that we ate had an aroma which no smoke machine can impart. All fresh, earthy and hearty!

The stove was large and there was additional place around to keep the ready food. All the dal, rice and veggies were kept in that area. It would be hot and therefore kept the food also piping hot. No reheating, no microwave. The chapati was made directly on coal – no smell of gas and no artificial flavours. The cook would dust off the soot, liberally dribble homemade ghee and serve it to us. And nowadays, we crave “wood-fired” pizza!!

My grand mom’s man Friday would clean the stove after every meal with water, washing away all remnants of food, leaving the place clean and shiny. We needed no pest control. The hot stove would allow no cockroaches to roost. The burnt coal was converted to ash, and that was used to wash the vessels. We had to recycle before it became a fancy word.

Once every few months the man Friday, would lovingly renew the stove with fresh mud and fill up the cracks and crevices.

The simple grub was nourishing and rich and healthy. I still maintain that I hated the veggies because it was insipid at it’s best. But that was the fault of the cook and not the system. I have still not eaten that kind of dal and chapati ever again.

My sister still makes this dish – Tawa ka Tikla. I had forgotten all about it until one day I got a longing and craving to eat this ghee laden yummy snack. I could eat only one, but back in school it was a staple and I could polish off a whole lot with pickle, in the name of lunch.

It’s very simple to make. It can be cooled and kept in an airtight container for a week plus.

SOME NOTES:

Enough ghee should be put into the dry ingredients so that the flour when closed into a fist stays intact and does not fall down and disintegrate like powder.

Warm water should be used to make the dough. Add it slowly, making the consistency a bit rubbery. Each flour quality reacts its own way, so a little more or less water might have to use, than specified in the recipe.

Please don’t try to go easy on the ghee. It’s a very indispensable ingredient and if you are following the latest health trends, – then – ghee is a vital and important fat and should be consumed in restrained quantities.

The holes are made, so that the Tikla does not puff up, and gets firm and semi-crisp, as you keep pressing and cooking it.

While rolling the dough, if it’s too sticky and is cracking and breaking up, it means that the dough needs more flour and a dribble of water. Add little at a time according to consistency.

Here is the video

http://therecipelarder.com/wp-content/uploads/2017/07/tawa-tikla-converted-with-Clipchamp.mp4


It’s an excellent and nutritive dish for kids tiffins, to keep as a quick snack. Top it with hummus, a mix of cucumber tomato kachumber, serve it with hot garlic chutney, with dry potato veggie – Just go for it. Dig in!!

I hope you make it and enjoy it. Cheers!

Tawa Ka Tikla
Print Recipe
Made with whole wheat flour, this traditional Marwari dish can take the place of a quick lunch, or a satisfying snack.
  • CourseBreakfast, Brunch, Snack
  • CuisineIndian
Servings Prep Time
12 - 15` pieces 10 minutes
Cook Time
15- 20 minutes
Servings Prep Time
12 - 15` pieces 10 minutes
Cook Time
15- 20 minutes
Ingredients
  • 2 Cups Whole Wheat flour (atta)
  • 1 Tspn salt
  • 1 1/2 Tbspn Ajwain (caraway seeds)
  • 1/3 Cup Ghee (for making the dough)
  • 1/3 Cup Ghee appx - for cooking the tikla
  • 1/2 Cup Plus Filtered water
Servings: pieces
Instructions
  1. Mix all the dry ingredients and give it a good whisk
  2. Heat the ghee mildly. You should be able to dip your finger into it.
  3. Add the ghee, and mix it well
  4. When the dough is held in your fist, it should not disintegrate and should hold for a few seconds.
  5. Once its mixed well, slowly add the water.
  6. Do not add it all at once
  7. Keep adding the water and keep kneading.
  8. The dough should be such that it's easily rollable, and not break when its being rolled.
  9. So if it breaks while rolling add a tspn or so of whole wheat flour and a dribble of water.
  10. This happens because the flour is not consistent in quality. Your flour could be different from mine. It could soak more water or less.
  11. Once the dough is ready, knead it on the counter.
  12. Make small balls and keep aside
  13. Roll each ball, on the counter into a small roti.
  14. Do not make it very thin. The video gives you an estimation.
  15. Once all the rotis are rolled, set the girdle on medium heat.
  16. Keep the ghee ready.
  17. Keep a ladle ready, which can help you press and flip the tikla.
  18. Once the girdle is warm, put the roti on it. You can put as many rotis as you like, as long as there is place for them to be flipped and not bang into each other and break.
  19. Once the girdle down side is semi cooked (see video), flip it.
  20. Add ghee to the top and to the sides (see video)
  21. Poke holes with the same spoon. Do so gently. It just needs some air perforation and does not need to go all the way through totally.
  22. Keep pressing and flipping.
  23. Do so till both sides are caramel brown.
  24. At this point it will be soft. It will harden a little more when it cools down.
  25. Blot on a kitchen towel.
  26. Keep cleaning your girdle intermittently, before cooking another lot, otherwise the left over oil will smoke and char your tikla.
  27. Serve hot, with mirchi (green chilly) ka or nimbu (lemon) ka achaar (pickle)
Share this Recipe

Filed Under: Breakfast, Lunch, Snacks Tagged With: ashes, charcoal, easy food, ghee, Lunch, make and keep, marwari cuisine, mud stove, old culture, old fashioned, organic, rajasthan, recycle, satisfying, snacks, Staple, tawa ka tikla

Beer Battered Onion Rings

October 27, 2016 By appu 2 Comments

First and foremost let me be fiercely profuse in my apologies for just disappearing. I spent 3 weeks running around Europe having a mad time. First two weeks with my girlfriends in Ireland, and then with the husband and another couple in Germany. It was a sabbatical of enormous proportions.

The super special girls' trip.

The super special girls’ trip.

Our farm in Mahabaleshwar is well on its way to being planted. The rains were particularly vicious this year. We lost many trees and shrubs. But well, that’s the ebb and flow of life, and we are looking forward to some organic, homegrown fruits and vegetables.

I had my best friend over in Mahabaleshwar, and we kindled up the wood-fired oven and made ourselves some pizza. I make the dough using fresh yeast. When it is nice and plumply risen, I roll out small rounds and give it an initial dance into the fire. Once it’s mildly pre-cooked, I add the pizza sauce, cheese and toppings and send it for another jig. As a result, I get thin – and I mean ultra thin pizzas, with a crunchy crisp bite.

Nishi and me.

Nishi and me.

This time around, the wood was still wet from the rains. The fire would not catch, the hearth would not heat and the pizzas would just not pre-cook. After a few exasperated tries (the dough was rising, and would have spoilt) I picked up the rolled out pizza dough and flipped it straight into the flames.

I heard a collective gasp from my helpers. One started dancing on his feet, saying “ It will burn, it will burn”. I just grinned and took a tong and flipped it over to let it cook the other side. All this took just a few seconds. And out came the most fantastic precooked pizza. It had blown up like a pita bread, but the results were sooooo good. Crunchy, with oozing melting cheese which stuck to our palates and teeth.

beer battered onion rings

beer battered onion rings

What I am trying to say here is cooking is an art – agreed, but it is also instinct. When I give cooking classes, I always tell my students, don’t think too much. If you want to substitute an ingredient with another do it. If you want to increase the heat do it. There is no right or wrong in cooking. Some person somewhere must have had jam with goat’s cheese and then started the trend of serving preserves with cheese. To my taste buds – nothing tastes better!

beer battered onion rings with a sprinkling of chaat masala

beer battered onion rings with a sprinkling of chaat masala

Enjoy the beer battered onion rings. These are my favourite fried snack, and my kids love them.

Darned easy to make. Just a little planning, as the onions have to marinate at least for two hours before they can be fried.

I make a quick fix, cheat sauce with these onion rings. They taste way better than, some store-bought sauce (though mine is a mix of store bought sauces :P) The fried ring, with the tart hot sauce gives it an amazing balance. Of course, you can substitute it with any other sauce of your choice. But do give my recipe a fair chance too.

beer battered onion rings and a chilled beer

beer battered onion rings and a chilled beer

Baking powder is a crucial ingredient in this recipe, so don’t try to substitute or do away with it. It is what gives the onion rings the crisp and crunchy texture when mixed with a beer in the batter.

My friend and me feasted on them, in Mahabaleshwar. Hope you like them too – PS: they go really well with chilled beer!!!


Beer Battered Onion Rings
Print Recipe
My favourite snack, darned easy to make. It will be an instant hit amongst your friends.
  • CourseAppetizer
  • CuisineAmerican, Fusion
Servings Prep Time
4 people 15 minutes
Cook Time Passive Time
15 minutes 2 hours
Servings Prep Time
4 people 15 minutes
Cook Time Passive Time
15 minutes 2 hours
Ingredients
For the onion rings
  • 2 large onions peeled and diced into 1 cm thick rings
  • 2 cups beer - larger appx 1 pint
  • 2 teaspoons vinegar
  • 1 tspn salt
  • 1 tspn Black Pepper crushed
For the batter
  • 3/4 cup corn starch or corn flour
  • 3/4 cup all purpose flour (maida)
  • 1 plus cup beer appx 1/2 pint
  • 1 tspn Baking Powder
  • 1 tspn salt
  • 1 tspn Red chilly flakes crushed
other stuff
  • Milk for frying
  • 2 tbspn Chaat masala
  • deep pan for frying
  • tongs for frying
  • kitchen towel for drying the onion rings before frying
Quick Cheat Sauce
  • 2 tbspn Ketchup
  • 1 tbspn hot sauce Use any. Even Tobassco is good.
  • 1/2 tspn soya sauce
  • 1 tspn garlic finely minced
  • 1 tspn Black Pepper
Servings: people
Instructions
To make the marinade
  1. Mix all the ingredients of the marinade in a vessel.
  2. Pull out all the rings of onions from the diced rounds. Each onion should be separated. The ring should be whole, without any cuts.
  3. Submerge the rings into the beer marinade and refrigerate for minimum 2 hours, and a maximum of 4 hours.
To make the batter
  1. Add all ingredients of the batter in a bowl
  2. The batter should be thick and should fall with a plop when dropped from a spoon.
  3. Give the batter a good mix with a whisk. It should have no lumps.
  4. Make this batter just before you need to fry the onion rings.
For frying the rings
  1. Pour oil into the non stick and heat well on slow to medium flame. It should not start smoking. If it does, let it cool down before popping in the onion rings.
  2. Wipe each ring, using a kitchen towel or a good quality paper napkin. Each ring should be completely dry.
  3. Dip one ring at a time, into the batter. Give it a quick flick to take off extra batter.
  4. Drop the ring into the hot oil.
  5. Work quickly and put in as many onions as you can, till the pan fills up.
  6. After appx 30 seconds (or when the batter looks well fried) turn the rings, using the tong, so that the other side can fry.
  7. Pick out the fried rings with the tong and place on a paper napkin to drain off excess oil. You can press it down slightly (not too hard) with another towel to drain off more oil.
  8. Sprinkle some chaat masala and serve hot, with the cheat sauce.
For the sauce
  1. Add all ingredients together and mix well.
Share this Recipe

Filed Under: Cocktail Parties, Sauces, Sides, Snacks Tagged With: beer, beer battered, beer battered onion rings, cheat sauce, onion rings, quick sauce., sauce, snacks, yummy

Meet the Author

For the 21 years and some months that I have been alive, there has been this crazy, eccentric, always-charged-up woman with a full-time job of being a mother to 6 (2 children, 4 dogs).

In her spare time she blasts music on her DJ console, reads like a maniac, downloads shows (because God forbid she runs out of something to watch), runs an entire household, and to top it all off, manages a very successful catering business which makes the most delicious food in the entire world. Once you have her food, everything else will taste like stale socks.

This is what you call "Maa ke haath ka khana".

- Kanak

Subscribe to Blog via Email

RECIPE BY CATEGORY

Copyright © 2022 THE RECIPE LARDER