THE RECIPE LARDER

  • Home
  • Nuts and Bolts, Sauces and Pans
  • Recipes
  • Contact

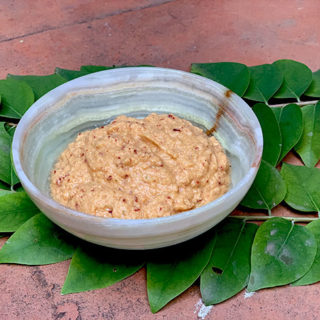
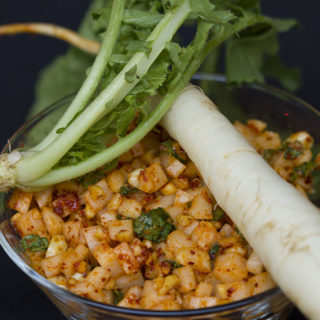
Amla Chutney

July 9, 2019 By appu 2 Comments

Amla Chutney
Print Recipe
A quick, easy and healthy chutney, to serve with - everything!!
  • CourseAppetizer, Breakfast, Side Dish
  • CuisineIndian
Servings Prep Time
100 gms 10 minutes
Passive Time
5 minutes
Servings Prep Time
100 gms 10 minutes
Passive Time
5 minutes
Amla Chutney
Print Recipe
A quick, easy and healthy chutney, to serve with - everything!!
  • CourseAppetizer, Breakfast, Side Dish
  • CuisineIndian
Servings Prep Time
100 gms 10 minutes
Passive Time
5 minutes
Servings Prep Time
100 gms 10 minutes
Passive Time
5 minutes
Ingredients
  • 100 gms amla
  • 1 Green Chilly
  • 1 inch Ginger chopped
  • 2 cloves garlic
  • 1 kashmiri red chilly
  • 1 tbspn Sesame Seeds
  • 1 tbspn Water
  • 1 tspn salt
Servings: gms
Instructions
  1. Add all ingredients to a grinder and grind to a paste
  2. Serve with lunch, dinner, pakodas, snacks, etc.
  3. Refrigerate for up to 4/ 5 days in a closed container
Recipe Notes

Bangalore is always a green and refreshing break for me. This time I was there only for a day, but I took the time to wander around in the garden. My friend Nishi and me saw our Amla tree flourishing with green gorgeous star shaped fruits.

The ones we have growing in our garden are not the traditional variety of Amla. We have a variety called Harpharouri in Hindi, or Malay gooseberry or Tahitian gooseberry. But as tasty and as edible.


You can of course and must use the Amla found in market. No point going on a hunt for this particular kind!

We had met after a long time, so we spent the entire day with each other. It was time for some drinks and snacks, and I must say that the Amla Chutney went well with everything - masala papad, pakodas, rice crisps, chips. We had some of it for dinner too, with our chapatti and veggies.

It's really simple to make. Takes only a few minutes. The only time consuming part would be the de seeding of the Amla. It's healthy. The Amla gives you a shot of Vitamin C (who does'nt need an extra shot of that huh?), the sesame seed has calcium and the chillies build immunity not to mention add a super zest to the whole thing.

Do send me comments. What did you eat it with? How did it taste? 

Cheers and Ciao till we meet again.

Share this Recipe

Filed Under: Chutneys Tagged With: amla, indiangooseberry, Vegan

Tawa Ka Tikla

July 20, 2017 By appu Leave a Comment

Tawa ka Tikla

This is a classic dish made by Marwaris. It’s healthy, wholesome and extremely satisfying. As a kid, I took it for school lunch almost three times a week. It’s made with whole wheat flour, so – healthy!! Ghee – good fats! Ajwain – great digestive. Whats not to like. And it’s yummylicious to boot!

The name Tawa ka Tikla is derived from the fact that it is made on a tawa (girdle) and there is no roasting on direct fire – like the normal roti’s and chapattis. The other Tikla we make is fried in ghee. Lethally tasty – that one too!

When we were growing up, we had no gas stoves at home. We were as organic as it could get. The food was cooked on a mud stove, and charcoal was used to light the fire. Of course, the kitchen got as black as well -soot, but Oh My! the food that we ate had an aroma which no smoke machine can impart. All fresh, earthy and hearty!

The stove was large and there was additional place around to keep the ready food. All the dal, rice and veggies were kept in that area. It would be hot and therefore kept the food also piping hot. No reheating, no microwave. The chapati was made directly on coal – no smell of gas and no artificial flavours. The cook would dust off the soot, liberally dribble homemade ghee and serve it to us. And nowadays, we crave “wood-fired” pizza!!

My grand mom’s man Friday would clean the stove after every meal with water, washing away all remnants of food, leaving the place clean and shiny. We needed no pest control. The hot stove would allow no cockroaches to roost. The burnt coal was converted to ash, and that was used to wash the vessels. We had to recycle before it became a fancy word.

Once every few months the man Friday, would lovingly renew the stove with fresh mud and fill up the cracks and crevices.

The simple grub was nourishing and rich and healthy. I still maintain that I hated the veggies because it was insipid at it’s best. But that was the fault of the cook and not the system. I have still not eaten that kind of dal and chapati ever again.

My sister still makes this dish – Tawa ka Tikla. I had forgotten all about it until one day I got a longing and craving to eat this ghee laden yummy snack. I could eat only one, but back in school it was a staple and I could polish off a whole lot with pickle, in the name of lunch.

It’s very simple to make. It can be cooled and kept in an airtight container for a week plus.

SOME NOTES:

Enough ghee should be put into the dry ingredients so that the flour when closed into a fist stays intact and does not fall down and disintegrate like powder.

Warm water should be used to make the dough. Add it slowly, making the consistency a bit rubbery. Each flour quality reacts its own way, so a little more or less water might have to use, than specified in the recipe.

Please don’t try to go easy on the ghee. It’s a very indispensable ingredient and if you are following the latest health trends, – then – ghee is a vital and important fat and should be consumed in restrained quantities.

The holes are made, so that the Tikla does not puff up, and gets firm and semi-crisp, as you keep pressing and cooking it.

While rolling the dough, if it’s too sticky and is cracking and breaking up, it means that the dough needs more flour and a dribble of water. Add little at a time according to consistency.

Here is the video

http://therecipelarder.com/wp-content/uploads/2017/07/tawa-tikla-converted-with-Clipchamp.mp4


It’s an excellent and nutritive dish for kids tiffins, to keep as a quick snack. Top it with hummus, a mix of cucumber tomato kachumber, serve it with hot garlic chutney, with dry potato veggie – Just go for it. Dig in!!

I hope you make it and enjoy it. Cheers!

Tawa Ka Tikla
Print Recipe
Made with whole wheat flour, this traditional Marwari dish can take the place of a quick lunch, or a satisfying snack.
  • CourseBreakfast, Brunch, Snack
  • CuisineIndian
Servings Prep Time
12 - 15` pieces 10 minutes
Cook Time
15- 20 minutes
Servings Prep Time
12 - 15` pieces 10 minutes
Cook Time
15- 20 minutes
Ingredients
  • 2 Cups Whole Wheat flour (atta)
  • 1 Tspn salt
  • 1 1/2 Tbspn Ajwain (caraway seeds)
  • 1/3 Cup Ghee (for making the dough)
  • 1/3 Cup Ghee appx - for cooking the tikla
  • 1/2 Cup Plus Filtered water
Servings: pieces
Instructions
  1. Mix all the dry ingredients and give it a good whisk
  2. Heat the ghee mildly. You should be able to dip your finger into it.
  3. Add the ghee, and mix it well
  4. When the dough is held in your fist, it should not disintegrate and should hold for a few seconds.
  5. Once its mixed well, slowly add the water.
  6. Do not add it all at once
  7. Keep adding the water and keep kneading.
  8. The dough should be such that it's easily rollable, and not break when its being rolled.
  9. So if it breaks while rolling add a tspn or so of whole wheat flour and a dribble of water.
  10. This happens because the flour is not consistent in quality. Your flour could be different from mine. It could soak more water or less.
  11. Once the dough is ready, knead it on the counter.
  12. Make small balls and keep aside
  13. Roll each ball, on the counter into a small roti.
  14. Do not make it very thin. The video gives you an estimation.
  15. Once all the rotis are rolled, set the girdle on medium heat.
  16. Keep the ghee ready.
  17. Keep a ladle ready, which can help you press and flip the tikla.
  18. Once the girdle is warm, put the roti on it. You can put as many rotis as you like, as long as there is place for them to be flipped and not bang into each other and break.
  19. Once the girdle down side is semi cooked (see video), flip it.
  20. Add ghee to the top and to the sides (see video)
  21. Poke holes with the same spoon. Do so gently. It just needs some air perforation and does not need to go all the way through totally.
  22. Keep pressing and flipping.
  23. Do so till both sides are caramel brown.
  24. At this point it will be soft. It will harden a little more when it cools down.
  25. Blot on a kitchen towel.
  26. Keep cleaning your girdle intermittently, before cooking another lot, otherwise the left over oil will smoke and char your tikla.
  27. Serve hot, with mirchi (green chilly) ka or nimbu (lemon) ka achaar (pickle)
Share this Recipe

Filed Under: Breakfast, Lunch, Snacks Tagged With: ashes, charcoal, easy food, ghee, Lunch, make and keep, marwari cuisine, mud stove, old culture, old fashioned, organic, rajasthan, recycle, satisfying, snacks, Staple, tawa ka tikla

Waffles

June 18, 2016 By appu Leave a Comment

I got this recipe from the internet, but its been so long that I cannot remember from where. At that time I did not think of noting it down. So – hey! Whoever it is, this is a wonderful recipe for waffles – thank you very much.

Waffles

Waffles

I love waffles, but am very picky about the texture. I hate them soft spongy ones. The minute the butter and maple syrup hit the waffle, it starts getting soggy! Lifting wilting bits of limp waffles on a fork is not really my thing. And so I hunted high and low for a recipe which would give me crisp biscuity waffles. After a massive hunt, I found it. This recipe of waffles hits the mark right at bullseye!

waffles slices with butter

Every summer when the kids come home, we get together with them and their friends and have a waffle brunch. Of course, Bloody Marys and Mimosas are very much on the menu too. We toast to their latest achievements and escapades, dig into butter and maple syrup laden waffles and exchange news between mouthfuls. Whatever batter is left over, is made into waffles and stored in an airtight container. Just pop into a warm oven and it is as good as new.

I love gobs of butter on my waffles, obviously along with the maple syrup. Something happens to my taste buds when the butter and syrup mix with the biscuity waffles. You can avoid it if you want, but I really suggest that you try at least one small bite with butter.

Waffles dripping with maple syrup

Waffles dripping with maple syrup

I love my waffle maker to bits. It’s a Krups machine, and I have been using it for a while. I have another of the Teflon make, but the consistency of Krups, the even browning is something else. I am not getting paid by Krups for saying this – I genuinely love that machine.

I put two dollops of the batter into the centre of the machine, turn the heat to 3 and then turn it all the way up to 6. Krups takes approximately 5 minutes to turn out a yummy, evenly browned, biscuity waffle. The time will depend on a machine to machine, so please make the first one and check the timings. Also, you will need to see how much batter to put in for a nice even waffle. I use approximately 1 Cup each time.

A lot of butter oozes out while the waffle is getting made, so please keep a wad of tissues or towels below the machine, so as to not soil the surface you have your machine on.

You, of course, need to clean the machine thoroughly after it is cooled down. I wipe off with some tissue paper immediately, soaking up a good amount of butter. Once it cools, its wiped down repeatedly with kitchen roll towels, till it starts coming away clean. I then leave a wad of tissue inside before closing it and keeping it away. Precious machine – what to do!!

Waffles
Print Recipe
Quick simple, biscuity waffles!
  • CourseBreakfast, Brunch
Servings
2 people
Servings
2 people
Waffles
Print Recipe
Quick simple, biscuity waffles!
  • CourseBreakfast, Brunch
Servings
2 people
Servings
2 people
Ingredients
  • 1 Cup Refined Flour
  • 2 Tbspn Castor Sugar
  • 2 Eggs seperated
  • 1/2 Cup Melted Butter
  • 1/3 Cup Milk
  • 1/8th tspn Baking Powder Basically a pinch
  • 1 Tspn Vanilla Essence
Accessories
  • Waffle making machine
  • wooden spoon
Servings: people
Instructions
  1. In a bowl, mix the flour, sugar and baking powder.
  2. Add the egg yolks, milk, melted butter and vanilla essence. Mix to combine.
  3. Whip egg whites to soft peaks, and add to the above mix.
  4. Refrigerate till consumed.
To make the waffles
  1. Ladle a large dollop in the middle of the machine.
  2. Set the temperature to medium (I set it to 3 in Krups) and then after 3 minutes to high (6 in Krups)
  3. It will brown to a nice crisp texture in total 7 minute tops.
  4. Remove with a wooden spatula, serve hot with butter and maple syrup
  5. PS :- When the waffles are cooking, a lot of butter will ooze out. Please place your machine of a towel or kitchen napkins to absorb the same and not spoil your surface.
Share this Recipe

Filed Under: Uncategorized

Scrambled Eggs with Truffle Oil

June 10, 2016 By appu 4 Comments

Scrambled eggs with truffle oil

Scrambled eggs with truffle oil

We ate at the most amazing restaurant in Hong Kong a few months back. Chef Patrick of La Table De Patrick. It was a small restaurant, with immediate and intimate service. We had called earlier to let them know we are vegetarians. He rotated our entire 5-course meal around it, using wonderful freshly available ingredients.

One dish which Chef served had a sprinkling of truffles on it. With gleeful hands, we tore at the food, but it came up short on the truffle flavour. It was crunchier and had very mild to non-existent truffle taste.

Chef explained that it was summer truffles, and has very little flavour. We uneducated, but truffle fans, learnt a lot that evening.

The most flavourful truffles are the winter ones. The white winter truffles are available from October to Christmas. These have a strong flavour and can deter new truffle tasters.

The black winter truffles are what most people serve and is more easily available. Its the most preferred variety of the lot. Available from Mid Jan to Easter. (What will happen to us truffle lovers from Christmas to Mid Jan? Hoarde! Hoarde! )

The summer Truffle is available from April to July and has a very light flavour. Almost non-existent. None of us much appreciated it.

Autumn burgundy truffles are more medium bodied and great for someone who likes truffles but cannot have too much of it because of the strong flavour and aroma.

scrabled eggs


scrambled egg with truffle oil

scrambled egg with truffle oil

In my family of four – three of us adore it, while the fourth needs to taste the autumn burgundy one to start developing a taste. (I have no clue where to get it from!!)

scrambled on toast

It was an educative and tasty evening and inspired me to make this scrambled egg.

If you have seen the movie or read the book – A hundred foot journey- the, to be a great chef, Hassan meets Mallory the owner of the restaurant. This is a synopsis from the book -Hassan, having heard from Marguerite that Mallory hires potential chefs by taste-testing an omelette and deciding whether the person is indeed a great chef, asks if he may cook an omelette for her to his recipe. Due to his injured hands, Mallory helps under Hassan’s supervision. After tasting the omelette, Mallory recognizes Hassan’s potential and invites him to work for her.

The omelette they made looked so amazing!! I used a part of the recipe for this blog.

Take a look!


scrambled egg and oil bottle

Scrambled Eggs with Truffle Oil
Print Recipe
Simple scrambled eggs, finished with a copious dash of black truffle oil.
  • CourseBreakfast, Brunch
  • CuisineFusion
Servings Prep Time
1 person 10 minutes
Cook Time
5 minutes
Servings Prep Time
1 person 10 minutes
Cook Time
5 minutes
Scrambled Eggs with Truffle Oil
Print Recipe
Simple scrambled eggs, finished with a copious dash of black truffle oil.
  • CourseBreakfast, Brunch
  • CuisineFusion
Servings Prep Time
1 person 10 minutes
Cook Time
5 minutes
Servings Prep Time
1 person 10 minutes
Cook Time
5 minutes
Ingredients
The Eggs
  • 3 Eggs Whole
  • 1/4 Cup Milk
  • 1 Tspn Mint Finely chopped
  • 1/2 Tspn chilli flakes
  • salt
  • pepper
  • 2 Tbspn Black or White Truffle Oil
  • 1 Tbspn Butter For cooking.
  • Toast Optional
The Accessories
  • 1 Med Bowl For mixing eggs
  • 1 Whisk
  • 1 Skillet
  • 1 Wooden Spatula
Servings: person
Instructions
  1. Break the eggs in the bowl. Yolks and all.
  2. Add the milk, salt and pepper and whisk gently. We dont need air here, just the mixture semi blended.
  3. Add the mint and chilli flakes, and mix gently till incorporated well.
  4. Heat the skillet (medium high) and drizzle some butter. Coat the skillet with the butter and let it sizzle.
  5. Pour the mixture into the skillet and let it be for approximately 45 seconds. It should not set and start turning into and omelette.
  6. Now start agitating the eggs, with the wooden spatula. Keep moving in small but consistent circles all over the skillet.
  7. After about 45 seconds, the eggs will clump but still be runny and soft. At this point if you like your eggs a bit runny, take it off on a plate.
  8. If you like it a little more well done, continue cooking, moving the eggs in the same round pattern. Do not stop agitating the eggs.
  9. Take it off on a plate and immediately drizzle the truffle oil. Enjoy hot off the skillet!!
  10. Umm! Goes really well with Champagne or white wine 😛
Recipe Notes

Here is the link to more happy education on truffles.

Share this Recipe

Filed Under: Uncategorized Tagged With: Black Truffle, Eggs, Lunch, Scrambled, Truffle Oil, White Truffle, White Wine

Mango and Milk

May 16, 2016 By appu 4 Comments

I am off to the USA tonight – for 3 weeks. My daughter, backbone and sounding board, graduates in a few days. Life has come on a full turn for us very very proud parents. From a broken toothed sweet child, we see an independent, perfect-toothed young lady in her graduation gown, entering a brand new phase of life. I will put on a few pounds of pride weight on the 28th of May 2016!! Congratulations Kanak Somani. We love you!

Kanak loves this dish, and much as I would love to take some mangoes to USA, and make it for her, I have no intention to get delayed meeting my babies (the son meets us too!)  because of food and customs issues!!

mango milk - aka aam doodh

mango milk – aka aam doodh

————————————————————————————————————————————————-

Are you overdosed with Mango yet?? C’mon – it’s such a limited season. How can I refrain from posting these recipes? But this is the last one – I promise! And it’s the best one.

mango milk

mango milk

Mango milk – or Aam doodh as we call it in Hindi – was described to me by one of my favourite people – Manjari. Sister to my husband, and sister of my heart! I have always been a fan of milk. Of FULL FAT milk!! According to me, any other milk other than full fat should be fed to the calves. Watery skimmed milk is blemish to the world of dairy. I grew up drinking glasses and glasses of milk. I hated eating – it was a waste of time. Drinking milk, on the other hand, was quick and it was tasty. Till much, to my angst, I had to stop. I could no longer digest those copious quantities.

milk

milk

But once in a while, I still crave milk. And when that sweet Manjari mentioned this recipe I had to try it out. I make it once in a while during the mango season. And when I feed myself spoonfuls of mango soaked and rose water fragrant milk, I close my eyes and imagine my milk drinking days. I relish every single drop and spoon.

mango milk

mango milk

The tantalising flavour of mango, and milk with sugar and rose water can take you to a paradise like a garden, where the flowers are in full bloom, the wind balmy on your face and a small spring singing next to you. Bees are humming and butterflies that sit close to you, take off with a small flap of their wings after having their fill of nectar. The sun shines bright, through the shade of a mango tree. The fragrance of slowly ripening mangoes satiate your senses and send you to lethargic sleep. And when you wake up, you are pleased to no end!

Sigh!!!

Such is the charisma of this quick dish.

Whoever invented this recipe deserves a standing ovation and a lifetime supply of mangoes. And when mangoes are out of season, the supply will be of milk! This person should never be wanting off any of this two food, for the rest of her life!

Enjoy! Do let me know how you liked it.

PS: Mango milk uses Rose or Screwpine water. Please don’t mix water with essence. Water is an extract of the flower petals. It’s natural and organic. Essence is potent and most times has a chemical like aftertaste. So if you do use essence, use just a few drops. Vanilla essence will overpower the taste of mango, whereas these flower waters lend it an amazing balance.

More information on Screwpine Water here.


Mango and Milk
Print Recipe
Charming mango and milk dish.
  • CourseBreakfast, Brunch, Dessert, Side Dish, Snack
  • CuisineIndian
Servings Prep Time
1 person 10 minutes
Passive Time
4 hours
Servings Prep Time
1 person 10 minutes
Passive Time
4 hours
Mango and Milk
Print Recipe
Charming mango and milk dish.
  • CourseBreakfast, Brunch, Dessert, Side Dish, Snack
  • CuisineIndian
Servings Prep Time
1 person 10 minutes
Passive Time
4 hours
Servings Prep Time
1 person 10 minutes
Passive Time
4 hours
Ingredients
  • 250 ml Full fat milk
  • 2 Tspn sugar
  • 2 Tspn Rose / Screwpine water (Gulab or Kewra water)
  • 1 Mango
Servings: person
Instructions
  1. Add sugar to the milk and stir to dissolve it. Use a large container. The milk will chill faster, and you need to dip your hand into it for a later step.
  2. Chill.
  3. Peel and cut the mango into cubes. Keep aside.
  4. Take the seed of the mango, and dipping it into the milk with your hands, rub all the pulp into the milk.
  5. Stir and add the mango cube.
  6. Add the rose or screwpine water and stir again.
  7. Chill for 2 hours minimum. The flavour of the rose/screwpine water seaps in, as does that of the mango pulp and pieces.
  8. Serve chilled.
Share this Recipe

Filed Under: Beverages, Breakfast, Desserts Tagged With: chilled, cold, full fat milk, Mango, milk, yum

Meet the Author

For the 21 years and some months that I have been alive, there has been this crazy, eccentric, always-charged-up woman with a full-time job of being a mother to 6 (2 children, 4 dogs).

In her spare time she blasts music on her DJ console, reads like a maniac, downloads shows (because God forbid she runs out of something to watch), runs an entire household, and to top it all off, manages a very successful catering business which makes the most delicious food in the entire world. Once you have her food, everything else will taste like stale socks.

This is what you call "Maa ke haath ka khana".

- Kanak

Subscribe to Blog via Email

RECIPE BY CATEGORY

Copyright © 2023 THE RECIPE LARDER