THE RECIPE LARDER

  • Home
  • Nuts and Bolts, Sauces and Pans
  • Recipes
  • Contact

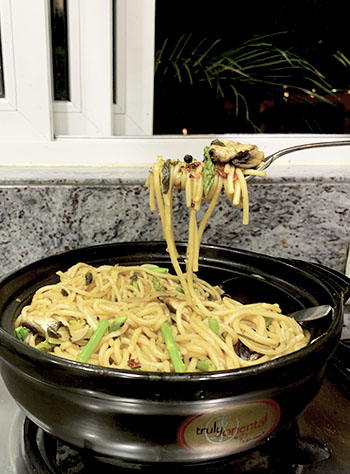
One Pot Pasta with Mukka Pyaz

March 31, 2020 By appu Leave a Comment

One Pot Pasta with Mukka Pyaz
Print Recipe
Easy and quick, and makes use of all your left over veggies.
  • CourseMain Dish
  • CuisineItalian
Servings Prep Time
3 pax 10 min
Cook Time
15 min
Servings Prep Time
3 pax 10 min
Cook Time
15 min
One Pot Pasta with Mukka Pyaz
Print Recipe
Easy and quick, and makes use of all your left over veggies.
  • CourseMain Dish
  • CuisineItalian
Servings Prep Time
3 pax 10 min
Cook Time
15 min
Servings Prep Time
3 pax 10 min
Cook Time
15 min
Ingredients
  • 2 Tbspn olive oil
  • 1 Tbspn Butter
  • 10 cloves garlic sliced thin
  • 1 med sized onion (do not peel)
  • 5 Black Pepper coarsely ground
  • 10 Cherry Tomatoes Cut into half
  • 1/3 packet Spaghetti (or any other pasta)
  • 2-3 Cups Water (you can use stock water if not using Veg Bouillon)
  • 1 Tbspn Veg Bouillon dilute in 2 tbspn water (can use stock water if you dont want to use Veg Bouillon)
  • 2 Tspn salt
  • 10-12 Leaves basil
  • 2 strands Rosemary
  • 1/2 Cup Brocolli cut into small florets
  • 1 Tspn Chilly Flakes
  • 1/3 Cup Asparagus Chopped into 3
  • 1/3 Cup Mushrooms Cut into 2 or 4 depending on the size.
Servings: pax
Instructions
  1. Without peeling the onion, cut off both the bases.
  2. With the broad side up, pound it hard a few times with your fist.(ie mukka pyaz)
  3. Tears will appear. Starting from the tear peel the onion and then start cutting and tearing the layers (see video) Keep aside
  4. In a thick bottom pan, add the olive oil and butter. When a little brown add the sliced garlic. Saute for a few minutes
  5. Add the black pepper then the onions
  6. Saute till onion is a translucent.
  7. Add the cherry tomato and saute for a few minutes.
  8. Add the herbs (basil and rosemary).
  9. Add the broccoli and then add the salt.
  10. Add the pasta and break it with the spoon and then douse it with water till the top of the pan. (see recipe notes - IMPORTANT)
  11. Dilute the bouillon in water and add to the pasta. (IMPORTANT - see recipe notes )
  12. Cook on medium heat till the pasta cooks and water soaks up completely.
  13. Keep stirring intermediately.
  14. If the water soaks up and the pasta hasn't cooked, add more water, but little at a time.
  15. If the pasta has cooked and some water is left, let it be. The pasta will soak it up.
  16. Add chilly flakes.
  17. When done and just before taking off the fire add the asparagus and mushrooms and mix into the pasta.
  18. Serve with garlic bread on the side.
Recipe Notes


Times have come when we are very very careful about wasting any food. This recipe hits the spot because it uses up all the left over veggies and wilting herbs in your fridge. It's an amazing recipe for students or those who need to cook quickly and minimally. Needless to say both my kids made this quite often when in college. But- for this recipe my son used a very Indian road side restaurant trick of Mucca Pyaz - ie fist broken onion.

Somehow when the onion is broken with the fist, the juices flow and dissipate in such a manner that the onion looses its fiery pungency and for some reason tastes way sweeter. Just for your info - try this with the very Indian Chola Kulcha.
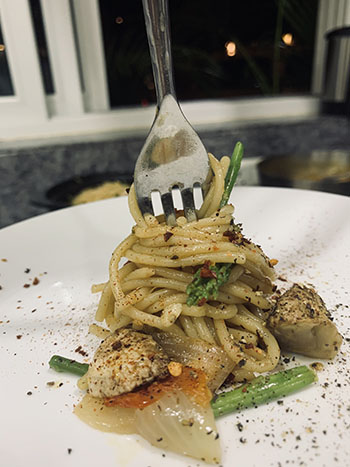
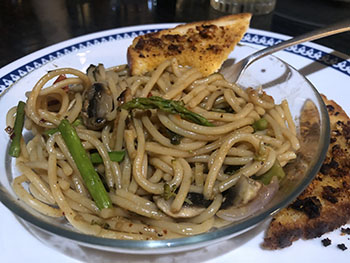
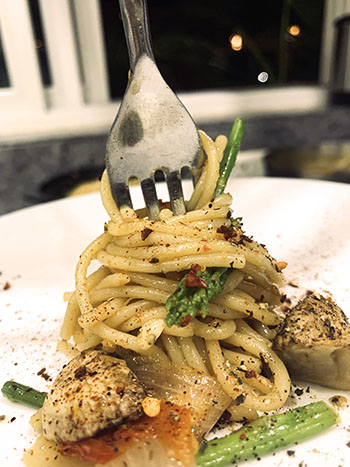
We have used broccoli, asparagus, some left over mushrooms, herbs that existed in our fridge. You can of course replace with any other her you have. Parsley, chives, oregano etc all go really well. If you dont have fresh herbs, dried herbs will also do the trick.

You want more heat add  some Spicy chillies while the pasta boils. Green chilly does not do well, so I would avoid that.

You can add any cheese you have, just before taking off the fire, stir some in.

We add the asparagus and mushrooms last, as they are veggies that cook really fast, and adding them earlier would have turned it to mush.

We hope you enjoy this recipe. Do tag us on #therecipelarder on instagram.
VEG STOCK V/S VEG BOUILLON

Since I did not want to use any extra veggies to make veg stock, I used veg Bouillon. I rather use veg stock as however organic bouillon is processed. But having said that bouillon has strong flavours and works well when you don't have too much time or patience at hand.

HOW TO MAKE VEG STOCK. For this recipe - take 4 cups of water. Add to a pan and in it add some bay leaf, black pepper and roughly cut white veggies - ie onions, bottle gourd, cabbage, cauliflower, pumpkin (not the very sweet one)etc. Boil everything together till the water boils down to half. Strain. Use the veggies in your chapati dough, or  mix it into your dal. Use this water for cooking pasta.

If you use stock do not add veg bouillon.

SEE VIDEO HERE:
http://therecipelarder.com/wp-content/uploads/2020/03/one-pot-pasta-with-mukka-pyaz-edited.mp4


Share this Recipe

Filed Under: Dinner, Healthy, Lunch Tagged With: healthy, spaghetti

Turkish Eggs

October 25, 2018 By appu Leave a Comment

I did it!! I finally learnt to poach eggs! And I have the very attractive legendary, Nigella Lawson to thank for it!

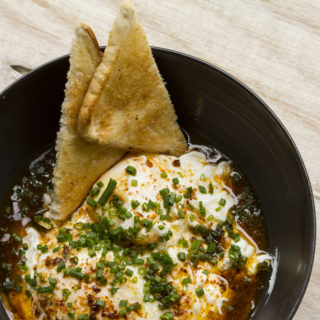
Turkish Eggs.

It’s actually so simple that it’s scary. But trust me, its really easy! I know what you must be thinking!! Nah! you say! I get it! I have no count of the number of eggs reduced to broken yolks and litres of water bubbling with broken scattered albumin! But one look at this recipe, and I can guarantee that you will be willing to try poaching eggs and you will succeed!

turkish poached eggs

This video / recipe will banish all myths about vinegar in the water, or swirling the water into a vortex, or that you need special skills to make this dubious poached egg!

When you break the egg in the water the white will move away. But as it cooks the white remembers it’s DNA and goes up and envelopes the yolk again. It’s quite interesting to note this, and reminds us to  never fail to be amazed by nature and all things natural.

This has become my favourite meal in a bowl. It’s quick, easy (yes! it is!) and super super tasty. Specially when you get to the last part where the egg yolk breaks and mixes with the curds and butter sauce! Then – it just melts in the mouth setting off a palate explosion!

I really have not much more to say in this post because you really have to taste it to know how strangled for words it will leave you!

turkish eggs

Go for it! And message me with pics!!!

Cheers!!


IMPORTANT: Do go through the notes section of the recipe for hacks and tricks!

http://therecipelarder.com/wp-content/uploads/2018/10/Turkish-Eggs-converted-with-Clipchamp-1.mp4


Turkish Eggs
Print Recipe
Soft poached eggs, hung garlicky curd and chilli butter sauce!
  • CourseBrunch, Main Course, Main Dish
  • CuisineMediterranean
Servings Prep Time
1 pax 10 min
Cook Time Passive Time
10 min 4 hours
Servings Prep Time
1 pax 10 min
Cook Time Passive Time
10 min 4 hours
Turkish Eggs
Print Recipe
Soft poached eggs, hung garlicky curd and chilli butter sauce!
  • CourseBrunch, Main Course, Main Dish
  • CuisineMediterranean
Servings Prep Time
1 pax 10 min
Cook Time Passive Time
10 min 4 hours
Servings Prep Time
1 pax 10 min
Cook Time Passive Time
10 min 4 hours
Ingredients
  • 100 gm curds / yoghurt hung for 4-5 hours
  • 1 tspn Minced Garlic
  • 1 tspn salt
  • 2 Eggs chilled
  • 1 tspn lemon juice
  • 500 ml Water (appx)
  • 1/2 tspn Paprika
  • 1/2 tspn spicy chilly flakes (can be reduced)
  • 1 tspn olive oil
  • 1 tbspn Butter
  • 1 tbspn chives finely chopped
  • Toast of your choice
Servings: pax
Instructions
  1. Hang the yoghurt / curds for 3-4 hours
  2. Transfer into a bowl, and add salt and half (ie 1/2 tspn) garlic
  3. Mix well and keep aside
  4. In slow to medium fire, set the water to boil.
  5. While water is heating, break one egg into a seive
  6. Let the extra albumin strain away
  7. Transfer gently to a cup
  8. Add half tspn lemon juice and keep ready
  9. When large bubble break to the surface of the water, reduce the fire and transfer the egg gently into the water.
  10. Poach the egg for 2 to 3 minutes
  11. Gently take it out with a slotted spoon and drain excess water
  12. Transfer on top of the curds
  13. Similarly poach the second egg.
  14. Set a pan on slow fire and, set the butter to melt.
  15. Add balance 1/2 tspn garlic and chilli flakes.
  16. Just before taking off fire add the olive oil
  17. Drizzle over the eggs
  18. Garnish with chives
  19. Enjoy with a point of toast.
Recipe Notes

Notes for perfect poached eggs:

  • The egg should be refrigerated or at least an hour before making the poached eggs.
  • Lemon juice is a must.
  • Do strain the extra egg white, it makes a difference.
  • There is no need to put vinegar in water and to make a swirling vortex. Instead the vortex and swirling water breaks the egg white and makes it into a streamy mess.
  • The water should not be rapidly boiling. If it is bring it down again to a point where large bubbles burst to the surface. Not too many bubbles, just one to three bubbles. This is the right time to slide the egg into the water.
  • Don't be in a hurry and bring up the heat. Let the egg cook slowly over 2 to 3 minutes.
  • Slotted spoon is a must. It helps drain excess water. No one wants hot water over yummy cook curds.


Share this Recipe

Filed Under: Uncategorized Tagged With: butter, butterchillysauce, buttersauce, chillies, chives, easymeal, Eggs, mealin abowl, nigellalawson, oliveoil, poachedeggs, satisfying, softeggs, turksiheggs

Cheese Toast

September 6, 2016 By appu Leave a Comment

Cheese toast with Cucumbers, onions and green chillies

Cheese toast with Cucumbers, onions and green chillies

Whats so special about cheese toast? For me — very special, because my grandmom used to make it the minute I entered her house. It was my absolute favourite and I still have it when I need some comforting.

Why is it special for you? Because it’s not just a cheese toast. It is many other things clinging to the cheese. Cucumbers, onion, green chillies….

My grandmom (Nani) was an amazing cook. Hell- she was an amazing lady. We lost her a few years ago, and that hole will never fill up. But the memories now make me smile and laugh and sometimes shed a tear or two. Always perfectly coiffured, immaculately dressed, Nani taught me everything I seem to know to survive and exist.

my perfect grand mom

my perfect grandmom and me

She decided she must perfect her English, so she grabbed hold of a teacher and started reading and understanding books I would not read unless I had an exam on it. She borrowed some money from her husband, learnt how to dabble in stocks, and struck gold. Then she decided she should help the underprivileged kids for education, so she opened an NGO, which now runs 2 schools and 1 vocational training centre. We used to get sweets as treats every year when the school results were declared.

When I made the cheese toast recently, the smell emanating from the oven, gave me a huge wave of nostalgia. I was thrown back into her house where I practically grew up.

open cheese toast

open cheese toast

The heavenly very soothing and reassuring fragrance of my favourite food, unlimited coke, my Nani’s gorgeous smile, those days spent learning how to walk, speak, garden, just about everything that a kid needs to feel loved and wanted. I know she is with me, when I cook when I eat and when I hug my loved ones.

my nani's special cheese toast

my nani’s special cheese toast

I make many of her recipes, but this one has a special place in my heart. It can be a complete meal on its own, or just pair it with soup- serve it as an appetiser. However, you use it – don’t forget to derive comfort from the melting cheese and crunchy cucumbers and onion as it hits your palate.

And Hey!! Go hug your grandmom right now!! Life is full of small pleasures!

cheese toast

cheese toast


Cheese Toast
Print Recipe
Melting cheese with a heavy dose of cucumbers and love.
  • CourseSide Dish, Sides
  • CuisineAmerican, Fusion
Servings Prep Time
2 slices 10 min
Cook Time
10 min
Servings Prep Time
2 slices 10 min
Cook Time
10 min
Cheese Toast
Print Recipe
Melting cheese with a heavy dose of cucumbers and love.
  • CourseSide Dish, Sides
  • CuisineAmerican, Fusion
Servings Prep Time
2 slices 10 min
Cook Time
10 min
Servings Prep Time
2 slices 10 min
Cook Time
10 min
Ingredients
  • 1/3 Cup Grated Cucumber squeeze out the water.
  • 1/3 Cup Cheddar Cheese grated
  • 1/4 Cup onions Finely Chopped
  • 1 Tspn Green Chillies Finely Chopped
  • 2 Tspn Butter room temerature
  • 2 Slices Bread white or multigrain
  • pinch salt
Servings: slices
Instructions
  1. Slater the bread slices with butter and keep aside
  2. Pre heat oven to 150 Deg C
  3. Grate cucumber and squeeze out the water.
  4. Chop onions finely.
  5. Add all ingredients together and give it a good mix.
  6. Spread the cheese mix on the toast and bake in hot oven till cheese melts.
  7. Cut into squares and serve hot with ketchup or chilli sauce.
Recipe Notes

You can increase or decrease the spice level to your liking, but don't do away with it altogether.

Enjoy!

Share this Recipe

Filed Under: Snacks Tagged With: cheese toast, cucumbers, open sandwich, spicy, toasted

Italian Tomato Sauce

August 13, 2016 By appu 2 Comments


italian tomato sauce

Apologies about the link —- this is the corrected version.

———————————————————————————————————————

I am super super excited about this recipe. It’s complicated (a little bit!) but it looked so brilliant. I saw a version of this on a cooking channel and I got up from my chair, headed to my bar, collected the vodka, (yup! It has Vodka!!) and all the ingredients and started making it, changing a little bit of the recipe here and there.

After 15 minutes into cooking, the fragrance wafting from the kitchen to the rest of the house drew many of the family members and a few neighbours into our kitchen. I tell you I am on my knees, worshipping this sauce.

It’s a thick sauce. Really thick. It’s not to be had on its own (but you might finish a lot of it while tasting it – I warn you!). You will have to mix it with some stock water, hell even mixing it in the water used to cook pasta lends it an amazing flavour.

Use it as a pizza base, as a base for Bruschetta, in a salad! Just make it, creative ideas will flow in.

I don’t want you to read all these descriptions and explanations. What I want you to do is get hold of all the ingredients and start making it. Let the family members walk in with appreciative sniffs and exclamations. Keep them waiting, and then hit them with a pasta made from this recipe. Lie back and bask in the glory!

PS: There is one very important thing that you have to follow, that’s – the instructions. There will be times while making the recipe you might think I am joking or that I have lost my mind. Have faith. I am very serious when I say what I say, and I am very sane and going to wait for your comments after you have made this recipe. You can advocate my sanity.

Without more blah blah – here is the recipe for Italian Tomato Sauce.

PS _AGAIN__and here is the link to the video —–

A shout out to my school friends who always have my back — hey there girls 🙂

Thanks to Brinda – for helping me with this video.


Italian Tomato Sauce
Print Recipe
An amazing base sauce. Let your imagination flow and get creative.
  • CourseMain Course, Main Dish, Sauces and Jams
  • CuisineItalian
Prep Time
15 minutes
Cook Time
30 minutes
Prep Time
15 minutes
Cook Time
30 minutes
Italian Tomato Sauce
Print Recipe
An amazing base sauce. Let your imagination flow and get creative.
  • CourseMain Course, Main Dish, Sauces and Jams
  • CuisineItalian
Prep Time
15 minutes
Cook Time
30 minutes
Prep Time
15 minutes
Cook Time
30 minutes
Ingredients
  • 1/3 Cup olive oil
  • 2 Tbspn Butter
  • 6 garlic pods large whole pcs
  • 2 Tubes Italian Tomato Paste I used Ardita Parma Italiana - available in all stores.
  • 1 tspn brown sugar
  • 1 large onion diced
  • 150 gram cherry tomato
  • 1/2 tspn Red chilly flakes coarsely ground
  • 1 tspn salt
  • 1 tspn lemon zest
  • 45 ml vodka
  • 1/4 tspn cayenne pepper
  • 2 tbspn basil minced
  • 1 tspn Red Wine Vinegar
Servings:
Instructions
  1. Heat a heavy bottomed non stick pan. Add olive oil and butter. Olive oil should completely cover the bottom of the pan. Let the butter melt
  2. Add garlic and saute till it's a bit brown. Take out the garlic and keep it aside.
  3. Add 1 1/2 tubes of tomato paste to the hot oil/ butter mix. DO NOT STIR. I kid you not - DO NOT STIR!! Just see to it that the paste is completely submerged in the oil.
  4. Cover and cook for 10 minutes in med/ high flame.
  5. Add Brown sugar, salt and pepper. Once the bubbles subside, add the diced onions and cherry tomatoes.
  6. Now you can stir and mix. You might see a little blackened sauce when you mix. Don't worry, its normal. Ofcourse the entire bottom shouldnt be burnt. This means your pan wasn't thick enough at the bottom.
  7. Cook covered till tomatoes get squishy and cooked.
  8. Add the left over 1/2 tube of tomato paste.
  9. Add lemon zest and cayenne pepper and mix.
  10. Add the pre cooked garlic.
  11. Mix
  12. Add the vodka and mix.
  13. Cook covered for 5 minutes. Then add the basil. Cook again for 2 minutes.
  14. Add the red wine vinegar and taste!!! Voila-- you are done.
Recipe Notes

Dilute with pasta water or stock and add to pasta.

Liberally coat a salad.

Layer your pizza.

Use in baked dishes.

Use for base of crostini or bruschetta.


Share this Recipe

Filed Under: Sauces Tagged With: base sauce, bruschetta sauce, italian, pizza sauce, salad, tomato sauce, vegetarian

Garlic Mashed Potatoes

June 14, 2016 By appu 2 Comments

Our trip to Japan was largely about Japanese food. Tofu meals, Zen meals and meals in the temple. We all developed a love and respect for Tofu and all its variations. This one restaurant that we went to and which was purely fusion was Rigoletto, in the Roppongi area of Tokyo. They had very few choices for vegetarians, but all of them were sumptuous.

I made the garlic mashed potatoes for my husband’s birthday. It was a smashing hit.

Garlic Mashed Potatoes

Garlic Mashed Potatoes

Yeah yeah, it has a lot of calories and all that. But hey! it is really tasty. And you gotta cheat once in a while right? How else will you enjoy life?

The potatoes have to be boiled and later mashed along with all the other ingredients. The entire mixture can be a heavy load for most blenders. Even mine protested mightily but held its own. By no means am I proclaiming Technora blenders to be the best, but where I am concerned it has stood the test of time and use. I love their inbuilt stirrer. I don’t have to open the lid and stir the food, I can do it while the blending is on. Pure genius.

garlic potatoes

This is a copycat recipe, so my imagination can take no credit for it. But I added a twist to its story, by cooking it in an earthen bowl. It wasn’t coated inside with any kind of ceramic polish. Just pure earthenware. So when the garlic mashed potatoes cooked, the flavour and fragrance of the natural clay seeped into the potato, giving it that extra kick and twist.

Wash the earthenware once and dry it in the sun if you can. Fill the mashed goodness, add dollops of butter, garnish and bake. It’s a quick and easy recipe, and I shall become famous – because everyone is going to ask you for this recipe.

😉

Have fun guys – I promise you a piece of heaven!

Ciao!

garlic mashed potatoes 2

Garlic Mashed Potatoes
Print Recipe
Served in earthen ware, so the smells and flavours infuse into one good yummy dish!
  • CourseBrunch, Side Dish
  • CuisineFusion
Servings Prep Time
12 pieces 20 minutes
Cook Time Passive Time
20 minutes 10 minutes
Servings Prep Time
12 pieces 20 minutes
Cook Time Passive Time
20 minutes 10 minutes
Ingredients
For the potatoe
  • 1 Kg potatoes Starchy "Russet" are the best.
  • 500 Grams Cream
  • 75 Grams Butter Softened
  • 100 Grams garlic Mildly crushed
  • 2 Tspn salt
  • 10 Grams Black Pepper Coarsley ground.
To Garnish before cooking.
  • 25 Grams garlic
  • 1/2 Tspn olive oil
  • 1/8 Tspn salt (basically a pinch!)
  • 1 Tbspn Finely chopped parsley
  • 1 Tbspn Red Chilli Flakes
  • 30 Grams Butter Softened.
Accessories
  • Potato Ricer
  • Heavy Duty Blender
  • oven 150 Deg C
  • 15 Earthen pots for serving (optionally baking dishes can be used)
  • Spatula
Servings: pieces
Instructions
  1. Boil the potatoes.
  2. Once the potatoes are boiled, peel and run it through the ricer.
  3. Add all the ingredients for the potatoes and load it into the blender.
  4. Blend well. You might have to do it in parts. It should have no lumps.
Garnish
  1. While the potato is boiling, peel the garlic meant for the garnish. Slice the garlic into thin slivers.
  2. Rub the olive oil and salt on it and pop into the oven. Bake for appx 10 minutes, till it is dehydrated and a wee bit brown. You don't want to make it crisp and completely baked
    Rub the olive oil and salt on it and pop into the oven. Bake for appx 10 minutes, till it is dehydrated and a wee bit brown. You don't want to make it crisp and completely baked
Final Dish
  1. Ladle the mixture in the earthen ware / baking dish, garnish with parsley, chilli flakes and the par baked garlic.
  2. Add dollops of butter (the one kept aside for the garnish) on all sides and slide into the oven.
  3. Bake for 10 minutes. First the butter will melt and then cook and infuse into the potato. When the butter sizzles, and the garlic on top looks browned, take out and serve hot.
Share this Recipe

Filed Under: Brunch, Sides Tagged With: garlic, Garlic mashed potatoes, Mashed Potatoes, technora

Scrambled Eggs with Truffle Oil

June 10, 2016 By appu 4 Comments

Scrambled eggs with truffle oil

Scrambled eggs with truffle oil

We ate at the most amazing restaurant in Hong Kong a few months back. Chef Patrick of La Table De Patrick. It was a small restaurant, with immediate and intimate service. We had called earlier to let them know we are vegetarians. He rotated our entire 5-course meal around it, using wonderful freshly available ingredients.

One dish which Chef served had a sprinkling of truffles on it. With gleeful hands, we tore at the food, but it came up short on the truffle flavour. It was crunchier and had very mild to non-existent truffle taste.

Chef explained that it was summer truffles, and has very little flavour. We uneducated, but truffle fans, learnt a lot that evening.

The most flavourful truffles are the winter ones. The white winter truffles are available from October to Christmas. These have a strong flavour and can deter new truffle tasters.

The black winter truffles are what most people serve and is more easily available. Its the most preferred variety of the lot. Available from Mid Jan to Easter. (What will happen to us truffle lovers from Christmas to Mid Jan? Hoarde! Hoarde! )

The summer Truffle is available from April to July and has a very light flavour. Almost non-existent. None of us much appreciated it.

Autumn burgundy truffles are more medium bodied and great for someone who likes truffles but cannot have too much of it because of the strong flavour and aroma.

scrabled eggs


scrambled egg with truffle oil

scrambled egg with truffle oil

In my family of four – three of us adore it, while the fourth needs to taste the autumn burgundy one to start developing a taste. (I have no clue where to get it from!!)

scrambled on toast

It was an educative and tasty evening and inspired me to make this scrambled egg.

If you have seen the movie or read the book – A hundred foot journey- the, to be a great chef, Hassan meets Mallory the owner of the restaurant. This is a synopsis from the book -Hassan, having heard from Marguerite that Mallory hires potential chefs by taste-testing an omelette and deciding whether the person is indeed a great chef, asks if he may cook an omelette for her to his recipe. Due to his injured hands, Mallory helps under Hassan’s supervision. After tasting the omelette, Mallory recognizes Hassan’s potential and invites him to work for her.

The omelette they made looked so amazing!! I used a part of the recipe for this blog.

Take a look!


scrambled egg and oil bottle

Scrambled Eggs with Truffle Oil
Print Recipe
Simple scrambled eggs, finished with a copious dash of black truffle oil.
  • CourseBreakfast, Brunch
  • CuisineFusion
Servings Prep Time
1 person 10 minutes
Cook Time
5 minutes
Servings Prep Time
1 person 10 minutes
Cook Time
5 minutes
Scrambled Eggs with Truffle Oil
Print Recipe
Simple scrambled eggs, finished with a copious dash of black truffle oil.
  • CourseBreakfast, Brunch
  • CuisineFusion
Servings Prep Time
1 person 10 minutes
Cook Time
5 minutes
Servings Prep Time
1 person 10 minutes
Cook Time
5 minutes
Ingredients
The Eggs
  • 3 Eggs Whole
  • 1/4 Cup Milk
  • 1 Tspn Mint Finely chopped
  • 1/2 Tspn chilli flakes
  • salt
  • pepper
  • 2 Tbspn Black or White Truffle Oil
  • 1 Tbspn Butter For cooking.
  • Toast Optional
The Accessories
  • 1 Med Bowl For mixing eggs
  • 1 Whisk
  • 1 Skillet
  • 1 Wooden Spatula
Servings: person
Instructions
  1. Break the eggs in the bowl. Yolks and all.
  2. Add the milk, salt and pepper and whisk gently. We dont need air here, just the mixture semi blended.
  3. Add the mint and chilli flakes, and mix gently till incorporated well.
  4. Heat the skillet (medium high) and drizzle some butter. Coat the skillet with the butter and let it sizzle.
  5. Pour the mixture into the skillet and let it be for approximately 45 seconds. It should not set and start turning into and omelette.
  6. Now start agitating the eggs, with the wooden spatula. Keep moving in small but consistent circles all over the skillet.
  7. After about 45 seconds, the eggs will clump but still be runny and soft. At this point if you like your eggs a bit runny, take it off on a plate.
  8. If you like it a little more well done, continue cooking, moving the eggs in the same round pattern. Do not stop agitating the eggs.
  9. Take it off on a plate and immediately drizzle the truffle oil. Enjoy hot off the skillet!!
  10. Umm! Goes really well with Champagne or white wine 😛
Recipe Notes

Here is the link to more happy education on truffles.

Share this Recipe

Filed Under: Uncategorized Tagged With: Black Truffle, Eggs, Lunch, Scrambled, Truffle Oil, White Truffle, White Wine

Meet the Author

For the 21 years and some months that I have been alive, there has been this crazy, eccentric, always-charged-up woman with a full-time job of being a mother to 6 (2 children, 4 dogs).

In her spare time she blasts music on her DJ console, reads like a maniac, downloads shows (because God forbid she runs out of something to watch), runs an entire household, and to top it all off, manages a very successful catering business which makes the most delicious food in the entire world. Once you have her food, everything else will taste like stale socks.

This is what you call "Maa ke haath ka khana".

- Kanak

Subscribe to Blog via Email

RECIPE BY CATEGORY

Copyright © 2022 THE RECIPE LARDER