THE RECIPE LARDER

  • Home
  • Nuts and Bolts, Sauces and Pans
  • Recipes
  • Contact

Beetroot Carpaccio with Tamarind Redution Vinaigrette.

March 19, 2020 By appu Leave a Comment

Beetroot Carpaccio with reduced Tamarind Redution.
Print Recipe
Thin veils of roasted beetroot, a fusion tamarind reduction and goats cheese. A salad made for cosy afternoons.
  • CourseSalad
  • CuisineFusion
Servings Prep Time
3 pax 15 minutes
Cook Time Passive Time
1 hour - plus 30 minutes
Servings Prep Time
3 pax 15 minutes
Cook Time Passive Time
1 hour - plus 30 minutes
Ingredients
  • 2 Beetroots
  • 2 Tbspn Tamarind
  • 2 Kashmiri Chillies
  • 1 Chipotle Chilly
  • 1 Tspn Corriander seeds
  • 1 Tspn Fenel Seeds
  • 1 Tspn Cumin Seeds
  • 1 Tspn Black Pepper
  • 2 Tbspn Water for cooking the tamarind reduction.
  • 1/2 Tspn salt
  • 1/1 Tspn soya sauce
  • 100 gms goat's cheese
  • 10 Salad Leaves preferably - rocket, aurugula, baby spinach.
Servings: pax
Instructions
  1. Preheat oven to 200 Deg F.
  2. Wash the beetroots well and scrub it.
  3. Enclose the wet beetroots in foil and place in the middle rack of the oven. This should take appx 1 hour.
  4. Soak the tamarind in hot water and leave aside for appx 30 minutes. Use only as much water to soak the tamarind. Do not use excess water.
  5. Soak the chillies and seeds and black pepper together in a bowl, with hot water. Keep aside for appx 30 minutes
  6. After appx 30 minutes, mash the tamarind and strain the juices with a strainer. Throw away the pulp (or use for marination) and keep the juices.
  7. In a grinder, grind to paste the strained tamarind, chillies, seeds and black pepper.
  8. Heat some oil in a pan and saute the tamarind and red chilly paste.
  9. Add salt and the 2 tbspn water and let it cook for appx a minute.
  10. Set aside to cool in a bowl.
  11. ASSEMBLY: (see video) 1) Place the leaves on the plate. 2) Arrange the beets in a circle on the leaves. 3) Smear scantily, the reduced tamarind vinaigrette. 4) Place blogs of goats cheese on the smeared beets. 5) Repeat again with the beets, then tamarind reduction and goats cheese, till all the beets are over.
  12. Garnish with piped cheese cream and more salad leaves.
  13. Serve totally chilled.
Recipe Notes

I have been a wee bit obsessed with all things carpaccio for a bit. Those thin, almost translucent slices of veggies fascinate me. These thin veils, with their dressing or sauce, melting in the mouth – the whole experience just makes me feel so good. I mean how can something so thin leave behind an explosion of flavors?


Goat’s cheese is my all time favourite cheese, snack, and go to for balance in taste. Tamarind is one of my favourite sour sides, and a very underrated variety. When have you heard of tamarind being used as a salad vinaigrette and yet it’s a kin of the oft used balsamic (sort off!!)


I don’t want to gabber too much, because you really need to go check out the recipe and make it. Now is a good time to experiment huh?


Please do tag us on #therecipelarder on insta and facebook, with pictures if you make this recipe.


Cheers!

Check out the video here


http://therecipelarder.com/wp-content/uploads/2020/03/Beetroot-carpaccio-with-reduced-tamarind-reduction-edited.mp4


Share this Recipe

Filed Under: Dinner, Healthy, Lunch Tagged With: tamarind, vinaigrette

Soong Dal

March 4, 2019 By appu 1 Comment

It’s that time of the year when Mahabaleshwar beckons, with its myriad sunsets, fresh fragrant strawberries and over powering array of flowers. We had ourselves farm fresh and organic vegetables just off the farm.


Since we do not use fertilisers or pesticides of any kind, we pluck off cherry tomatoes and radish straight from the Canadian pharmacy plants and merrily munch it on the go!

fresh off the farm.

For a day and a half, we were just mom and son! We ate, drank and had some crazy conversations.

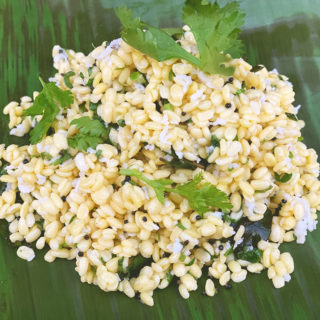
We both wanted something a bit healthy for our brain doping lunch, and anyways friends who love this dish have been asking for the recipe. So we decided to make it and blog it.

This is a super healthy snack.  I sometimes have it as the lonesome dish for dinner too. It’s super filling, high in protein and very very healthy. It does not sit in your tummy, but leaves you feeling full and satiated. The tangy, spicy flavour makes it soooo very edible and tasty.

I optionally also add finely chopped raw mango (kairi) to it and reduce the lemon a wee bit. You can play around with it as you like. Reduce the spice, increase it (yaay!), add onions, take off the coconut, add a dash of green chutney!!! Just go for it. Not much can destroy this dish!

Add to it a dhokla mix, or to some other chaat item. Serve it mixed with broken idli and podi chutney. Let your creativity flow and do tell me also how you played with it!

Soong dal goes amazingly well with drinks. But serve it chilled. Like – absolutely and totally chilled. If you think of heating it – u might as well eat dal. So DO NOT HEAT this dish!!

Have fun! Cheers!


PS: Here is the video shoot we did for the Soong Dal. It’s very basic and rustic, as is the kitchen in our farm.

http://therecipelarder.com/wp-content/uploads/2019/02/soong-dal-converted-with-Clipchamp.mp4

Soong Dal
Print Recipe
A healthy and tasty snack. Super with drinks.
  • CourseAppetizer, Salad, Side Dish
  • CuisineIndian
Servings Prep Time
4 pax 5 minutes
Cook Time Passive Time
5 minutes 4 hours
Servings Prep Time
4 pax 5 minutes
Cook Time Passive Time
5 minutes 4 hours
Soong Dal
Print Recipe
A healthy and tasty snack. Super with drinks.
  • CourseAppetizer, Salad, Side Dish
  • CuisineIndian
Servings Prep Time
4 pax 5 minutes
Cook Time Passive Time
5 minutes 4 hours
Servings Prep Time
4 pax 5 minutes
Cook Time Passive Time
5 minutes 4 hours
Ingredients
  • 1 Cup Yellow Moong Dal
  • 1 Tspn oil
  • 1/2 Tspn Mustard Seeds
  • 1/4 Tspn Hing
  • 10-15 Curry Leaves
  • 1 Tspn salt
  • 1/4 Cup Coconut grated
  • 2 Tbspn Corriander Leaves finely chopped
  • 1 Tspn Green Chillies (or less/ more - according to taste)
  • 1 Tbspn lemon juice
  • 1 Tbspn Raw Mango (optional) finely chopped (reduce lemon juice)
Servings: pax
Instructions
  1. Wash and soak the yellow moong dal for 4 hours.
  2. Drain the water, rinse the dal and keep on a draining sieve for appx 20 minutes, so that no water is left.
  3. Once the water has drained, get the tadka ready. Keep the moong dal in a mixing bowl.
  4. In a tadka pan, add the oil.
  5. When hot, add the mustard seeds.
  6. When spluttering, add the hing and finally the curry leaves.
  7. All the curry leaves should splatter, so mix it with a spoon once, while still on the fire.
  8. Take off the fire and put it on the moong dal.
  9. Now add the salt, chopped corriander, coconut and green chillies (and optionally the raw mango)
  10. Lastly squeeze in the lemon juice.
  11. Mix well.
  12. Serve completely chilled.
Share this Recipe

Filed Under: Healthy, Sides Tagged With: appetizer, fresh, healthy, indian, lentils, Moondal, protein, protein power, quick, salad, Serve Chilled, snacks, south indian, spicy, tangy, yellow dal, yum

Radish Salad

April 6, 2018 By appu Leave a Comment

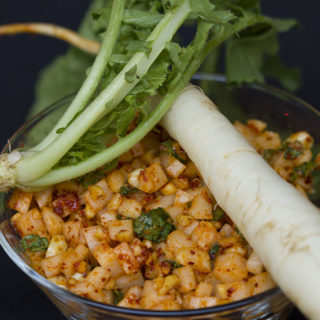
I detest radish! It’s bitter, pungent and according to me serves no purpose in the culinary world. The Japanese use a lot of radish in their cuisine, and I always wondered what they do to it to make that pungent and mouth twisting bitter taste, disappear ?! Even after tasting that kind of radish, I could still not lift a piece of raw radish from a salad! Until – this lady made me taste her concoction.

…

Read More »

Filed Under: Brunch, Healthy, Lunch Tagged With: cold pressed mustard oil, farm fresh, farm to table, gluten free, healthy, indian, indian cooking, indian salad, mooli, organic, peanuts, quick and easy, quick salad, radish, salad, vegetarian, wholesome

Cucumber Boat Salad

February 20, 2017 By appu 2 Comments

Chilled Cucumber Boat Salad

The Daughter made another demand — I’m so pleased she has got into cooking! The chef in me feels fulfilled and the mom and me feel happy! 😛

I make this salad very often at home. It needs to be served really really chilled, so it is a good idea to make it a wee bit in advance.

It’s a messy salad though! Be prepared for a white moustache and a few drips down your chin! But it’s worth the dishevelled look you will sport while eating it.

Look for crisp cucumbers with a clean green interior. I always cut off the side of the cucumber and taste it before using it. Sometimes cucumbers can be very very bitter, and even one bitter cucumber in a salad of 20 cucumbers can spoil the entire dish. Taste it and throw it away if its bitter. (You can always chuck it in the compost pile of course!)

The yoghurt should be thick, so hang it for an hour or so if you want. There is zero neatness in this salad, so there really isn’t any right or wrong way to fill it. Slice the spring onions really thin and small. Garlic can be upped as per your taste. To my mind, too much garlic takes away the sweetness of the yoghurt and the original taste of the cucumber.

I add a little of chilli flakes, but you can always add some herbs too – parsley, thyme, oregano. Don’t use very strong herbs. Again – it takes away the original flavours.

The boats can get very wobbly, as the base is rounded. You can slice off a small part of the cucumber from the bottom to make a little steadier base. But – mostly, it will wobble and fall a little to the side, but if the yoghurt is not too drippy things should not slide out and drip into the plate.

I’m attaching a quick video for you.

I hope you enjoy this salad. Do write in.

As always – Cheers! and Happy Times!

http://therecipelarder.com/wp-content/uploads/2017/02/cucumber-boat-salad_CLIPCHAMP_480p.mp4

Cucumber Boat Salad
Print Recipe
Crips. filling, gooey, and crunchy. Great as a cocktail snack, as well as a salad. Don't let the fancy look deter you from making this perfectly easy and hearty salad.
  • CourseSalad
  • CuisineFusion
Servings
4 peopl
Servings
4 peopl
Cucumber Boat Salad
Print Recipe
Crips. filling, gooey, and crunchy. Great as a cocktail snack, as well as a salad. Don't let the fancy look deter you from making this perfectly easy and hearty salad.
  • CourseSalad
  • CuisineFusion
Servings
4 peopl
Servings
4 peopl
Ingredients
  • 2 large cucumbers peeled and slit lengthwise
  • 1/2 cup hung curd or greek yoghurt
  • 1 green oinion finely chopped with greens
  • 1 tspn salt
  • 1 tbspn garlic coarsely pounded
  • 1 tspn Black Pepper
  • 1 tspn chilli flakes
  • 1 tspn herbs optional.
  • 50 grams alfa alfa sprouts soaked in cold water
Servings: peopl
Instructions
  1. Peel and slit the cucumbers lengthwise.
  2. De seed the inner core using a spoon (see video) Chill in refrigerator till you need to fill it.
  3. Chop the green onions finely. Use all the whites and some of the greens
  4. Soak the alfa alfa in iced water, so that it untangles and the sprouts open up. Drain before using.
  5. In a clean bowl, mix the hung curd or greek yoghurt with all the other ingredients.
  6. Taking a small spoon, fill the cores of the cucumbers with the filling. A little will drip out. You can either leave it, or wipe it with a clean paper towel.
  7. Heap the sprouts on the yoghurt mix.
  8. This salad can be filled in advance, or just before eating. Either way, the filled boat, or the filling and cored cucumber should be in the refrigerator till served.
Share this Recipe

Filed Under: Brunch, Cocktail Parties, Dinner, Lunch Tagged With: Alfa Alfa Sprouts, Chilled Salad, Chilli flakes, crisp, cucumbers, Foodie, Greek Yoghurt, Hung Curd, salad, Serve Chilled, Stufed

Lettuce Wedge Salad

November 18, 2016 By appu Leave a Comment

I first had Lettuce Wedge Salad, in London, in a restaurant called Roka. Of course, the restaurant has stayed a favourite, as has this salad. I would always, analyse it, gaze at it in wonder and awe, thinking I will replicate it in some manner. And – I would always forget.

lettuce wedge salad

The fresh crisp lettuce, perfect square wedges of stacked leaves, the immensely flavourful dressing – everything made it a favourite, of ordered a dish.

 lettuce wedge salad

I went on a hunch, (because I was daunted by those perfect square wedges) and bought two fresh heads of lettuce. I had no idea how to cut it. No matter how many times I would visit the salad in my mind’s eye, knife in hand, I could not figure out how to cut it. I have no formal training in cuisine, so these skills are alien to me, till I figure them out.

lettuce wedge salad2

With great trepidation, I cut the salad in half, vertically, root to the top of the head. Then I sank all the four heads in ice water, (more ice, less water) and left it to hydrate for approximately 30 minutes. Let me tell you what happened! The lettuce took in so much water, it took me another 10 minutes to drain it. But the lettuce was happy to have had that water. The leaves were crisp and clean.

Then I randomly chopped here and there, but the wedges were nowhere near perfect. I took a pause and really visualised, and them hit on the right technique.

This is how it is done.

Firstly – try not to use a metal knife. The metal in the knife oxidises the leaves and makes them look soggy.  A plastic or ceramic knife works very well. I had bought a ceramic knife from Japan, Kyocera brand, and was warned that it could lop off my fingers if I am not careful. I use it very sparingly, because hey! I love my digits.

Now then on to the method –

I am going to be showing pics at every step because I am finding it very difficult to explain the process! Words are just not enough.

Chop the lettuce vertically, from the root to the top. (see pic below)

Cut from root to top.

Cut from root to top.

Dunk in ice water, and drain well after 30 minutes.

Now take the chopped side, the side where you can see all the layer of leaves, and place that to your right. (see pic below)

The side which is cut, keep it to your right

The side which is cut, keep it to your right

Then, take three, (if you have a larger head of lettuce then take four or five) long wooden barbecue sticks, (they should be larger than cocktail toothpicks – about 4 to 5 inches long) and leaving an inch from the side of the cut side of the lettuce, poke them at 1 and 1/2 inches interval. This is done 90 Deg from the cut side of the lettuce, and not parallel to the root and cut side of the lettuce. (see pic below)

Stick bbq sticks into the lettuce

Stick bbq sticks into the lettuce

The cutting will happen from the non-cut side of the lettuce. The one which is the root side and on your left. The opposite side of the cut side of the lettuce. (see pic below)

This from where you will cut a large wedge

This from where you will cut a large wedge

Taking your knife and leaving an inch from the uncut side of the lettuce, cut off the part with the toothpick inserts. The toothpick inserts should now be all in a row, and the large wedge should have separated from the main head of lettuce. (see pic below)

how to cut into wedges 2

Slice of the entire strip with the bbq sticks

Slice of the entire strip with the bbq sticks

Now, just lop off individual wedges, seeing that you get as close to a square as possible. (see pic below)

Cut off individual wedges.

Cut off individual wedges.

Trim the wayward leaves, and push the stack of cut lettuce wedge further into the stick.

Garnish, turning it all around.

Garnish well - rotating all sides.

Garnish well – rotating all sides.

Serve Chilled.

Lettuce wedge salad with Japanese sesame oil dressing

Lettuce wedge salad with Japanese sesame oil dressing


Lettuce Wedge Salad
Print Recipe
Crisp, refreshing and immensely flavourful salad. Quick and easy to make, though it looks a bit daunting.
  • CourseSalad
  • CuisineFusion, Japanese
Servings Prep Time
4 people 20 minutes
Passive Time
30 minutes
Servings Prep Time
4 people 20 minutes
Passive Time
30 minutes
Ingredients
  • 2 heads lettuce fresh
For the dressing
  • 6 Tbspn Sesame oil
  • 2 Tbspn light soya sauce
  • 2 Tspn White wine vinegar
  • 1.5 Tspn salt
  • 3.5 Tbspn garlic Minced
  • 2 Red thai , or bird's eye chilly dried or fresh
  • 3/4th Tspn Black Pepper ground
Last garnish
  • 2.5 Tbspn Sesame Seeds Roasted
Servings: people
Instructions
  1. Chop the lettuce vertically, from the root to the top.
    Chop the lettuce vertically, from the root to the top.
  2. Dunk in ice water, and drain well after 30 minutes.
  3. Now take the chopped side, the side where you can see all the layer of leaves, and place that to your right.
    Now take the chopped side, the side where you can see all the layer of leaves, and place that to your right.
  4. Then, take three, (if you have a larger head of lettuce then take four or five) long wooden barbecue sticks, (they should be larger than cocktail toothpicks - about 4 to 5 inches long) and leaving an inch from the side of the cut side of the lettuce, poke them at 1 and 1/2 inches interval. This is done 90 Deg from the cut side of the lettuce, and not parallel to the root and cut side of the lettuce.
    Then, take three, (if you have a larger head of lettuce then take four or five) long wooden barbecue sticks, (they should be larger than cocktail toothpicks - about 4 to 5 inches long) and leaving an inch from the side of the cut side of the lettuce, poke them at 1 and 1/2 inches interval. This is done 90 Deg from the cut side of the lettuce, and not parallel to the root and cut side of the lettuce.
  5. The cutting will happen from the non cut side of the lettuce. The one which is the root side and on your left. The opposite side of the cut side of the lettuce.
    The cutting will happen from the non cut side of the lettuce. The one which is the root side and on your left. The opposite side of the cut side of the lettuce.
  6. Taking your knife and leaving an inch from the uncut side of the lettuce, cut off the part with the toothpick inserts. The toothpick inserts should now be all in a row, and the large wedge should have separated from the main head off lettuce.
    Taking your knife and leaving an inch from the uncut side of the lettuce, cut off the part with the toothpick inserts. The toothpick inserts should now be all in a row, and the large wedge should have separated from the main head off lettuce.
  7. Now, just lop off individual wedges, seeing that you get as close to a square as possible.
    Now, just lop off individual wedges, seeing that you get as close to a square as possible.
  8. Trip the wayward leaves, and push the wedges little further into the bbq stick.
  9. Repeat the same way with the balance left over lettuce head.
  10. if serving later, keep covered, in ice water.
Sesame oil dressing
  1. Mix all the ingredients and give it a good whisk.
Finishing
  1. Rotate the lettuce wedges, and drizzle dressing generously.
  2. Serve Chilled. Garnish with sesame seeds just before serving.
Share this Recipe

Filed Under: Brunch, Dinner, Lunch Tagged With: cermaic knife, lettuce, lettuce wedge salad, light soya sauce, minced garlic, sesame oil. garlic

Mexican Fruit with Tajin

July 14, 2016 By appu Leave a Comment

Peaches and Pineapples with Tajin

Peaches and Pineapples with Tajin

Another Mexican dish? I’m telling you – the last trip to San Diego, I really revved on Mexican Food. It was so very different from the typical Enchilada, Burrito, Nachos!

San Diego stands on the edge of Mexico. My son was told in his orientation, to be very careful while on the local train. One stop further and he would be in Mexico, and if he did not have his visa and college papers, he would land into big trouble. That’s how close Mexico is! Now you can imagine, the Mexican food influence in San Diego!

The Mexican Street Food, was so yum! Very close to Indian food in some ways, yet a different taste bud was touched with each dish. This particular Fruit Salad was and is my favourite. The only hitch is you have to get hold of the Tajin mix, available easily online and in supermarkets all over USA.

Tajin

Tajin

Mexican fruit salad was served to us in a broad glass. They stuffed in strips of Pineapple, Apple, Mango, (and when I made it in India, I used Alphonso — OOOH! the taste!!) Melon, and a dried spicy mango, easily available in Trader Joe. The bottom of the glass had a huge dollop of this Tajin mix, and it copiously laden on the fruits too. I wanted to shove my face into the glass and lick up all the Tajin, once the fruits were over. My son had a friend join us for lunch that day. Poor chap must have thought his friend’s mom is completely addled!

watermelon wit tajin

watermelon wit tajin

Eat it on a hot day – refreshing, on a rainy day – soothing, on a blustery windy day – warming. This dish just makes you upbeat! The sour, tangy, mildly spicy (it looks very spicy, but is not), will make you want to sing and dance – the happy tune emanating from your palate. It hits all the right spots in your taste buds, and sends a zing up your body, almost like an adrenalin rush.

Use it with whatever fruit catches your fancy. Strawberries, Kiwi, Apples, Oranges, Pineapple, Peaches, Dried Fruits etc.

Pineapple with Tajin

Pineapple with Tajin

It takes only minutes to make – the major task being cutting the fruits. We had it with drinks, and it went very well with Whisky and Beer.

Peaches with Tajin

Peaches with Tajin

Let me know if you went as crazy over this dish as I did.


Mexican Fruit with Tajin
Print Recipe
Easy and immensely satisfying dish to make.
  • CourseSalad, Sides, Snack
  • CuisineMexican
Servings Prep Time
6 people 15 minutes
Servings Prep Time
6 people 15 minutes
Mexican Fruit with Tajin
Print Recipe
Easy and immensely satisfying dish to make.
  • CourseSalad, Sides, Snack
  • CuisineMexican
Servings Prep Time
6 people 15 minutes
Servings Prep Time
6 people 15 minutes
Ingredients
  • 500 gms Pineapple Cut into thick strips 3 inches long
  • 2 Mangoes Peeled and cut into thick slices
  • 2 Peaches Peeled and cut into thick slices
  • 3 pieces Dried Mango (Trader Joe) Cut to equal sizes
  • 1 Orange Peeled and segments separated.
Tajin Mix
  • 5 Tablespoon Tajin Mix
  • 4 Tablespoon lemon juice
Servings: people
Instructions
  1. Cut all the fruits and Chill.
  2. Add Tajin and Lemon juice. Add the juice a little at a time. The mixture should be a thick paste and not runny.
  3. Tajin mix already has dried lemon in it, so you don't want to drown the Tajin in too much lemon.
  4. You can make more Tajin, if the mix is less than you need. If making less the ratio become 1:1 - Tajin powder : lemon juice.
Assembling
  1. Arrange all the fruits in a dish.
  2. Drizzle the Tajin mix over the fruits.
  3. Serve a small bowl of the Tajin mix with the fruits. Some people might want to dip in for an extra dose of this amazing mix.
Share this Recipe

Filed Under: Snacks Tagged With: amazing, fruits, mexican street food, salad, sour, spicy, trjin, vegetarian

Meet the Author

For the 21 years and some months that I have been alive, there has been this crazy, eccentric, always-charged-up woman with a full-time job of being a mother to 6 (2 children, 4 dogs).

In her spare time she blasts music on her DJ console, reads like a maniac, downloads shows (because God forbid she runs out of something to watch), runs an entire household, and to top it all off, manages a very successful catering business which makes the most delicious food in the entire world. Once you have her food, everything else will taste like stale socks.

This is what you call "Maa ke haath ka khana".

- Kanak

Subscribe to Blog via Email

RECIPE BY CATEGORY

Copyright © 2023 THE RECIPE LARDER