THE RECIPE LARDER

  • Home
  • Nuts and Bolts, Sauces and Pans
  • Recipes
  • Contact

Kachcha Sambhar (raw sambhar)

August 25, 2016 By appu 4 Comments

kachcha sambhar

I was all set to meet the husband for a romantic lunch, but Bangalore being crowded, overpopulated, Bangalore, the traffic was such that it was either the lunch or the airport. And that airport had a plane parked which was going to take us to Goa! So really there was no dispute, the airport on time – it was.


I surprised our caretaker with a lunch request. She wasn’t prepared to make anything since I had announced gleefully about my romantic plans. So she hemmed and hawed, wondering what to make. (And I was feeling fussy about food that day!) Her husband (I have mentioned him before in my blogs. He is a complete foodie- for which I am eternally grateful!) Well her husband suggested “Kachcha Sambhar” in his typical local accent. It took him three repeats of the word before I realised that is what he actually meant. Raw Sambhar.

I have learnt to experiment and sometimes leave the suggestions to the experts. AND I WAS NOT DISAPPOINTED. In fact, I was in food paradise. Every spoonful going in was ambrosia. Now I love garlic, and I love spice, and the most fun part was it has not one drop of oil!! Perfect right??

We did take off to Goa, and we had an amazing time, caught up in that leftover romance and all that! 😛 But I raved and raved about the Kachcha Sambhar, and he finally told me to use other methods to turn him on!! ( 😛 we are a foodie family!!)

Here is the recipe — the tomatoes have to be burnt — burnt black on a high flame. Wait for it to cool, and skim the skin off. Please do wait for it to cool — this way the skin comes off and does not leave small pieces of black burnt skin behind. We don’t want any black stuff in the sambhar. Same goes for the green chilly.

This is a very spicy dish. Deseeding the chilly reduces the spice. If you want it less spicy, reduce the quantity of the chilly, but don’t delete it completely. That would be a SIN! and Karma will pay you back!!

Tastes absolutely amazing with rice and a bland veggie. I love it with chilla. You make your own combinations and message me.

I was on the floor worshipping this dish! Hope you like it too!

Ciao!!


Kachcha Sambhar (raw sambhar)
Print Recipe
Quick, elegant and earth shatteringly tasty!
  • CourseSide Dish
  • CuisineSouth Indian
Servings Prep Time
4 people 5 minutes
Passive Time
5 minutes
Servings Prep Time
4 people 5 minutes
Passive Time
5 minutes
Kachcha Sambhar (raw sambhar)
Print Recipe
Quick, elegant and earth shatteringly tasty!
  • CourseSide Dish
  • CuisineSouth Indian
Servings Prep Time
4 people 5 minutes
Passive Time
5 minutes
Servings Prep Time
4 people 5 minutes
Passive Time
5 minutes
Ingredients
  • 2 tomatoes large size
  • 1 Green Chilly medium spicy
  • 1 tspn salt
  • 1 tbsn + tspn onions very very finely chopped
  • 1 Tspn garlic very very finely chopped
  • 1 tbspn corriander roughly torn
  • 1.5 Cups Water Clean, filtered.
Servings: people
Instructions
  1. Burn the tomato over high flame. Tomato should be rotated. It should char completely.
    Burn the tomato over high flame. Tomato should be rotated. It should char completely.
  2. Burn the green chilly over high flame. Rotate and burn till completely charred.
  3. Let the tomato and chilly cool.
  4. When cooled, peel the black skin off the tomato and discard.
  5. Wash your hands so that no black stuff sticks back on the peeled tomato
  6. Chop as finely as possible. This reduces the time required later while pureeing with hand blender.
  7. Peel the black layer of the green chilly. Deseed the chilly. (This is very important)
  8. Chop the chilly into small pieces.
  9. To a pot, add the tomatoe, green chilly, salt and water. Mix well with a hand blender. No large pieces of tomato should be left.
  10. There will be a few small pieces of tomato floating around, let them be.
  11. Transfer contents to a serving bowl, add onions, garlic and garnish with corrinader. Serve cold.
Share this Recipe

Filed Under: Sides Tagged With: garlic, no oil, onion, puree, quick and easy, sambhar, tomatoes, vegetarian

Puran Poli

May 31, 2016 By appu 2 Comments

Aloha! From Maui – Hawaii!

It’s been a busy happy week for us. Our daughter graduated with double majors in History and Anthropology! What a ceremony and what a delightful time for us proud parents. A huge bunch of us attended her graduation – her grandparents, brother, parents and her many many loyal friends. We hooted and cheered, and of course, her dad n me wept quite openly.

Will post pictures soon……! It’s all in the camera right now, and we are vacationing in Hawaii!


————————————————————————————————————————————————-

puran poli

puran poli

It’s a recipe from Rekha once more. Rekha of the serene nature and yummy cooking!

The recipe is really tedious for the first time. But once you make it (and you will – again and again, I promise you), it will become easier and easier.

puran poli - cooked to perfection

puran poli – cooked to perfection

The trick is in the dough. Once you have got that right, everything falls into place as easily as a beer in a glass.

She made it on a plastic surface, but she said using a banana leaf gives amazing results. “The flavour of the leaf seeps in”, she said.

I have given the measurement for the water, but each flour behaves differently from the other. Some soak up too much water, while others use less. Use the water little at a time, till you get the right consistency. I have put up images and videos for the same.

Stack Of Puran Poli

Stack Of Puran Poli

Without further ado – here is the recipe.

the filling of the poli

the filling in the poli


Puran Poli
Print Recipe
A little work, but the final dish will have you dancing.
  • CourseMain Course
  • CuisineIndian, South Indian
Servings Prep Time
15 pieces 30 minutes
Cook Time
45 minutes
Servings Prep Time
15 pieces 30 minutes
Cook Time
45 minutes
Puran Poli
Print Recipe
A little work, but the final dish will have you dancing.
  • CourseMain Course
  • CuisineIndian, South Indian
Servings Prep Time
15 pieces 30 minutes
Cook Time
45 minutes
Servings Prep Time
15 pieces 30 minutes
Cook Time
45 minutes
Ingredients
For the filling
  • 1 Cup Channa Dal (Yellow split peas)
  • 1 Cup Dried Coconut Desiccated / grated
  • 1 Cup Jaggery Crumbled / grated
  • 2 Pods Cardomom
For the dough
  • 1 1/2 Cup Maida (Refined flour)
  • 1 Cup Water
  • 1/4 Cup oil
For making the poli
  • 15 inch square food grade plastic
  • 3/4 Cup Ghee (Clarified Butter)
Optional
  • 15 inch Banana leaf
For cooking
  • Mortar Pestle
  • heavy bottomed pan
  • A Big Plate
  • Non stick Pan
Servings: pieces
Instructions
The filling.
  1. Wash and boil the channa dal, till it is well cooked. It should not be over cooked. The grains should look whole, and when pressed with a spoon should smash.
  2. Once cooked, leave it to drain completely. No water should be left in the dal.
  3. Deseed the cardamom pods and smash the seeds in a mortar.
  4. In a heavy bottomed pan, add the drained dal, jaggery, cardamom pods and desiccated coconut. Stir and cook for 5 minutes, till the jaggery just melts.
  5. Scrape out on a plate and let it cool.
  6. Once cool, blend it in a heavy duty blender. Blend little at a time. The mixture will be very dense and you might think of adding a little water. DO NOT DO IT. Be patient.
  7. Make 35 gm oblong balls.
For the dough.
  1. Make a sticky dough using a little water at a time. Keep your hands oiled, using the oil mentioned in the ingredient list. Do not pour the oil in the dough mixture. PLEASE SEE THE VIDEO AT THE BOTTOM OF THE RECIPE FOR THE DOUGH TEXTURE.
  2. Once the dough is kneaded, let it rest for 15 minutes.
  3. Make 25 gram balls.
Filling
  1. Take the dough balls and flatten them into a 2 inch diameter circle.
  2. Take the balls made with the filling, and roll in into an oblong shape. It should look way larger than the dough ball.
    Take the balls made with the filling, and roll in into an oblong shape. It should look way larger than the dough ball.
  3. Put the filling into the ball and start pushing the filling into the ball, gently but firmly. At the same time keep pushing the dough over towards the top of the filling. Basically the dough has to engulf the filling. PLEASE SEE VIDEO NO 2 AT THE BOTTOM OF THE RECIPE FOR INSTRUCTIONS ON HOW TO FILL THE FILLING INTO THE DOUGH.
  4. Once the filling has gone into the dough, cover the top with a twist of the dough and pat it into a 3 inch circle. KEEP YOUR PALMS AND FINGERS OILED. (I'm glaring at you when I say that!!)
How to roll the poli
  1. Oil the banana leaf. If you are not using a banana leaf, you will need a 15 inch square of food grade plastic.
  2. Keep spreading the poli till it is really thin and you think now it will break. PLEASE SEE VIDEO NO 3 AT THE BOTTOM OF THE RECIPES FOR INSTRUCTIONS.
Cooking
  1. Heat the non stick pan. Keep the flame / intensity to medium high.
  2. Ladle a teaspoon of ghee into the non stick pan.
  3. Gently lift the poli off the banana leaf and put into the non stick pan.
  4. Spread another spoon of ghee all around the poli
  5. After a few minutes lift and turn the poli. The non cooked side will now be touching the non stick pan.
  6. Add another spoon of ghee and take off the fire, after 3 odd minutes.
  7. The filling is dry and the flour used for the dough is greedy for ghee. You may add as much as you require or as less. But remember, that hot poli eaten with a small spoon of hot ghee spread on it tastes the best.
  8. Serve warm with ghee and red chilli chutney. (See previous blog!)
    Serve warm with ghee and red chilli chutney. (See previous blog!)
Recipe Notes

http://therecipelarder.com/wp-content/uploads/2016/05/dough-texture.mp4


http://therecipelarder.com/wp-content/uploads/2016/05/how-to-fill_CLIPCHAMP_keep.mp4

http://therecipelarder.com/wp-content/uploads/2016/05/how-to-make-it_CLIPCHAMP_keep.mp4


Share this Recipe

Filed Under: Dinner, Lunch Tagged With: coastal cusine, happy meal. yum. yummly, main course, pural poli, south indian, vegetarian

Red Chilli Chutney – From Bangalore.

May 23, 2016 By appu 4 Comments

In the din and pollution of Bangalore, exists a quiet retreat. The garden is lush, and in the centre of it all stands my favourite tree – The Parijat. There is something about the small white flower with the orange stems. It has a hard grip on my list of all time favourites. In the days of the old, my grandmother and her sisters in law, would break the orange stem, and make a dye with it. They used it to colour their sarees and wore them for auspicious occasions.

The parijat flower

The parijat flower

In that serene atmosphere, lives Rekha with her husband and daughter. When she got married, her very foodie husband was appalled at her cooking skills, so he took her to his mother’s home for some training. Rekha being Rekha, understood that way to her husband’s heart is through his stomach (as it is with mine!) She dedicated her self to traditional cooking training. I say “well done” husband, because otherwise, we would have lost out on eating out of the hands of one of the best cooks I have ever met.

Rekha is clean, neat and extremely efficient. Her recipes have been so well measured, that nothing goes waste.

In the next few weeks, I will be adding a few of her recipes. The food you must have eaten, but her’s are worth trying out once.

red chutneu feature

Here is a simple Red Chilli Chutney. I asked her the traditional name for it, she just shrugged and said – Red Chilli Chutney. Well then. So be it!!

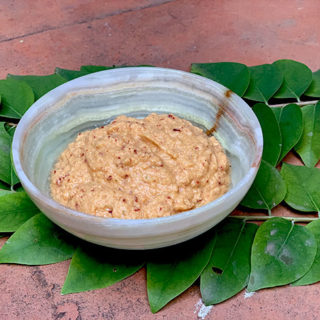
Since the time I made it, I’ve had it with everything – toast, pooran poli, in a salad. I even layered the base of Lasagna sheets with it, before putting in the fillings. It is not as spicy as it looks.

Red Chutney with anything

Red Chutney with anything

The taste of the jaggery and imli (tamarind), blend with the chillies, giving it the right tang and a hint of spiciness. For the palate that does not mind experimenting with a little spice, this recipe is a must try. And it’s adorably simple.

Red Chilli Chutney

Red Chilli Chutney

Ingredients for the chutney. Sans the red chillies

Ingredients for the chutney. Sans the red chillies


Red Chilli Chutney - From Bangalore
Print Recipe
For the complex tastes that hit your palate, this is a very simple, easy and quick recipe to make. Phenomenally versatile....
  • CourseSauces and Jams, Side Dish
  • CuisineSouth Indian
Servings Prep Time
150 grams appx 15 minutes
Cook Time Passive Time
5 minutes 5 minutes
Servings Prep Time
150 grams appx 15 minutes
Cook Time Passive Time
5 minutes 5 minutes
Ingredients
  • 75 gms Kashmiri Red Chillies
  • 1 tspn Jeera (Cumin) seeds
  • 1 small Ball of Tamarind
  • 1 small Ball of Jaggery
  • 1/2 tspn salt
  • 1 Stem Curry Leaves
  • 4 pods garlic peeled.
  • 1/4 Cup Drinking water To blend.
  • 1/4 tspn Methi (fenugreek) seeds
Servings: grams appx
Instructions
  1. Take off the stems of the red chillies and soak them whole, in room temperature water.
  2. While the chillies soak, dry roast the methi, jeera and curry leaves, on a non stick pan. Roast till the jeera gives off fragrance and the curry leaves look just a bit wilted.
  3. After 15 minutes drain the chillies and throw away the water.
  4. Blend together, soaked red chillies, dry roasted methi, jeera and curry leaves, tamarind, jaggery, garlic and salt in a blender. Use a little water to blend.
  5. Make a coarse paste. Don't blend till its too fine.
  6. Stores well in refrigerator for a week.
Share this Recipe

Filed Under: Chutneys Tagged With: garlic, jaggery, no oil, red chilliy chutney, spicy, tamarind, vegetarian, versatile, yum

Meet the Author

For the 21 years and some months that I have been alive, there has been this crazy, eccentric, always-charged-up woman with a full-time job of being a mother to 6 (2 children, 4 dogs).

In her spare time she blasts music on her DJ console, reads like a maniac, downloads shows (because God forbid she runs out of something to watch), runs an entire household, and to top it all off, manages a very successful catering business which makes the most delicious food in the entire world. Once you have her food, everything else will taste like stale socks.

This is what you call "Maa ke haath ka khana".

- Kanak

Subscribe to Blog via Email

RECIPE BY CATEGORY

Copyright © 2023 THE RECIPE LARDER