THE RECIPE LARDER

  • Home
  • Nuts and Bolts, Sauces and Pans
  • Recipes
  • Contact

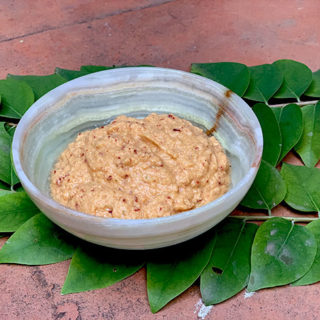
Amla Chutney

July 9, 2019 By appu 2 Comments

Amla Chutney
Print Recipe
A quick, easy and healthy chutney, to serve with - everything!!
  • CourseAppetizer, Breakfast, Side Dish
  • CuisineIndian
Servings Prep Time
100 gms 10 minutes
Passive Time
5 minutes
Servings Prep Time
100 gms 10 minutes
Passive Time
5 minutes
Amla Chutney
Print Recipe
A quick, easy and healthy chutney, to serve with - everything!!
  • CourseAppetizer, Breakfast, Side Dish
  • CuisineIndian
Servings Prep Time
100 gms 10 minutes
Passive Time
5 minutes
Servings Prep Time
100 gms 10 minutes
Passive Time
5 minutes
Ingredients
  • 100 gms amla
  • 1 Green Chilly
  • 1 inch Ginger chopped
  • 2 cloves garlic
  • 1 kashmiri red chilly
  • 1 tbspn Sesame Seeds
  • 1 tbspn Water
  • 1 tspn salt
Servings: gms
Instructions
  1. Add all ingredients to a grinder and grind to a paste
  2. Serve with lunch, dinner, pakodas, snacks, etc.
  3. Refrigerate for up to 4/ 5 days in a closed container
Recipe Notes

Bangalore is always a green and refreshing break for me. This time I was there only for a day, but I took the time to wander around in the garden. My friend Nishi and me saw our Amla tree flourishing with green gorgeous star shaped fruits.

The ones we have growing in our garden are not the traditional variety of Amla. We have a variety called Harpharouri in Hindi, or Malay gooseberry or Tahitian gooseberry. But as tasty and as edible.


You can of course and must use the Amla found in market. No point going on a hunt for this particular kind!

We had met after a long time, so we spent the entire day with each other. It was time for some drinks and snacks, and I must say that the Amla Chutney went well with everything - masala papad, pakodas, rice crisps, chips. We had some of it for dinner too, with our chapatti and veggies.

It's really simple to make. Takes only a few minutes. The only time consuming part would be the de seeding of the Amla. It's healthy. The Amla gives you a shot of Vitamin C (who does'nt need an extra shot of that huh?), the sesame seed has calcium and the chillies build immunity not to mention add a super zest to the whole thing.

Do send me comments. What did you eat it with? How did it taste? 

Cheers and Ciao till we meet again.

Share this Recipe

Filed Under: Chutneys Tagged With: amla, indiangooseberry, Vegan

Lasooni Palak

November 30, 2017 By appu 2 Comments


If you have been following my blog, you would have realised that my favourite flavour is garlic. I have grown up in a family that cooked without onion and garlic, for religious purposes. Garlic is said to have “tamsik” qualities. Tamsik food is considered unhealthy, and it brings out the negative in you, gives rise to anger and other repugnant emotions. During the Vedic times, everything that was considered not good, was given a religious decree of non consumption.

I have realised over the years that a lot of do’s and dont’s of the Vedic ages are now being proven scientifically true. Take for example the benefits of turmeric. The world over, turmeric is prescribed for it’s qualities. But there is also the other side of science, which has proven some foods that were earlier considered bad, are now proven to have health benefits. Garlic is very good for the heart.

As for me – I like to live dangerously and garlic is very good for my soul!

I can have garlic in every single meal, and not get tired of the taste. I think I am still making up for my lost childhood!


Nishi enjoying the taste!

Lasooni Palak, or Saag as its called in some places, is my favourite version of consuming spinach. I like the smooth texture, but I also like the chopped version. So I came up with a recipe that was a mix of both. I like my food on the little spicier side (more Tamsik me!!) and somehow the taste of garlic, rough and smooth spinach with a hint of fire sets me in the absolutely perfect mood!

I experimented with this recipe in the green environs of Mahabaleshwar.  The spinach was not fresh off the farm, but it was still from the hills of Panchgani, and as fresh as one could possibly get. But the spinach I grow in our farm, is far superior, completely organic and I pluck it when still in baby stages. The result is a sweeter taste, with a hint of bitterness and then of course we add the ever loved garlic and fiery spices. In the near future, when the garlic grows green and fragrant in my farm, I will try this same recipe with new green garlic stalks. The taste will be a little different – more herby!

The recipe goes best with chappati, made with whole wheat or jowar.


Lasooni Palak or Lasooni Saag
Print Recipe
Greens flavoured with heady garlic, a perfect Indian veggie for any meal.
  • CourseMain Course
  • CuisineIndian
Servings Prep Time
2/3 people 15 minutes
Cook Time
15 minutes
Servings Prep Time
2/3 people 15 minutes
Cook Time
15 minutes
Lasooni Palak or Lasooni Saag
Print Recipe
Greens flavoured with heady garlic, a perfect Indian veggie for any meal.
  • CourseMain Course
  • CuisineIndian
Servings Prep Time
2/3 people 15 minutes
Cook Time
15 minutes
Servings Prep Time
2/3 people 15 minutes
Cook Time
15 minutes
Ingredients
  • 3 Bunch Spinach (each bunch has appx 25-30 leaves)
Tadka 1
  • 30 cloves garlic roughly chopped
  • 3 Green Chilly roughly chopped
  • 1 small onion roughly chopped
  • 1 Tspn Jeera (cumin)
  • 1 Red Kashmiri Chilly whole
  • 1 Tbspn oil
  • 1 tspn salt
Tadka 2
  • 1 Tbspn oil
  • 1 Bay Leaf whole
  • 1 tspn Jeera (cumin)
  • 1 Red Chilli Kashmiri whole
  • 1 tspn salt
  • 1/4 Cup Water
  • 1 Tbspn Yoghurt
Servings: people
Instructions
Spinach
  1. Blanch all three bunches of spinach in hot water. After 2/3 minutes, drain the hot water and dunk the spinach into ice cold water. This helps it to retain its colour.
  2. Finely chop appx one bunch of spinach and leave aside.
  3. Roughly chop the remaining two bunches of spinach and leave aside.
Tadka 1 with roughly chopped spinach
  1. In a pan, add and heat the oil. Add the jeera till it splutters. Now add the green chillies, red chilly and let these splutter.
  2. Now add the onion and garlic and cook till a bit brown.
  3. Add the roughly chopped spinach.
  4. Add salt and mix well.
  5. Leave aside to cool.
  6. Once its cool, run it in a mixer grinder till it becomes a fine paste. All the ingredients should be made into a paste, red chillies and all.
Tadka 2 with finely chopped spinach
  1. Heat oil in a pan. When hot add the jeera.
  2. When it splutters add the bay leaf and red chilly.
  3. Add the finely chopped spinach.
  4. Now add the salt and the water.
  5. Mix well and leave aside.
Finishing the dish.
  1. Add the spinach which has been ground to a paste, to the finely chopped spinach in the pan. The heat should be on.
  2. Add the yoghurt and mix well. Voila your dish is ready!
  3. Serve hot with any form of Indian Bread.
Share this Recipe

Filed Under: Vegetable Tagged With: fibre, glutenfree, healthy, indian, indianmeal, ironrich, serve with indian bread, spinach, vegetable

Kachcha Sambhar (raw sambhar)

August 25, 2016 By appu 4 Comments

kachcha sambhar

I was all set to meet the husband for a romantic lunch, but Bangalore being crowded, overpopulated, Bangalore, the traffic was such that it was either the lunch or the airport. And that airport had a plane parked which was going to take us to Goa! So really there was no dispute, the airport on time – it was.


I surprised our caretaker with a lunch request. She wasn’t prepared to make anything since I had announced gleefully about my romantic plans. So she hemmed and hawed, wondering what to make. (And I was feeling fussy about food that day!) Her husband (I have mentioned him before in my blogs. He is a complete foodie- for which I am eternally grateful!) Well her husband suggested “Kachcha Sambhar” in his typical local accent. It took him three repeats of the word before I realised that is what he actually meant. Raw Sambhar.

I have learnt to experiment and sometimes leave the suggestions to the experts. AND I WAS NOT DISAPPOINTED. In fact, I was in food paradise. Every spoonful going in was ambrosia. Now I love garlic, and I love spice, and the most fun part was it has not one drop of oil!! Perfect right??

We did take off to Goa, and we had an amazing time, caught up in that leftover romance and all that! 😛 But I raved and raved about the Kachcha Sambhar, and he finally told me to use other methods to turn him on!! ( 😛 we are a foodie family!!)

Here is the recipe — the tomatoes have to be burnt — burnt black on a high flame. Wait for it to cool, and skim the skin off. Please do wait for it to cool — this way the skin comes off and does not leave small pieces of black burnt skin behind. We don’t want any black stuff in the sambhar. Same goes for the green chilly.

This is a very spicy dish. Deseeding the chilly reduces the spice. If you want it less spicy, reduce the quantity of the chilly, but don’t delete it completely. That would be a SIN! and Karma will pay you back!!

Tastes absolutely amazing with rice and a bland veggie. I love it with chilla. You make your own combinations and message me.

I was on the floor worshipping this dish! Hope you like it too!

Ciao!!


Kachcha Sambhar (raw sambhar)
Print Recipe
Quick, elegant and earth shatteringly tasty!
  • CourseSide Dish
  • CuisineSouth Indian
Servings Prep Time
4 people 5 minutes
Passive Time
5 minutes
Servings Prep Time
4 people 5 minutes
Passive Time
5 minutes
Kachcha Sambhar (raw sambhar)
Print Recipe
Quick, elegant and earth shatteringly tasty!
  • CourseSide Dish
  • CuisineSouth Indian
Servings Prep Time
4 people 5 minutes
Passive Time
5 minutes
Servings Prep Time
4 people 5 minutes
Passive Time
5 minutes
Ingredients
  • 2 tomatoes large size
  • 1 Green Chilly medium spicy
  • 1 tspn salt
  • 1 tbsn + tspn onions very very finely chopped
  • 1 Tspn garlic very very finely chopped
  • 1 tbspn corriander roughly torn
  • 1.5 Cups Water Clean, filtered.
Servings: people
Instructions
  1. Burn the tomato over high flame. Tomato should be rotated. It should char completely.
    Burn the tomato over high flame. Tomato should be rotated. It should char completely.
  2. Burn the green chilly over high flame. Rotate and burn till completely charred.
  3. Let the tomato and chilly cool.
  4. When cooled, peel the black skin off the tomato and discard.
  5. Wash your hands so that no black stuff sticks back on the peeled tomato
  6. Chop as finely as possible. This reduces the time required later while pureeing with hand blender.
  7. Peel the black layer of the green chilly. Deseed the chilly. (This is very important)
  8. Chop the chilly into small pieces.
  9. To a pot, add the tomatoe, green chilly, salt and water. Mix well with a hand blender. No large pieces of tomato should be left.
  10. There will be a few small pieces of tomato floating around, let them be.
  11. Transfer contents to a serving bowl, add onions, garlic and garnish with corrinader. Serve cold.
Share this Recipe

Filed Under: Sides Tagged With: garlic, no oil, onion, puree, quick and easy, sambhar, tomatoes, vegetarian

Hummus Beiruti

July 26, 2016 By appu Leave a Comment

I had Hummus for the first time as an adult. It picked up as a rage, and every party had a bowl of Hummus, with Pita. Then came the Lavash. Crisp flat wheat savouries topped with seeds.

Hummus with Lavash.

Hummus with Lavash.

I had Hummus for the first time some 20 years ago, in a restaurant called Olive. They had the typical platter of Baba Ganoush, Hummus and Tzatziki. At that time – I thought it was made with magic. How could something so tasty, so creamy be so amazing and healthy? When I learnt to make hummus, I was amazed at how easy it was, but I never seemed to like it as much as I liked the ones in a restaurant.

The fact is – I used terrible shortcuts. Sesame instead of Tahini. Sacrilege!! (my logic – Tahini is made out of sesame right??) Too much garlic, not enough creamy texture — blah blah!

I thought I would never be able to replicate the hummus, we have in good Mediterranean restaurants.I love the Hummus Beiruti. Its creamy with a mild tang of spice. Polishing off a small bowl is no big feat.

Hummus Beiruti

Hummus Beiruti

I tried Hummus again, (after my many not so good tries) and this time I used the proper Tahini. Another thing a chef friend of mine suggested was using cold water.

In this recipe, I use a little leftover water after boiling the chickpeas. I like to soak the chickpeas at night, and cook it the next morning and make the Hummus a few hours later. The water left over from cooking the chickpeas and the chickpeas itself are cooled down and refrigerated.

The hard work is soaking and cooking, after that its the quickest recipe you can make.

Serve it with a Rocket and cucumber salad, over toast with Avocado, obviously with Pita and Lavash. So many ways!! Do write in and tell me how you like to present it.

 Hummus


                                                                               Hummus

I made Hummus for my son last evening, thinking he could have it with Avocado. Confidently, I also made a small olive oil, garlic and Sumac drizzle for the top. Failure of failures! – the Avocado was not ripe enough and we had to chuck it. (Once cut it turns black quicker than a piece of charcoal rubbed on a face!) Then he suggested that we caramelise some onions, and top it with the same. Bigger flop. I had no brown sugar with me, and any case something made in a hurry not always turns out good. It was sticky …. basically – a flop!! I was flapping around about what he would eat, but he said the Hummus was good enough to eat on its own.. YAAAY!! Hummus saved the day!

hummus

hummus

hummus


Hummus Beiruti
Print Recipe
A Meditteranean staple, creamy and yummy!
  • CourseAppetizer
  • CuisineMediterranean
Servings Prep Time
4 people 10 minutes
Cook Time Passive Time
15 minutes 12 hours
Servings Prep Time
4 people 10 minutes
Cook Time Passive Time
15 minutes 12 hours
Hummus Beiruti
Print Recipe
A Meditteranean staple, creamy and yummy!
  • CourseAppetizer
  • CuisineMediterranean
Servings Prep Time
4 people 10 minutes
Cook Time Passive Time
15 minutes 12 hours
Servings Prep Time
4 people 10 minutes
Cook Time Passive Time
15 minutes 12 hours
Ingredients
  • 1/2 Cup Chick Peas Soaked over night
  • 2 Tblspn olive oil Virgin if possible
  • 2 Tblspn Yogurt
  • 5 Pods garlic peeled
  • 2 Tblspn Tahini
  • 1 Tblspn Water left over from cooking chick peas cold
  • 2 Tblspn Cold Water
  • 1 Tspn salt
  • 1/2 Tspn Cumin Powder
  • 1/3 Green Chilly Deseeded and chopped
  • 1/2 Tspn lemon juice
Garnish
  • 1 Tspn parsley chopped fine
  • 1/2 Tspn Sesame Seeds Roasted
  • 1 Tblspn olive oil
  • 1/2 Tspn Paprika
  • 1/4 Tspn salt
Servings: people
Instructions
  1. Soak the chick peas over night.
  2. Wash and cook till its soft. It should not disintegrate. It should retain its shape. I like to use a pressure cooker for this.
  3. Drain the water, cool and refrigerate.
  4. Cool chick peas and refrigerate.
  5. After a few hours, add all ingredients in a blender and blend till you get a fine paste. Keep opening the jar and spoon the mixture stuck on the sides back into the jar. PS: if you use the Tecnora brand of mixie (available on amazon) which comes with a very handy stirrer in the jar. While blending, one can keep stirring the mixture, so that it blends easily. You don't have to keep opening the jar.
  6. Once you have the consistency you want, plate it and garnish with olive oil, sesame seeds, parsley and mint leaves.
  7. Serve with Pita, Crisp Pita and Lavash.
  8. NOTE ON TAHINI: When using Tahini, please stir well and take from the bottom of the jar, as the solids settle way down.
Share this Recipe

Filed Under: Cocktail Parties, Sides, Snacks Tagged With: Chick Peas, Lavash, Mediterranean, Vegan, vegetarian

Meet the Author

For the 21 years and some months that I have been alive, there has been this crazy, eccentric, always-charged-up woman with a full-time job of being a mother to 6 (2 children, 4 dogs).

In her spare time she blasts music on her DJ console, reads like a maniac, downloads shows (because God forbid she runs out of something to watch), runs an entire household, and to top it all off, manages a very successful catering business which makes the most delicious food in the entire world. Once you have her food, everything else will taste like stale socks.

This is what you call "Maa ke haath ka khana".

- Kanak

Subscribe to Blog via Email

RECIPE BY CATEGORY

Copyright © 2023 THE RECIPE LARDER