THE RECIPE LARDER

  • Home
  • Nuts and Bolts, Sauces and Pans
  • Recipes
  • Contact

Turkish Eggs

October 25, 2018 By appu Leave a Comment

I did it!! I finally learnt to poach eggs! And I have the very attractive legendary, Nigella Lawson to thank for it!

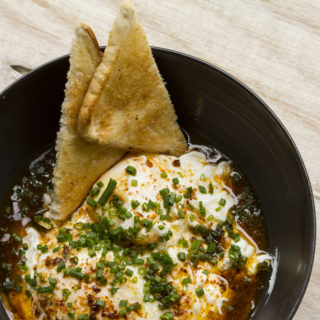
Turkish Eggs.

It’s actually so simple that it’s scary. But trust me, its really easy! I know what you must be thinking!! Nah! you say! I get it! I have no count of the number of eggs reduced to broken yolks and litres of water bubbling with broken scattered albumin! But one look at this recipe, and I can guarantee that you will be willing to try poaching eggs and you will succeed!

turkish poached eggs

This video / recipe will banish all myths about vinegar in the water, or swirling the water into a vortex, or that you need special skills to make this dubious poached egg!

When you break the egg in the water the white will move away. But as it cooks the white remembers it’s DNA and goes up and envelopes the yolk again. It’s quite interesting to note this, and reminds us to  never fail to be amazed by nature and all things natural.

This has become my favourite meal in a bowl. It’s quick, easy (yes! it is!) and super super tasty. Specially when you get to the last part where the egg yolk breaks and mixes with the curds and butter sauce! Then – it just melts in the mouth setting off a palate explosion!

I really have not much more to say in this post because you really have to taste it to know how strangled for words it will leave you!

turkish eggs

Go for it! And message me with pics!!!

Cheers!!


IMPORTANT: Do go through the notes section of the recipe for hacks and tricks!

http://therecipelarder.com/wp-content/uploads/2018/10/Turkish-Eggs-converted-with-Clipchamp-1.mp4


Turkish Eggs
Print Recipe
Soft poached eggs, hung garlicky curd and chilli butter sauce!
  • CourseBrunch, Main Course, Main Dish
  • CuisineMediterranean
Servings Prep Time
1 pax 10 min
Cook Time Passive Time
10 min 4 hours
Servings Prep Time
1 pax 10 min
Cook Time Passive Time
10 min 4 hours
Turkish Eggs
Print Recipe
Soft poached eggs, hung garlicky curd and chilli butter sauce!
  • CourseBrunch, Main Course, Main Dish
  • CuisineMediterranean
Servings Prep Time
1 pax 10 min
Cook Time Passive Time
10 min 4 hours
Servings Prep Time
1 pax 10 min
Cook Time Passive Time
10 min 4 hours
Ingredients
  • 100 gm curds / yoghurt hung for 4-5 hours
  • 1 tspn Minced Garlic
  • 1 tspn salt
  • 2 Eggs chilled
  • 1 tspn lemon juice
  • 500 ml Water (appx)
  • 1/2 tspn Paprika
  • 1/2 tspn spicy chilly flakes (can be reduced)
  • 1 tspn olive oil
  • 1 tbspn Butter
  • 1 tbspn chives finely chopped
  • Toast of your choice
Servings: pax
Instructions
  1. Hang the yoghurt / curds for 3-4 hours
  2. Transfer into a bowl, and add salt and half (ie 1/2 tspn) garlic
  3. Mix well and keep aside
  4. In slow to medium fire, set the water to boil.
  5. While water is heating, break one egg into a seive
  6. Let the extra albumin strain away
  7. Transfer gently to a cup
  8. Add half tspn lemon juice and keep ready
  9. When large bubble break to the surface of the water, reduce the fire and transfer the egg gently into the water.
  10. Poach the egg for 2 to 3 minutes
  11. Gently take it out with a slotted spoon and drain excess water
  12. Transfer on top of the curds
  13. Similarly poach the second egg.
  14. Set a pan on slow fire and, set the butter to melt.
  15. Add balance 1/2 tspn garlic and chilli flakes.
  16. Just before taking off fire add the olive oil
  17. Drizzle over the eggs
  18. Garnish with chives
  19. Enjoy with a point of toast.
Recipe Notes

Notes for perfect poached eggs:

  • The egg should be refrigerated or at least an hour before making the poached eggs.
  • Lemon juice is a must.
  • Do strain the extra egg white, it makes a difference.
  • There is no need to put vinegar in water and to make a swirling vortex. Instead the vortex and swirling water breaks the egg white and makes it into a streamy mess.
  • The water should not be rapidly boiling. If it is bring it down again to a point where large bubbles burst to the surface. Not too many bubbles, just one to three bubbles. This is the right time to slide the egg into the water.
  • Don't be in a hurry and bring up the heat. Let the egg cook slowly over 2 to 3 minutes.
  • Slotted spoon is a must. It helps drain excess water. No one wants hot water over yummy cook curds.


Share this Recipe

Filed Under: Uncategorized Tagged With: butter, butterchillysauce, buttersauce, chillies, chives, easymeal, Eggs, mealin abowl, nigellalawson, oliveoil, poachedeggs, satisfying, softeggs, turksiheggs

Guacamole

February 12, 2018 By appu Leave a Comment

avocado and all other ingredients ready and prepped for mashing

To be very frank, I’m not a huge fan of Guacamole. Actually not a huge fan of Avocado either. The son, daughter and husband love it though!!

My son is on a full blown -I am going to build my body, and eat healthy – kind of streak, and he makes a lot of Guacamole, or Guac as the kids call it.

This here, is his recipe. Quick and super easy, and very filling. He made it for me last winter when he was here on holidays, and though my eyes don’t start shining in emotional gratefulness at the sight of Guac, I did dip a couple of nachos into it and I must say I was thoroughly impressed with it.

Avocado is not easily available where I stay. It grows in abundance in Bangalore, but the taste, texture and flavour is not as good as the one available in California.  When I went to spend sometime with my daughter in San Jose – California, I accompanied her to the super market. My eyes popped out, seeing the gigantic heaps of Avocado, spilling on to the floor, overflowing from their baskets. And the price!! Oh! Boy, it was being sold for peanuts.

I wanted to take back a few with me to India, but my kid gave me a fairly accurate description of the way it would get squashed and then get in between my clothes and when I would try to pull them clothes out, I would have slimy, gooey flesh smeared on my hands ….. you get the gist, don’t you?! Disheartened I gave up the idea, but began a hunt in Bombay for good Avocados. It was quite a task. They would be either underdone or over ripe and always, always very expensive.

I finally found a store, and now I get ripe to be eaten – the day I want – type of Avocado whenever I so please. It’s still a tad expensive, but it’s exotic fruit (yes Avocado is a fruit!) in India, and we pay for the glamour.

Do try out this recipe. It’s super easy and actually mashing the fruit – I found it kind of stress relieving.

avocados

http://therecipelarder.com/wp-content/uploads/2018/02/guac-converted-with-Clipchamp.mp4

Storage

Guac gets black very fast, as it starts oxidising when exposed to oxygen in the air. Lemon helps keep its colour, but it still needs further help. As such it’s best to make Guac just before serving, but it’s not always possible. To store Guac without letting the exposure affect it, store in a air tight box, or in a bowl, and cover with cling film, letting the cling film stick right on top of the guac. When you serve the guac, you will have to scrape the guac off the cling film, but it’s worth the effort.

If you want to use only one half of the fruit, retain the stone (seed), push it back into the cavity of the left over half, and cling film it tightly and keep refrigerated. This helps to a certain level, but eventually you better consume the fruit as soon as you can.

Cheers! to good fat!


Guacamole
Print Recipe
Quick and easy recipe for a healthy snack.
  • CourseAppetizer, Snack
  • CuisineMexican
Servings Prep Time
3/4 pax 10 minutes
Cook Time
5 minutes
Servings Prep Time
3/4 pax 10 minutes
Cook Time
5 minutes
Guacamole
Print Recipe
Quick and easy recipe for a healthy snack.
  • CourseAppetizer, Snack
  • CuisineMexican
Servings Prep Time
3/4 pax 10 minutes
Cook Time
5 minutes
Servings Prep Time
3/4 pax 10 minutes
Cook Time
5 minutes
Ingredients
  • 1 Ripe Avocado
  • 2 Tbspn onions Finely chopped
  • 1 Tspn Sea Salt
  • 1 Tspn Jalapeno Chillies Fresh and finely chopped, (or any other spicy green chilly)
  • 1/2 Tspn Paprika
  • 2 Tspn Cumin Powder (jeera)
  • 2 Tspn Black Pepper Coarsely ground
  • 2 Tspn Fresh Corriander roughly chopped
  • 2 - 3 Tspn lemon juice
  • 1-2 cloves garlic optional
Servings: pax
Instructions
  1. Cut the Avocado from the stem to the root, slicing the fruit into two
  2. Pull apart the two ends, and scoop out the seed with a spoon.
  3. Using a sharp knife, make horizontal and vertical slits into the flesh of the fruit.
  4. Now scoop out the flesh with a spoon, scraping into the skin of the fruit.
  5. Put all the flesh into a bowl.
  6. Add all the ingredients into the bowl with the avocado, and start pulverising with a fork. First break down the fruit and then start mashing the rest of the ingredients with the avocado.
  7. Lastly add the lemon juice and mix some more.
  8. Voila - it's ready to serve with nacho chips.
Share this Recipe

Filed Under: Cocktail Parties, Snacks Tagged With: avacado, foodfad, garlic, glutenfree, goodfat, guac, guacamole, healthy, healthyfat, healthysnack, highfibre, mexican, nachos, nogluten, snack, tortillas, Vegan, vegetarian

Hummus Beiruti

July 26, 2016 By appu Leave a Comment

I had Hummus for the first time as an adult. It picked up as a rage, and every party had a bowl of Hummus, with Pita. Then came the Lavash. Crisp flat wheat savouries topped with seeds.

Hummus with Lavash.

Hummus with Lavash.

I had Hummus for the first time some 20 years ago, in a restaurant called Olive. They had the typical platter of Baba Ganoush, Hummus and Tzatziki. At that time – I thought it was made with magic. How could something so tasty, so creamy be so amazing and healthy? When I learnt to make hummus, I was amazed at how easy it was, but I never seemed to like it as much as I liked the ones in a restaurant.

The fact is – I used terrible shortcuts. Sesame instead of Tahini. Sacrilege!! (my logic – Tahini is made out of sesame right??) Too much garlic, not enough creamy texture — blah blah!

I thought I would never be able to replicate the hummus, we have in good Mediterranean restaurants.I love the Hummus Beiruti. Its creamy with a mild tang of spice. Polishing off a small bowl is no big feat.

Hummus Beiruti

Hummus Beiruti

I tried Hummus again, (after my many not so good tries) and this time I used the proper Tahini. Another thing a chef friend of mine suggested was using cold water.

In this recipe, I use a little leftover water after boiling the chickpeas. I like to soak the chickpeas at night, and cook it the next morning and make the Hummus a few hours later. The water left over from cooking the chickpeas and the chickpeas itself are cooled down and refrigerated.

The hard work is soaking and cooking, after that its the quickest recipe you can make.

Serve it with a Rocket and cucumber salad, over toast with Avocado, obviously with Pita and Lavash. So many ways!! Do write in and tell me how you like to present it.

 Hummus


                                                                               Hummus

I made Hummus for my son last evening, thinking he could have it with Avocado. Confidently, I also made a small olive oil, garlic and Sumac drizzle for the top. Failure of failures! – the Avocado was not ripe enough and we had to chuck it. (Once cut it turns black quicker than a piece of charcoal rubbed on a face!) Then he suggested that we caramelise some onions, and top it with the same. Bigger flop. I had no brown sugar with me, and any case something made in a hurry not always turns out good. It was sticky …. basically – a flop!! I was flapping around about what he would eat, but he said the Hummus was good enough to eat on its own.. YAAAY!! Hummus saved the day!

hummus

hummus

hummus


Hummus Beiruti
Print Recipe
A Meditteranean staple, creamy and yummy!
  • CourseAppetizer
  • CuisineMediterranean
Servings Prep Time
4 people 10 minutes
Cook Time Passive Time
15 minutes 12 hours
Servings Prep Time
4 people 10 minutes
Cook Time Passive Time
15 minutes 12 hours
Hummus Beiruti
Print Recipe
A Meditteranean staple, creamy and yummy!
  • CourseAppetizer
  • CuisineMediterranean
Servings Prep Time
4 people 10 minutes
Cook Time Passive Time
15 minutes 12 hours
Servings Prep Time
4 people 10 minutes
Cook Time Passive Time
15 minutes 12 hours
Ingredients
  • 1/2 Cup Chick Peas Soaked over night
  • 2 Tblspn olive oil Virgin if possible
  • 2 Tblspn Yogurt
  • 5 Pods garlic peeled
  • 2 Tblspn Tahini
  • 1 Tblspn Water left over from cooking chick peas cold
  • 2 Tblspn Cold Water
  • 1 Tspn salt
  • 1/2 Tspn Cumin Powder
  • 1/3 Green Chilly Deseeded and chopped
  • 1/2 Tspn lemon juice
Garnish
  • 1 Tspn parsley chopped fine
  • 1/2 Tspn Sesame Seeds Roasted
  • 1 Tblspn olive oil
  • 1/2 Tspn Paprika
  • 1/4 Tspn salt
Servings: people
Instructions
  1. Soak the chick peas over night.
  2. Wash and cook till its soft. It should not disintegrate. It should retain its shape. I like to use a pressure cooker for this.
  3. Drain the water, cool and refrigerate.
  4. Cool chick peas and refrigerate.
  5. After a few hours, add all ingredients in a blender and blend till you get a fine paste. Keep opening the jar and spoon the mixture stuck on the sides back into the jar. PS: if you use the Tecnora brand of mixie (available on amazon) which comes with a very handy stirrer in the jar. While blending, one can keep stirring the mixture, so that it blends easily. You don't have to keep opening the jar.
  6. Once you have the consistency you want, plate it and garnish with olive oil, sesame seeds, parsley and mint leaves.
  7. Serve with Pita, Crisp Pita and Lavash.
  8. NOTE ON TAHINI: When using Tahini, please stir well and take from the bottom of the jar, as the solids settle way down.
Share this Recipe

Filed Under: Cocktail Parties, Sides, Snacks Tagged With: Chick Peas, Lavash, Mediterranean, Vegan, vegetarian

Mexican street corn (Elotes)

July 3, 2016 By appu Leave a Comment


corn the mexican way

corn the mexican way

I am really not that big a fan of corn. According to me, eating it off the cob is the only way – boiled, roasted, barbecued! But man! It is too much of an effort! The son took me to Puesto, in San Diego. We had Mexican Style Street Corn, and I tell you, the effort of stuffing huge gobs of corn in your face, yanking off the kernels, and getting all the mayo and cheese stuck on your nose and cheeks was well worth it.

Many years back, I read an article, on corn in National Geographic magazine. A very young and naive me, almost had a hysterical moment, when I saw the variety of different types of corn grown around the world. Mexico takes the top position for it. I saw pictures of blue corn, 2 coloured corn, black corn, red corn, small corn.

See the images of different types of corn here!

The world just opened up for me. So now while I travel, I look for the local food caverns and stops, drink the local alcohol and eat the local food. My friend is a big believer in this – and has tasted alligator meat too. (Yup! she landed up with a massive stomach pain the next day!) I have always been taken by surprise on how local salt, local water and local ingredients can paint each dish with different colours.

When we have dal ki pakodi, in our native village in Rajasthan, the flavours are so original, so specific off each ingredient. And the same thing tastes a bit bland and bleh, back in Bombay. It is the local dal, and the water, which makes the dish all that much more delicious.

Corn with mayo and feta and mexican chillies

Corn with mayo and feta and mexican chillies

Corn from my farm in Mahabaleshwar tastes really good. It’s organic, and we cut it just a few minutes before we want to cook it. This recipe requires crumbled Feta Cheese. I like to freeze the cheese for an hour or so, then grate it with a cheese grater, then again freeze it. Just thaw it an hour before I need to use it. The cheese looks really nice and even and does not coagulate. I use the same trick when I need to crumble Goat’s cheese.

mexican style corn

mexican style corn

See the link of “how to roast corn”  as shown in my previous post. You can, of course, use boiled corn too for this recipe.

Let’s go – visit the streets of Mexico with this one!!

mexican style corn

mexican corn

Mexican street corn (Elotes)
Print Recipe
My favourite way to have corn! Very easy to make.
  • CourseSide Dish, Sides
  • CuisineMexican
Servings Prep Time
2 person 10 minutes
Cook Time
30 minutes
Servings Prep Time
2 person 10 minutes
Cook Time
30 minutes
Mexican street corn (Elotes)
Print Recipe
My favourite way to have corn! Very easy to make.
  • CourseSide Dish, Sides
  • CuisineMexican
Servings Prep Time
2 person 10 minutes
Cook Time
30 minutes
Servings Prep Time
2 person 10 minutes
Cook Time
30 minutes
Ingredients
  • 1 Cob Corn Roasted or boiled
  • 2 Tbspn Mayonnaise
  • 2 Tbspn Feta Cheese Crumbled
  • 1 Tspn Paprika or any form of chilli powder
Servings: person
Instructions
  1. Brush corn with mayonnaise, turning the corn to get it spread evenly.
  2. Keep the feta cheese on a flat dish or plate, and roll the corn on it, so that it sticks on all sides.
  3. Stand the corn on the serving dish and sprinkle paprika (or any other chilli powder) on the corn.
  4. Serve warm.
Share this Recipe

Filed Under: Sides, Snacks Tagged With: corn, feta cheese, mayonnaise, mexcian street food, mexican style corn, paprika , vegetarian

Meet the Author

For the 21 years and some months that I have been alive, there has been this crazy, eccentric, always-charged-up woman with a full-time job of being a mother to 6 (2 children, 4 dogs).

In her spare time she blasts music on her DJ console, reads like a maniac, downloads shows (because God forbid she runs out of something to watch), runs an entire household, and to top it all off, manages a very successful catering business which makes the most delicious food in the entire world. Once you have her food, everything else will taste like stale socks.

This is what you call "Maa ke haath ka khana".

- Kanak

Subscribe to Blog via Email

RECIPE BY CATEGORY

Copyright © 2023 THE RECIPE LARDER