THE RECIPE LARDER

  • Home
  • Nuts and Bolts, Sauces and Pans
  • Recipes
  • Contact

One Pot Pasta with Mukka Pyaz

March 31, 2020 By appu Leave a Comment

One Pot Pasta with Mukka Pyaz
Print Recipe
Easy and quick, and makes use of all your left over veggies.
  • CourseMain Dish
  • CuisineItalian
Servings Prep Time
3 pax 10 min
Cook Time
15 min
Servings Prep Time
3 pax 10 min
Cook Time
15 min
One Pot Pasta with Mukka Pyaz
Print Recipe
Easy and quick, and makes use of all your left over veggies.
  • CourseMain Dish
  • CuisineItalian
Servings Prep Time
3 pax 10 min
Cook Time
15 min
Servings Prep Time
3 pax 10 min
Cook Time
15 min
Ingredients
  • 2 Tbspn olive oil
  • 1 Tbspn Butter
  • 10 cloves garlic sliced thin
  • 1 med sized onion (do not peel)
  • 5 Black Pepper coarsely ground
  • 10 Cherry Tomatoes Cut into half
  • 1/3 packet Spaghetti (or any other pasta)
  • 2-3 Cups Water (you can use stock water if not using Veg Bouillon)
  • 1 Tbspn Veg Bouillon dilute in 2 tbspn water (can use stock water if you dont want to use Veg Bouillon)
  • 2 Tspn salt
  • 10-12 Leaves basil
  • 2 strands Rosemary
  • 1/2 Cup Brocolli cut into small florets
  • 1 Tspn Chilly Flakes
  • 1/3 Cup Asparagus Chopped into 3
  • 1/3 Cup Mushrooms Cut into 2 or 4 depending on the size.
Servings: pax
Instructions
  1. Without peeling the onion, cut off both the bases.
  2. With the broad side up, pound it hard a few times with your fist.(ie mukka pyaz)
  3. Tears will appear. Starting from the tear peel the onion and then start cutting and tearing the layers (see video) Keep aside
  4. In a thick bottom pan, add the olive oil and butter. When a little brown add the sliced garlic. Saute for a few minutes
  5. Add the black pepper then the onions
  6. Saute till onion is a translucent.
  7. Add the cherry tomato and saute for a few minutes.
  8. Add the herbs (basil and rosemary).
  9. Add the broccoli and then add the salt.
  10. Add the pasta and break it with the spoon and then douse it with water till the top of the pan. (see recipe notes - IMPORTANT)
  11. Dilute the bouillon in water and add to the pasta. (IMPORTANT - see recipe notes )
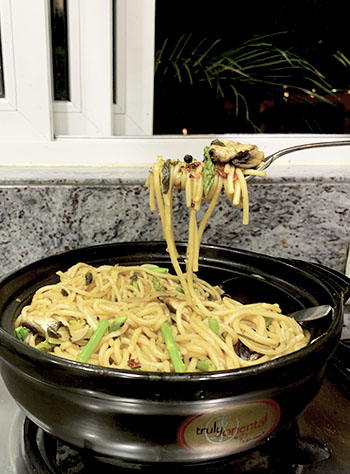
  12. Cook on medium heat till the pasta cooks and water soaks up completely.
  13. Keep stirring intermediately.
  14. If the water soaks up and the pasta hasn't cooked, add more water, but little at a time.
  15. If the pasta has cooked and some water is left, let it be. The pasta will soak it up.
  16. Add chilly flakes.
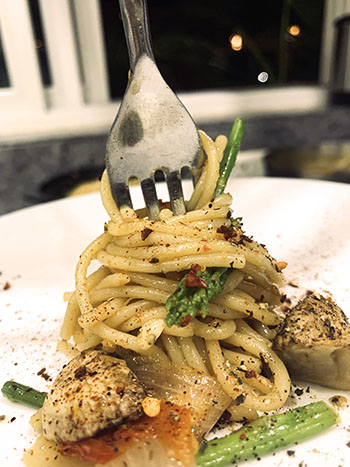
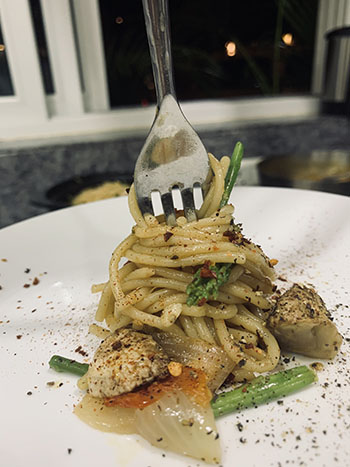
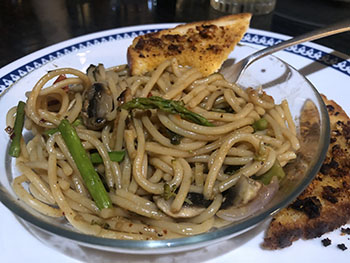
  17. When done and just before taking off the fire add the asparagus and mushrooms and mix into the pasta.
  18. Serve with garlic bread on the side.
Recipe Notes


Times have come when we are very very careful about wasting any food. This recipe hits the spot because it uses up all the left over veggies and wilting herbs in your fridge. It's an amazing recipe for students or those who need to cook quickly and minimally. Needless to say both my kids made this quite often when in college. But- for this recipe my son used a very Indian road side restaurant trick of Mucca Pyaz - ie fist broken onion.

Somehow when the onion is broken with the fist, the juices flow and dissipate in such a manner that the onion looses its fiery pungency and for some reason tastes way sweeter. Just for your info - try this with the very Indian Chola Kulcha.

We have used broccoli, asparagus, some left over mushrooms, herbs that existed in our fridge. You can of course replace with any other her you have. Parsley, chives, oregano etc all go really well. If you dont have fresh herbs, dried herbs will also do the trick.

You want more heat add  some Spicy chillies while the pasta boils. Green chilly does not do well, so I would avoid that.

You can add any cheese you have, just before taking off the fire, stir some in.

We add the asparagus and mushrooms last, as they are veggies that cook really fast, and adding them earlier would have turned it to mush.

We hope you enjoy this recipe. Do tag us on #therecipelarder on instagram.

VEG STOCK V/S VEG BOUILLON

Since I did not want to use any extra veggies to make veg stock, I used veg Bouillon. I rather use veg stock as however organic bouillon is processed. But having said that bouillon has strong flavours and works well when you don't have too much time or patience at hand.

HOW TO MAKE VEG STOCK. For this recipe - take 4 cups of water. Add to a pan and in it add some bay leaf, black pepper and roughly cut white veggies - ie onions, bottle gourd, cabbage, cauliflower, pumpkin (not the very sweet one)etc. Boil everything together till the water boils down to half. Strain. Use the veggies in your chapati dough, or  mix it into your dal. Use this water for cooking pasta.

If you use stock do not add veg bouillon.

SEE VIDEO HERE:

http://therecipelarder.com/wp-content/uploads/2020/03/one-pot-pasta-with-mukka-pyaz-edited.mp4


Share this Recipe

Filed Under: Dinner, Healthy, Lunch Tagged With: healthy, spaghetti

Soong Dal

March 4, 2019 By appu 1 Comment

It’s that time of the year when Mahabaleshwar beckons, with its myriad sunsets, fresh fragrant strawberries and over powering array of flowers. We had ourselves farm fresh and organic vegetables just off the farm.


Since we do not use fertilisers or pesticides of any kind, we pluck off cherry tomatoes and radish straight from the Canadian pharmacy plants and merrily munch it on the go!

fresh off the farm.

For a day and a half, we were just mom and son! We ate, drank and had some crazy conversations.

We both wanted something a bit healthy for our brain doping lunch, and anyways friends who love this dish have been asking for the recipe. So we decided to make it and blog it.

This is a super healthy snack.  I sometimes have it as the lonesome dish for dinner too. It’s super filling, high in protein and very very healthy. It does not sit in your tummy, but leaves you feeling full and satiated. The tangy, spicy flavour makes it soooo very edible and tasty.

I optionally also add finely chopped raw mango (kairi) to it and reduce the lemon a wee bit. You can play around with it as you like. Reduce the spice, increase it (yaay!), add onions, take off the coconut, add a dash of green chutney!!! Just go for it. Not much can destroy this dish!

Add to it a dhokla mix, or to some other chaat item. Serve it mixed with broken idli and podi chutney. Let your creativity flow and do tell me also how you played with it!

Soong dal goes amazingly well with drinks. But serve it chilled. Like – absolutely and totally chilled. If you think of heating it – u might as well eat dal. So DO NOT HEAT this dish!!

Have fun! Cheers!


PS: Here is the video shoot we did for the Soong Dal. It’s very basic and rustic, as is the kitchen in our farm.

http://therecipelarder.com/wp-content/uploads/2019/02/soong-dal-converted-with-Clipchamp.mp4

Soong Dal
Print Recipe
A healthy and tasty snack. Super with drinks.
  • CourseAppetizer, Salad, Side Dish
  • CuisineIndian
Servings Prep Time
4 pax 5 minutes
Cook Time Passive Time
5 minutes 4 hours
Servings Prep Time
4 pax 5 minutes
Cook Time Passive Time
5 minutes 4 hours
Soong Dal
Print Recipe
A healthy and tasty snack. Super with drinks.
  • CourseAppetizer, Salad, Side Dish
  • CuisineIndian
Servings Prep Time
4 pax 5 minutes
Cook Time Passive Time
5 minutes 4 hours
Servings Prep Time
4 pax 5 minutes
Cook Time Passive Time
5 minutes 4 hours
Ingredients
  • 1 Cup Yellow Moong Dal
  • 1 Tspn oil
  • 1/2 Tspn Mustard Seeds
  • 1/4 Tspn Hing
  • 10-15 Curry Leaves
  • 1 Tspn salt
  • 1/4 Cup Coconut grated
  • 2 Tbspn Corriander Leaves finely chopped
  • 1 Tspn Green Chillies (or less/ more - according to taste)
  • 1 Tbspn lemon juice
  • 1 Tbspn Raw Mango (optional) finely chopped (reduce lemon juice)
Servings: pax
Instructions
  1. Wash and soak the yellow moong dal for 4 hours.
  2. Drain the water, rinse the dal and keep on a draining sieve for appx 20 minutes, so that no water is left.
  3. Once the water has drained, get the tadka ready. Keep the moong dal in a mixing bowl.
  4. In a tadka pan, add the oil.
  5. When hot, add the mustard seeds.
  6. When spluttering, add the hing and finally the curry leaves.
  7. All the curry leaves should splatter, so mix it with a spoon once, while still on the fire.
  8. Take off the fire and put it on the moong dal.
  9. Now add the salt, chopped corriander, coconut and green chillies (and optionally the raw mango)
  10. Lastly squeeze in the lemon juice.
  11. Mix well.
  12. Serve completely chilled.
Share this Recipe

Filed Under: Healthy, Sides Tagged With: appetizer, fresh, healthy, indian, lentils, Moondal, protein, protein power, quick, salad, Serve Chilled, snacks, south indian, spicy, tangy, yellow dal, yum

Radish Salad

April 6, 2018 By appu Leave a Comment

I detest radish! It’s bitter, pungent and according to me serves no purpose in the culinary world. The Japanese use a lot of radish in their cuisine, and I always wondered what they do to it to make that pungent and mouth twisting bitter taste, disappear ?! Even after tasting that kind of radish, I could still not lift a piece of raw radish from a salad! Until – this lady made me taste her concoction.

…

Read More »

Filed Under: Brunch, Healthy, Lunch Tagged With: cold pressed mustard oil, farm fresh, farm to table, gluten free, healthy, indian, indian cooking, indian salad, mooli, organic, peanuts, quick and easy, quick salad, radish, salad, vegetarian, wholesome

Corn Pulao

March 29, 2018 By appu Leave a Comment

There is something about the farm  in full bloom, the birds happy with themselves, bees humming, butterflies swarming around, and our two dogs furtively chasing away the monkeys (who want to uproot our vegetable patches!). The entire happy cycle of nature makes my soul sigh in satisfaction.

This season we got bushels and bushels of corn from our farm in Mahabaleshwar. And strawberries. And radish.  And beans. And cauliflower!! And so many other small batches of pure organic vegetables. The taste and inherent sweetness of the freshly plucked organic vegetables is a  world apart from what we get in cities.

We had freshly plucked corn, and we all decided to have Corn  Pulao.

Fresh corn, fragrant rice, a one pot marvel.

This is a really simple recipe, very easy prep and damn tasty to boot! Just before adding the rice, you will realise that the corn looks so good, and it tastes and smells good too. At this point you can easily not add the rice and serve it as a veggies with any kind of roti! (we almost did that, as the smell was making us go crazy – and we were fast loosing patience).

Serve it with yoghurt and papad! Or eat it plain! You can easily increase or decrease the spices. What I have written in my recipe is not a very spicy version. The yoghurt, balances the spices.

Fresh rice Pulao, made with organic corn.

I hope you like the recipe as much as all of us did!

PS: here is the link to the youtube video to make your life a tad easier!

Cheers and Ciao!


Corn Pulao
Print Recipe
Easy one pot Corn Pulao, full of fragrant spices.
  • CourseMain Course
  • CuisineIndian
Servings Prep Time
4 Pax 15 min
Cook Time Passive Time
25 min 30 min
Servings Prep Time
4 Pax 15 min
Cook Time Passive Time
25 min 30 min
Corn Pulao
Print Recipe
Easy one pot Corn Pulao, full of fragrant spices.
  • CourseMain Course
  • CuisineIndian
Servings Prep Time
4 Pax 15 min
Cook Time Passive Time
25 min 30 min
Servings Prep Time
4 Pax 15 min
Cook Time Passive Time
25 min 30 min
Ingredients
  • 1/4 Cup Mustard Oil (sarson ka tel)
  • 1 Black Cardamom (kaali elaichi)
  • 3 Green Cardamom (hari elaichi)
  • 1 Cinanmon Small piece (dalchini)
  • 2 Bay Leaves (tej patta)
  • 3/4 Cloves (laung)
  • 3/4 Black Pepper Whole (aakhi kaali mirchi)(optional)
  • 1/3 Cup onion Finely chopped
  • 1 1/2 Tbspn Ginger Garlic Paste (or chopped garlic and ginger)
  • 1 Tspn Turmeric powder (haldi)
  • 1 1/2 Tspn Corriander Powder (dhania powder)
  • 1 1/2 Tspn red chilly powder (lal mirchi powder)
  • 1 1/2 Tspn Cumin Powder (jeera)
  • 2 Cups Corn raw
  • 1 Tspn Asafoetida (hing) - diluted in 2/3 tbspn water
  • 1/3 Cup Yoghurt (dahi, curds)
  • 1 1/2 Cups Rice raw, Soaked for 30 minutes
  • 1 tspn Fresh Corriander (dhania patti)
  • 2/3 Cups Water
Servings: Pax
Instructions
  1. Take the corn grains off the cob.
  2. Heat oil. When spluttering add the cinnamon, green cardamoms, cloves, black pepper(optional), and bay leaves one by one.
  3. Roast well, then add chopped onions.
  4. When translucent and semi brown, add the garlic and ginger.
  5. After a minute, add the green chillies.
  6. Now add the turmeric and red chilli powder.
  7. Fry for a while till the (spices) masalas all mix together.
  8. Add the corn and toss and mix well.
  9. Now add the hing water and mix it all together.
  10. Add salt and fresh corriander.
  11. Add the yoghurt, and mix into the corn.
  12. When well mixed and small bubbles appear, add the soaked raw rice.
  13. Mix all together and add the water.
  14. Mix, and cover with well fitted lid, to cook. Medium flame.
  15. Keep checking the contents so that it does not burn and catch at the bottom.
  16. If water reduces, and rice has not cooked, add a 1/4th cup rice and then add slowly as needed.
  17. When cooked, garnish and serve immediately.
Share this Recipe

Filed Under: Dinner, Lunch Tagged With: cold pressed oil, corn, earthy, family meals, farm fresh, fragrance, fresh corn, fresh from the farm, garlic, healthy, high fibre, home cooked meals, indian, indian meals, organic, Pulao, Rice, spices, vegetarian

Puffed Rice (Kurmura) Poha

March 14, 2018 By appu 2 Comments

It was evening, and hunger pangs were making our stomach growl furiously. There was no time to make a time consuming snack, we all wanted something healthy and not too heavy. (The dinner menu looked very mouth wateringly promising!).

Rekha, our house keeper jumped to the rescue of our collective moaning tummies. She quickly chopped some onions, made a tadka of spices and curry leaves, took a large helping of puffed rice and to my astonishment, dumped it in a sieve and ran it under running water for a good 3 to 4 minutes.

By now I should not be surprised and astounded by the different ways and methods people around me cook. Rekha and my cousins and family continuously come up with new techniques and unique mixes. My last post was one such experience.

As recipes go, this one is the easiest, quickest snack you can make. You can make the onion mixture ahead of time and soak and mix the puffed rice (kurmura) just before serving.

Most of the ingredients are normally available in all Indian house holds, so there is no need to go rushing to the nearest grocer to buy something. You can of course make it spicer, more sour, add garlic … there is no end to how you can play around with the dish.

On this note, let me announce with the greatest of excitement that I have started my own Youtube channel. Its called The Recipe Larder, same as this blog.

The youtube video link to this recipe is available here. It shows you the step by step method of making this recipe. Do subscribe for more off beat recipes.

Hope you end up making this. Do send me pics!!  Cheers! and Ciao!

PS: please tag therecipelarder on istagram, if you wish to share your pics.

Puffed Rice (Kurmura) Poha
Print Recipe
A quick, easy and healthy snack made with puffed rice (kurmura).
  • CourseMain Dish, Snack
  • CuisineIndian
Servings Prep Time
3/4 pax 10 minutes
Cook Time
5 minutes
Servings Prep Time
3/4 pax 10 minutes
Cook Time
5 minutes
Puffed Rice (Kurmura) Poha
Print Recipe
A quick, easy and healthy snack made with puffed rice (kurmura).
  • CourseMain Dish, Snack
  • CuisineIndian
Servings Prep Time
3/4 pax 10 minutes
Cook Time
5 minutes
Servings Prep Time
3/4 pax 10 minutes
Cook Time
5 minutes
Ingredients
  • 3 Cups Puffed Rice (kurmura)
  • 1 Tspn Mustard Seeds (rai)
  • 1 onion Chopped finely
  • 15 -20 Curry Leaves
  • 2 Tspn Green Chillies finely chopped
  • 1/2 Tspn Turmeric powder (haldi)
  • 1/4 Cup Peanuts roasted and coarsely crushed
  • 2 Tbspn Coconut Grated
  • 1 Tbspn lemon juice
  • 1 Tspn salt
Servings: pax
Instructions
  1. Dry roast, remove the skin and coarsely crush the peanuts.
  2. Keep aside
  3. Grate the coconut and keep aside.
  4. In a pan, add the oil.
  5. When hot add the mustard seeds.
  6. When the splutter, add the chopped onions.
  7. Fry for a bit, then add the curry leaves.
  8. Fry for a few minutes more. When the onion becomes translucent, add the green chillies.
  9. Add the turmeric powder and salt and fry well.
  10. Shut the flame and keep this mixture aside.
  11. When you want to serve it, put all the puffed rice into a sieve and wash for 3 to 5 minutes under running water.
  12. tightly squeeze all the water out and keep the soaked puff rice aside.
  13. Before serving, add the puffed rice to the onion mixture. (you don't have to start the fire at this point)
  14. Add the peanuts, grated coconut, coriander leaves and lemon juice.
  15. Mix well and serve immediately.
Share this Recipe

Filed Under: Healthy, Snacks Tagged With: easy snack, healthy, indian cooking, indian food, indian snack, kurmura, muri, nutritious, organic, puffed rice, quick meal, vegetarian

Guacamole

February 12, 2018 By appu Leave a Comment

avocado and all other ingredients ready and prepped for mashing

To be very frank, I’m not a huge fan of Guacamole. Actually not a huge fan of Avocado either. The son, daughter and husband love it though!!

My son is on a full blown -I am going to build my body, and eat healthy – kind of streak, and he makes a lot of Guacamole, or Guac as the kids call it.

This here, is his recipe. Quick and super easy, and very filling. He made it for me last winter when he was here on holidays, and though my eyes don’t start shining in emotional gratefulness at the sight of Guac, I did dip a couple of nachos into it and I must say I was thoroughly impressed with it.

Avocado is not easily available where I stay. It grows in abundance in Bangalore, but the taste, texture and flavour is not as good as the one available in California.  When I went to spend sometime with my daughter in San Jose – California, I accompanied her to the super market. My eyes popped out, seeing the gigantic heaps of Avocado, spilling on to the floor, overflowing from their baskets. And the price!! Oh! Boy, it was being sold for peanuts.

I wanted to take back a few with me to India, but my kid gave me a fairly accurate description of the way it would get squashed and then get in between my clothes and when I would try to pull them clothes out, I would have slimy, gooey flesh smeared on my hands ….. you get the gist, don’t you?! Disheartened I gave up the idea, but began a hunt in Bombay for good Avocados. It was quite a task. They would be either underdone or over ripe and always, always very expensive.

I finally found a store, and now I get ripe to be eaten – the day I want – type of Avocado whenever I so please. It’s still a tad expensive, but it’s exotic fruit (yes Avocado is a fruit!) in India, and we pay for the glamour.

Do try out this recipe. It’s super easy and actually mashing the fruit – I found it kind of stress relieving.

avocados

http://therecipelarder.com/wp-content/uploads/2018/02/guac-converted-with-Clipchamp.mp4

Storage

Guac gets black very fast, as it starts oxidising when exposed to oxygen in the air. Lemon helps keep its colour, but it still needs further help. As such it’s best to make Guac just before serving, but it’s not always possible. To store Guac without letting the exposure affect it, store in a air tight box, or in a bowl, and cover with cling film, letting the cling film stick right on top of the guac. When you serve the guac, you will have to scrape the guac off the cling film, but it’s worth the effort.

If you want to use only one half of the fruit, retain the stone (seed), push it back into the cavity of the left over half, and cling film it tightly and keep refrigerated. This helps to a certain level, but eventually you better consume the fruit as soon as you can.

Cheers! to good fat!


Guacamole
Print Recipe
Quick and easy recipe for a healthy snack.
  • CourseAppetizer, Snack
  • CuisineMexican
Servings Prep Time
3/4 pax 10 minutes
Cook Time
5 minutes
Servings Prep Time
3/4 pax 10 minutes
Cook Time
5 minutes
Guacamole
Print Recipe
Quick and easy recipe for a healthy snack.
  • CourseAppetizer, Snack
  • CuisineMexican
Servings Prep Time
3/4 pax 10 minutes
Cook Time
5 minutes
Servings Prep Time
3/4 pax 10 minutes
Cook Time
5 minutes
Ingredients
  • 1 Ripe Avocado
  • 2 Tbspn onions Finely chopped
  • 1 Tspn Sea Salt
  • 1 Tspn Jalapeno Chillies Fresh and finely chopped, (or any other spicy green chilly)
  • 1/2 Tspn Paprika
  • 2 Tspn Cumin Powder (jeera)
  • 2 Tspn Black Pepper Coarsely ground
  • 2 Tspn Fresh Corriander roughly chopped
  • 2 - 3 Tspn lemon juice
  • 1-2 cloves garlic optional
Servings: pax
Instructions
  1. Cut the Avocado from the stem to the root, slicing the fruit into two
  2. Pull apart the two ends, and scoop out the seed with a spoon.
  3. Using a sharp knife, make horizontal and vertical slits into the flesh of the fruit.
  4. Now scoop out the flesh with a spoon, scraping into the skin of the fruit.
  5. Put all the flesh into a bowl.
  6. Add all the ingredients into the bowl with the avocado, and start pulverising with a fork. First break down the fruit and then start mashing the rest of the ingredients with the avocado.
  7. Lastly add the lemon juice and mix some more.
  8. Voila - it's ready to serve with nacho chips.
Share this Recipe

Filed Under: Cocktail Parties, Snacks Tagged With: avacado, foodfad, garlic, glutenfree, goodfat, guac, guacamole, healthy, healthyfat, healthysnack, highfibre, mexican, nachos, nogluten, snack, tortillas, Vegan, vegetarian

Basil Pesto and Pesto Pasta

January 10, 2018 By appu Leave a Comment

It’s that time of the year again, when our farm in Mahabaleshwar is thriving and blooming. The entire farm is disrupted during the monsoons, which are heavy, non stop and torrential. In fact Mahabaleshwar gets the second highest rainfall in India, next only to Cherrapunji.

Just before the rains are predicted to stop, (and these predictions never come true!), we start planting some seeds in a sheltered area. Once the rains stop, the seeds are now seedlings and can be re transplanted in pots or beds. It’s a lot of work! The soil has to be turned, aired and new top soil has to be spread. Since we plant over almost 2 acres of land, it’s a busy time for all of us.

Seeing the seedlings burst forth into vegetables and flowers is the best thrill and pure fodder for my soul. I love the city but off late ever so often I just want to vacate my senses and vegetate with the vegetation.

This year started with a wild, wild and massive bush of Basil. So much that I did not know what to do with it. I plucked them and got them back to Bombay, still pondering in my head and actually stressing over not wasting this lot. It was fragrant, the leaves heavy with taste. I decided to make Pesto and sell it to my customers.

Pesto made with fresh fragrant organic basil

I came home and experimented with a batch. It was perfect, green and luscious. I bottled it and announced the sale, and it was gone within hours! All the bottles were booked!

Over time, the green becomes pale and dark. So if you want really bright green pesto, make it on the spot and use it. Making it a day in advance allows all the flavours to steep. But if you want to use it as a dip, or in an open sandwich, then make it on the spot.

Basil grows very easily in home cultured pots. And mind you, it can grow wild. Now when you have too much Basil, and your heart is breaking at the wastage, you know what to do with it.

We were all having fondue, and one of our friends did not like the smell of the cheese. So I made Pesto Pasta for her and her husband. I do believe the plate was polished off!!! 😀

Basil Pesto mixed with pasta

I hope you enjoy making this recipe, because there is no better smell than that of, fresh basil, smooth virgin olive oil and fragrant new garlic.

Cheer!


Basil Pesto and Pesto Pasta
Print Recipe
Fresh fragrant basil, made into pesto. Can be used as a dipping sauce, over sandwiches and salads, and of course made into a pasta.
  • CourseMain Course, Main Dish, Sauces and Jams
  • CuisineItalian
Servings Prep Time
4 pax 10 minutes
Cook Time
15 minutes
Servings Prep Time
4 pax 10 minutes
Cook Time
15 minutes
Ingredients
Pesto
  • 1 Cup Fresh Basil Leaves packed
  • 1/2 Cup Walnuts toasted
  • 1/4 Cup garlic Peeled
  • 1 1/2 tspn Sea Salt
  • 10 pcs Black Pepper
  • 1 1/2 Cup Extra Virgin Olive oil
Pasta
  • 1/2 Packet Pasta Boiled
  • 1/2 Cup Exrtra Virgin Olive Oil
  • 1/2 Cup Grated Parmesan Cheese
  • 4/5 Cherry Tomatoes for garnishing, optional.
Servings: pax
Instructions
  1. Add all the ingredients of the pesto to a food processor and mix till its cohesive and no coarse pieces can be seen or felt.
  2. Put aside to use immediately or bottle in sterilised jar for future use.
Pasta
  1. Boil the pasta and keep aside
  2. Add the oil to the pan, and then add the pesto.
  3. Add the pasta and half of the parmesan cheese.
  4. Toss well and add 1/4th cup of the pasta water to the mix
  5. Toss again
  6. Serve hot garnished with the remaining parmesan cheese and cherry tomatoes.
  7. Add a side of toasty garlic or plain bread with this dish.
Share this Recipe

Filed Under: Dinner, Healthy, Lunch, Sauces Tagged With: basil, black pepper, comfort food, farm to table, fragrant, fresh, garlic, healthy, italian, organic, parmesan cheese, pasta, quikc dish, virgin olive oil, walnuts

Lasooni Palak

November 30, 2017 By appu 2 Comments


If you have been following my blog, you would have realised that my favourite flavour is garlic. I have grown up in a family that cooked without onion and garlic, for religious purposes. Garlic is said to have “tamsik” qualities. Tamsik food is considered unhealthy, and it brings out the negative in you, gives rise to anger and other repugnant emotions. During the Vedic times, everything that was considered not good, was given a religious decree of non consumption.

I have realised over the years that a lot of do’s and dont’s of the Vedic ages are now being proven scientifically true. Take for example the benefits of turmeric. The world over, turmeric is prescribed for it’s qualities. But there is also the other side of science, which has proven some foods that were earlier considered bad, are now proven to have health benefits. Garlic is very good for the heart.

As for me – I like to live dangerously and garlic is very good for my soul!

I can have garlic in every single meal, and not get tired of the taste. I think I am still making up for my lost childhood!


Nishi enjoying the taste!

Lasooni Palak, or Saag as its called in some places, is my favourite version of consuming spinach. I like the smooth texture, but I also like the chopped version. So I came up with a recipe that was a mix of both. I like my food on the little spicier side (more Tamsik me!!) and somehow the taste of garlic, rough and smooth spinach with a hint of fire sets me in the absolutely perfect mood!

I experimented with this recipe in the green environs of Mahabaleshwar.  The spinach was not fresh off the farm, but it was still from the hills of Panchgani, and as fresh as one could possibly get. But the spinach I grow in our farm, is far superior, completely organic and I pluck it when still in baby stages. The result is a sweeter taste, with a hint of bitterness and then of course we add the ever loved garlic and fiery spices. In the near future, when the garlic grows green and fragrant in my farm, I will try this same recipe with new green garlic stalks. The taste will be a little different – more herby!

The recipe goes best with chappati, made with whole wheat or jowar.


Lasooni Palak or Lasooni Saag
Print Recipe
Greens flavoured with heady garlic, a perfect Indian veggie for any meal.
  • CourseMain Course
  • CuisineIndian
Servings Prep Time
2/3 people 15 minutes
Cook Time
15 minutes
Servings Prep Time
2/3 people 15 minutes
Cook Time
15 minutes
Lasooni Palak or Lasooni Saag
Print Recipe
Greens flavoured with heady garlic, a perfect Indian veggie for any meal.
  • CourseMain Course
  • CuisineIndian
Servings Prep Time
2/3 people 15 minutes
Cook Time
15 minutes
Servings Prep Time
2/3 people 15 minutes
Cook Time
15 minutes
Ingredients
  • 3 Bunch Spinach (each bunch has appx 25-30 leaves)
Tadka 1
  • 30 cloves garlic roughly chopped
  • 3 Green Chilly roughly chopped
  • 1 small onion roughly chopped
  • 1 Tspn Jeera (cumin)
  • 1 Red Kashmiri Chilly whole
  • 1 Tbspn oil
  • 1 tspn salt
Tadka 2
  • 1 Tbspn oil
  • 1 Bay Leaf whole
  • 1 tspn Jeera (cumin)
  • 1 Red Chilli Kashmiri whole
  • 1 tspn salt
  • 1/4 Cup Water
  • 1 Tbspn Yoghurt
Servings: people
Instructions
Spinach
  1. Blanch all three bunches of spinach in hot water. After 2/3 minutes, drain the hot water and dunk the spinach into ice cold water. This helps it to retain its colour.
  2. Finely chop appx one bunch of spinach and leave aside.
  3. Roughly chop the remaining two bunches of spinach and leave aside.
Tadka 1 with roughly chopped spinach
  1. In a pan, add and heat the oil. Add the jeera till it splutters. Now add the green chillies, red chilly and let these splutter.
  2. Now add the onion and garlic and cook till a bit brown.
  3. Add the roughly chopped spinach.
  4. Add salt and mix well.
  5. Leave aside to cool.
  6. Once its cool, run it in a mixer grinder till it becomes a fine paste. All the ingredients should be made into a paste, red chillies and all.
Tadka 2 with finely chopped spinach
  1. Heat oil in a pan. When hot add the jeera.
  2. When it splutters add the bay leaf and red chilly.
  3. Add the finely chopped spinach.
  4. Now add the salt and the water.
  5. Mix well and leave aside.
Finishing the dish.
  1. Add the spinach which has been ground to a paste, to the finely chopped spinach in the pan. The heat should be on.
  2. Add the yoghurt and mix well. Voila your dish is ready!
  3. Serve hot with any form of Indian Bread.
Share this Recipe

Filed Under: Vegetable Tagged With: fibre, glutenfree, healthy, indian, indianmeal, ironrich, serve with indian bread, spinach, vegetable

Seed Paté

August 6, 2017 By appu Leave a Comment

Some time back, the husband and I started on a diet with Deepika, who works with Luke. She has been in touch with me on a daily basis, and I cannot convey in words how wonderful we both started feeling within weeks of our nutritional plan. Unlike other “dieticians” they don’t nail our heads to a wooden plank, if we cheat or if we don’t follow instructions to the hilt. It’s actually a slow gentle coaxing to start changing our lifestyle and eating habits. So many small issues like sleeplessness, bloating etc are taken care of, using natural home remedies. And I must say it works, because now I sleep like the proverbial log, and in the mornings the bed and I are like lovers – loathe to leave each other.

Without realising, we have now changed our eating habits. The old hogging days no longer appeal to us, and on a very elemental level, we have started opting for healthy, nutritious and wholesome meals. Overeating even a little bit makes us groan and moan unbelievably.

This diet takes care of us very holistically. Small ailments are sorted almost immediately. Over the period of a year, my blood pressure and cholesterol are within normal limits.They care for our mental, emotional and physical health. After all this, we cannot return back to our old ways of eating aimlessly and only for taste. I now look for recipes that are healthy but tasty. This  Seed Paté is one of the many such recipes.

It’s a very versatile recipe. You don’t have to follow it the way it’s written. The dill can be replaced with coriander or any other herb of your choice.  Please read the notes following the recipe, before making the Seed Paté.

It can be used in many different ways. Eat it like a sandwich, mix it in vegetables as a gravy, dip with pita, layered with a salad — the options are endless and left to your imagination.

I hope you enjoy it as much as we do.


Seed Pate
Print Recipe
Versatile, super quick, easy, gluten free and healthy.
  • CourseSnack
  • CuisineFusion
Servings Prep Time
4 pax 5 minutes
Cook Time
5 minutes
Servings Prep Time
4 pax 5 minutes
Cook Time
5 minutes
Seed Pate
Print Recipe
Versatile, super quick, easy, gluten free and healthy.
  • CourseSnack
  • CuisineFusion
Servings Prep Time
4 pax 5 minutes
Cook Time
5 minutes
Servings Prep Time
4 pax 5 minutes
Cook Time
5 minutes
Ingredients
  • 3/4 Cup Mixed Seeds (Mildly roasted) Pumpkin, Water melon, Melon, Sunflower, Flax, Sesame.
  • 1/2 Cup Boiled Chickpeas
  • 1/4 Cup Water from boiled Chickpeas
  • 8 Cloves garlic
  • 1 1/2 Tbspn Tahini
  • 1 Tspn Dill
  • 1 Tspn parsley
  • 1 Tbspn Extra Virgin Olive oil
  • 1/4 Tspn soya sauce gluten free or optional
  • 1 Tbspn Black Pepper
  • 1/2 Tspn salt
  • 4 Slices Multigrain toast.
  • 1 Tbspn Sesame seeds - roasted for garnish
  • 1 Tbspn Extra virgin
Servings: pax
Instructions
  1. Put everything in a mixie and grind to a coarse mix.
  2. Don't over grind. You want a coarse texture. Even if some seeds are only partially ground, it's fine. That's what you want.
  3. Cut the bread slices into 1 inch broad fingers and toast till crisp.
  4. To serve, heap the paté on the toast and spread. It should be a thick layer.
  5. Garnish with sesame seeds and olive oil and serve immediately. Preparing too much in advance will make the toast soggy.
  6. The paté can also be had as a dip.
Recipe Notes

Seeds : You can use any of these seeds, or a mix of all. I have used Pumpkin, Water melon, Melon, Hemp and Sunflower.

Water: I have used the same water which was left over from boiling the chickpea. The left over water is thick, and sluggish and does not flow easily. This lends a heavy texture to the paté and does not make it runny. If for some reason, you are not using this water, you can use normal filtered water. BUT REDUCE THE QUANTITY. Use a little at a time. You will not need more than 1 - 2 Tbpsn max.

Herbs: The flavour of dill is very strong. But the quantity in the recipe is just enough to give you a hint of flavour. You can do away with dill altogether and increase the parsley. You can also replace it with coriander, or basil. It's totally up to you and your preference. But some herb definitely has to be used.


Share this Recipe

Filed Under: Gluten Free, Healthy, Snacks Tagged With: deepikarathod, easysnack, glutenfree, healthy, highfibre, lukecoutinho, quicksnacks, s esayfood

Palak Kebab

March 25, 2017 By appu 2 Comments

Palak Kebab

Another shout out from my daughter, for this recipe. I had made it for their friends when they were here and it was polished off in no time.

Well, many a good news hovering around me. The daughter got into Yale, my cooking classes have taken off and this darned blog has got fixed. There were some major issues, so all those of you who tried to come back for your favourite recipes and found gibberish in the ingredient section, my apologies. My very profound and heartfelt apologies. It could have got fixed earlier, but as usual, I was travelling.

I was in Mahabaleshwar, a small quaint hill station a few hours from Bombay. I have a home and a farm there, so this time the 12 days I stayed there, I ate off the farm, played with the new pup and chilled with my best friend Nishi.

We cooked, ate and drank!

We would wake up in the mornings, sit in the sun, (it was cold there!), and sip our tea and coffee. Then after a leisurely breakfast, we would put face packs (moisturising ones – like I said it was Brrrrr!) and jabber away for an hour or so. By the time the watch thought of turning both its hands to 12 – we would be sitting with our afternoon drinks – again yakking away to our hearts’ content. It was the most idyllic holiday one can have.

I plucked fresh Spinach, from the field and made this ultra easy and very delicious recipe. It needs very little preparation time. I have cooked it on a non-stick, with very little oil, but if you have a large party you can easily fry it in oil. I did it for the kid’s 21st birthday party and it vanished into mouths as soon as freshly fried plates were put in front of them.

cocktail snacks

I have also made a video, for a quick look-see. The first video I made was not “good enough” and my niece and son insisted I work a little harder and produce a better one. Well, they are not all that happy with this one either, but I lack patience so there is for all to view.

Unfortunately, I am not able to load the video here because of (temporary – I will fix it asap) data restrictions. But here is the Facebook URL

FACEBOOK URL FOR VIDEO OF PALAK KEBAB

and there is the google drive URL.

CLICK HERE FOR GOOGLE DRIVE LINK

I hope you will see the video and try the recipe. It makes for great cocktail snacks, lunch box sides, or sides.

Promise to get back with a recipe soon. I’ve been tardy!


Palak Kebab
Print Recipe
Quick and easy, with minimum fuss and preparation. Great as cocktail snacks.
  • CourseSide Dish, Sides
  • CuisineIndian
Servings Prep Time
3 /4 Pax 30 minutes
Cook Time
15 minutes
Servings Prep Time
3 /4 Pax 30 minutes
Cook Time
15 minutes
Palak Kebab
Print Recipe
Quick and easy, with minimum fuss and preparation. Great as cocktail snacks.
  • CourseSide Dish, Sides
  • CuisineIndian
Servings Prep Time
3 /4 Pax 30 minutes
Cook Time
15 minutes
Servings Prep Time
3 /4 Pax 30 minutes
Cook Time
15 minutes
Ingredients
  • 1/2 Cup Whole Black Masoor Dal (Indian Brown Lentils)
  • 1 Bunch Spinach
  • 1/3 Cup Cottage Cheese (or Ricotta cheese)
  • 5 Cloves garlic
  • 2 pcs green chilles
  • 1 Inch Ginger
  • 1/3 Cup onion Finely chopped.
  • 2 Tbspn Cashews, crushed
  • 1 1/2 Tspn Garam Masala
  • 1 Tspn salt
  • 2 Tbspn - Plus oil for cooking and oiling hands
  • Water
Garnish
  • 1 Tbspn Chaat masala
  • 1 onion Sliced.
Servings: Pax
Instructions
  1. Soak the dal for 30 minutes.
  2. In a mortar and pestle, pound together the chilles, garlic and ginger.
  3. Wash and chop the spinach into very fine strands.
  4. Bring water to a boil, and boil the Spinach for a 2 / 3 minutes.
  5. Wash and grind the soaked dal into paste with as little water as possible. Preferably no water.
  6. In a non stick skillet, add a appx 1 Tbspn oil.
  7. Add the ginger, chilly and garlic paste. Fry till it is brown.
  8. Add the onions, and fry till brown.
  9. Now add the Dal paste, and again fry till it forms lumps and all the water has evaporated.
  10. Now add the spinach and mix and cook till incorporated.
  11. Add the cottage cheese/ ricotta cheese. Break it and sprinkle it all around for a better mix.
  12. Mix till incorprated.
  13. Add the cashews, garam masala and salt.
  14. Mix well and take off the fire on a plate to cool.
  15. Oil your hands and make small rounds, appx the size of a small lemon.
  16. Flatten it. Repeat with the entire mix.
  17. In a skillet add appx 1 Tbspn oil and cook the kebabs, pressing it and turning it till it browns on both the sides.
  18. You can also fry these kebabs in oil.
  19. Serve hot, sprinkled with chaat masala and garnished with onions. Serve with a corriander chutney.
Share this Recipe

Filed Under: Cocktail Parties, Sides, Snacks Tagged With: cocktail snack, healthy, quick and easy snack, snack, spinach, vegetarian

Meet the Author

For the 21 years and some months that I have been alive, there has been this crazy, eccentric, always-charged-up woman with a full-time job of being a mother to 6 (2 children, 4 dogs).

In her spare time she blasts music on her DJ console, reads like a maniac, downloads shows (because God forbid she runs out of something to watch), runs an entire household, and to top it all off, manages a very successful catering business which makes the most delicious food in the entire world. Once you have her food, everything else will taste like stale socks.

This is what you call "Maa ke haath ka khana".

- Kanak

Subscribe to Blog via Email

RECIPE BY CATEGORY

Copyright © 2023 THE RECIPE LARDER