THE RECIPE LARDER

  • Home
  • Nuts and Bolts, Sauces and Pans
  • Recipes
  • Contact

Radish Salad

April 6, 2018 By appu Leave a Comment

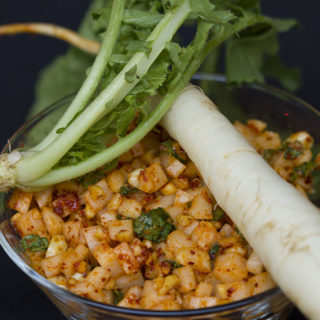
I detest radish! It’s bitter, pungent and according to me serves no purpose in the culinary world. The Japanese use a lot of radish in their cuisine, and I always wondered what they do to it to make that pungent and mouth twisting bitter taste, disappear ?! Even after tasting that kind of radish, I could still not lift a piece of raw radish from a salad! Until – this lady made me taste her concoction.

…

Read More »

Filed Under: Brunch, Healthy, Lunch Tagged With: cold pressed mustard oil, farm fresh, farm to table, gluten free, healthy, indian, indian cooking, indian salad, mooli, organic, peanuts, quick and easy, quick salad, radish, salad, vegetarian, wholesome

Corn Pulao

March 29, 2018 By appu Leave a Comment

There is something about the farm  in full bloom, the birds happy with themselves, bees humming, butterflies swarming around, and our two dogs furtively chasing away the monkeys (who want to uproot our vegetable patches!). The entire happy cycle of nature makes my soul sigh in satisfaction.

This season we got bushels and bushels of corn from our farm in Mahabaleshwar. And strawberries. And radish.  And beans. And cauliflower!! And so many other small batches of pure organic vegetables. The taste and inherent sweetness of the freshly plucked organic vegetables is a  world apart from what we get in cities.

We had freshly plucked corn, and we all decided to have Corn  Pulao.

Fresh corn, fragrant rice, a one pot marvel.

This is a really simple recipe, very easy prep and damn tasty to boot! Just before adding the rice, you will realise that the corn looks so good, and it tastes and smells good too. At this point you can easily not add the rice and serve it as a veggies with any kind of roti! (we almost did that, as the smell was making us go crazy – and we were fast loosing patience).

Serve it with yoghurt and papad! Or eat it plain! You can easily increase or decrease the spices. What I have written in my recipe is not a very spicy version. The yoghurt, balances the spices.

Fresh rice Pulao, made with organic corn.

I hope you like the recipe as much as all of us did!

PS: here is the link to the youtube video to make your life a tad easier!

Cheers and Ciao!


Corn Pulao
Print Recipe
Easy one pot Corn Pulao, full of fragrant spices.
  • CourseMain Course
  • CuisineIndian
Servings Prep Time
4 Pax 15 min
Cook Time Passive Time
25 min 30 min
Servings Prep Time
4 Pax 15 min
Cook Time Passive Time
25 min 30 min
Corn Pulao
Print Recipe
Easy one pot Corn Pulao, full of fragrant spices.
  • CourseMain Course
  • CuisineIndian
Servings Prep Time
4 Pax 15 min
Cook Time Passive Time
25 min 30 min
Servings Prep Time
4 Pax 15 min
Cook Time Passive Time
25 min 30 min
Ingredients
  • 1/4 Cup Mustard Oil (sarson ka tel)
  • 1 Black Cardamom (kaali elaichi)
  • 3 Green Cardamom (hari elaichi)
  • 1 Cinanmon Small piece (dalchini)
  • 2 Bay Leaves (tej patta)
  • 3/4 Cloves (laung)
  • 3/4 Black Pepper Whole (aakhi kaali mirchi)(optional)
  • 1/3 Cup onion Finely chopped
  • 1 1/2 Tbspn Ginger Garlic Paste (or chopped garlic and ginger)
  • 1 Tspn Turmeric powder (haldi)
  • 1 1/2 Tspn Corriander Powder (dhania powder)
  • 1 1/2 Tspn red chilly powder (lal mirchi powder)
  • 1 1/2 Tspn Cumin Powder (jeera)
  • 2 Cups Corn raw
  • 1 Tspn Asafoetida (hing) - diluted in 2/3 tbspn water
  • 1/3 Cup Yoghurt (dahi, curds)
  • 1 1/2 Cups Rice raw, Soaked for 30 minutes
  • 1 tspn Fresh Corriander (dhania patti)
  • 2/3 Cups Water
Servings: Pax
Instructions
  1. Take the corn grains off the cob.
  2. Heat oil. When spluttering add the cinnamon, green cardamoms, cloves, black pepper(optional), and bay leaves one by one.
  3. Roast well, then add chopped onions.
  4. When translucent and semi brown, add the garlic and ginger.
  5. After a minute, add the green chillies.
  6. Now add the turmeric and red chilli powder.
  7. Fry for a while till the (spices) masalas all mix together.
  8. Add the corn and toss and mix well.
  9. Now add the hing water and mix it all together.
  10. Add salt and fresh corriander.
  11. Add the yoghurt, and mix into the corn.
  12. When well mixed and small bubbles appear, add the soaked raw rice.
  13. Mix all together and add the water.
  14. Mix, and cover with well fitted lid, to cook. Medium flame.
  15. Keep checking the contents so that it does not burn and catch at the bottom.
  16. If water reduces, and rice has not cooked, add a 1/4th cup rice and then add slowly as needed.
  17. When cooked, garnish and serve immediately.
Share this Recipe

Filed Under: Dinner, Lunch Tagged With: cold pressed oil, corn, earthy, family meals, farm fresh, fragrance, fresh corn, fresh from the farm, garlic, healthy, high fibre, home cooked meals, indian, indian meals, organic, Pulao, Rice, spices, vegetarian

Puffed Rice (Kurmura) Poha

March 14, 2018 By appu 2 Comments

It was evening, and hunger pangs were making our stomach growl furiously. There was no time to make a time consuming snack, we all wanted something healthy and not too heavy. (The dinner menu looked very mouth wateringly promising!).

Rekha, our house keeper jumped to the rescue of our collective moaning tummies. She quickly chopped some onions, made a tadka of spices and curry leaves, took a large helping of puffed rice and to my astonishment, dumped it in a sieve and ran it under running water for a good 3 to 4 minutes.

By now I should not be surprised and astounded by the different ways and methods people around me cook. Rekha and my cousins and family continuously come up with new techniques and unique mixes. My last post was one such experience.

As recipes go, this one is the easiest, quickest snack you can make. You can make the onion mixture ahead of time and soak and mix the puffed rice (kurmura) just before serving.

Most of the ingredients are normally available in all Indian house holds, so there is no need to go rushing to the nearest grocer to buy something. You can of course make it spicer, more sour, add garlic … there is no end to how you can play around with the dish.

On this note, let me announce with the greatest of excitement that I have started my own Youtube channel. Its called The Recipe Larder, same as this blog.

The youtube video link to this recipe is available here. It shows you the step by step method of making this recipe. Do subscribe for more off beat recipes.

Hope you end up making this. Do send me pics!!  Cheers! and Ciao!

PS: please tag therecipelarder on istagram, if you wish to share your pics.

Puffed Rice (Kurmura) Poha
Print Recipe
A quick, easy and healthy snack made with puffed rice (kurmura).
  • CourseMain Dish, Snack
  • CuisineIndian
Servings Prep Time
3/4 pax 10 minutes
Cook Time
5 minutes
Servings Prep Time
3/4 pax 10 minutes
Cook Time
5 minutes
Puffed Rice (Kurmura) Poha
Print Recipe
A quick, easy and healthy snack made with puffed rice (kurmura).
  • CourseMain Dish, Snack
  • CuisineIndian
Servings Prep Time
3/4 pax 10 minutes
Cook Time
5 minutes
Servings Prep Time
3/4 pax 10 minutes
Cook Time
5 minutes
Ingredients
  • 3 Cups Puffed Rice (kurmura)
  • 1 Tspn Mustard Seeds (rai)
  • 1 onion Chopped finely
  • 15 -20 Curry Leaves
  • 2 Tspn Green Chillies finely chopped
  • 1/2 Tspn Turmeric powder (haldi)
  • 1/4 Cup Peanuts roasted and coarsely crushed
  • 2 Tbspn Coconut Grated
  • 1 Tbspn lemon juice
  • 1 Tspn salt
Servings: pax
Instructions
  1. Dry roast, remove the skin and coarsely crush the peanuts.
  2. Keep aside
  3. Grate the coconut and keep aside.
  4. In a pan, add the oil.
  5. When hot add the mustard seeds.
  6. When the splutter, add the chopped onions.
  7. Fry for a bit, then add the curry leaves.
  8. Fry for a few minutes more. When the onion becomes translucent, add the green chillies.
  9. Add the turmeric powder and salt and fry well.
  10. Shut the flame and keep this mixture aside.
  11. When you want to serve it, put all the puffed rice into a sieve and wash for 3 to 5 minutes under running water.
  12. tightly squeeze all the water out and keep the soaked puff rice aside.
  13. Before serving, add the puffed rice to the onion mixture. (you don't have to start the fire at this point)
  14. Add the peanuts, grated coconut, coriander leaves and lemon juice.
  15. Mix well and serve immediately.
Share this Recipe

Filed Under: Healthy, Snacks Tagged With: easy snack, healthy, indian cooking, indian food, indian snack, kurmura, muri, nutritious, organic, puffed rice, quick meal, vegetarian

Masaledar Aloo (A family recipe)

March 7, 2018 By appu Leave a Comment

Rich blend of spices – sookhi aloo ki sabji

Lot of good things happen in Mahabaleshwar. One of the finest things is – something about that place makes people want to cook.

The kitchen is airy and has huge windows opening out to our kitchen garden. The fact that it’s a biggish sized kitchen also makes it easier to have people milling around and experimenting with various home grown and organic ingredients.

I had my cousin uncle and aunt over. The fact that he is my age does not deter me from calling him uncle. Some childhood habits just don’t get out of your system….

Read More »

Filed Under: Dinner, Lunch, Vegetable Tagged With: alpp, food fad, garam masala, happy meal, home cooked food, indian cooking, indian meals, indian spices, organic, potatoe, recipes from the dad, sabji, sesame seeds, spices, taught by dad, vegetarian, veggies

Guacamole

February 12, 2018 By appu Leave a Comment

avocado and all other ingredients ready and prepped for mashing

To be very frank, I’m not a huge fan of Guacamole. Actually not a huge fan of Avocado either. The son, daughter and husband love it though!!

My son is on a full blown -I am going to build my body, and eat healthy – kind of streak, and he makes a lot of Guacamole, or Guac as the kids call it.

This here, is his recipe. Quick and super easy, and very filling. He made it for me last winter when he was here on holidays, and though my eyes don’t start shining in emotional gratefulness at the sight of Guac, I did dip a couple of nachos into it and I must say I was thoroughly impressed with it.

Avocado is not easily available where I stay. It grows in abundance in Bangalore, but the taste, texture and flavour is not as good as the one available in California.  When I went to spend sometime with my daughter in San Jose – California, I accompanied her to the super market. My eyes popped out, seeing the gigantic heaps of Avocado, spilling on to the floor, overflowing from their baskets. And the price!! Oh! Boy, it was being sold for peanuts.

I wanted to take back a few with me to India, but my kid gave me a fairly accurate description of the way it would get squashed and then get in between my clothes and when I would try to pull them clothes out, I would have slimy, gooey flesh smeared on my hands ….. you get the gist, don’t you?! Disheartened I gave up the idea, but began a hunt in Bombay for good Avocados. It was quite a task. They would be either underdone or over ripe and always, always very expensive.

I finally found a store, and now I get ripe to be eaten – the day I want – type of Avocado whenever I so please. It’s still a tad expensive, but it’s exotic fruit (yes Avocado is a fruit!) in India, and we pay for the glamour.

Do try out this recipe. It’s super easy and actually mashing the fruit – I found it kind of stress relieving.

avocados

http://therecipelarder.com/wp-content/uploads/2018/02/guac-converted-with-Clipchamp.mp4

Storage

Guac gets black very fast, as it starts oxidising when exposed to oxygen in the air. Lemon helps keep its colour, but it still needs further help. As such it’s best to make Guac just before serving, but it’s not always possible. To store Guac without letting the exposure affect it, store in a air tight box, or in a bowl, and cover with cling film, letting the cling film stick right on top of the guac. When you serve the guac, you will have to scrape the guac off the cling film, but it’s worth the effort.

If you want to use only one half of the fruit, retain the stone (seed), push it back into the cavity of the left over half, and cling film it tightly and keep refrigerated. This helps to a certain level, but eventually you better consume the fruit as soon as you can.

Cheers! to good fat!


Guacamole
Print Recipe
Quick and easy recipe for a healthy snack.
  • CourseAppetizer, Snack
  • CuisineMexican
Servings Prep Time
3/4 pax 10 minutes
Cook Time
5 minutes
Servings Prep Time
3/4 pax 10 minutes
Cook Time
5 minutes
Guacamole
Print Recipe
Quick and easy recipe for a healthy snack.
  • CourseAppetizer, Snack
  • CuisineMexican
Servings Prep Time
3/4 pax 10 minutes
Cook Time
5 minutes
Servings Prep Time
3/4 pax 10 minutes
Cook Time
5 minutes
Ingredients
  • 1 Ripe Avocado
  • 2 Tbspn onions Finely chopped
  • 1 Tspn Sea Salt
  • 1 Tspn Jalapeno Chillies Fresh and finely chopped, (or any other spicy green chilly)
  • 1/2 Tspn Paprika
  • 2 Tspn Cumin Powder (jeera)
  • 2 Tspn Black Pepper Coarsely ground
  • 2 Tspn Fresh Corriander roughly chopped
  • 2 - 3 Tspn lemon juice
  • 1-2 cloves garlic optional
Servings: pax
Instructions
  1. Cut the Avocado from the stem to the root, slicing the fruit into two
  2. Pull apart the two ends, and scoop out the seed with a spoon.
  3. Using a sharp knife, make horizontal and vertical slits into the flesh of the fruit.
  4. Now scoop out the flesh with a spoon, scraping into the skin of the fruit.
  5. Put all the flesh into a bowl.
  6. Add all the ingredients into the bowl with the avocado, and start pulverising with a fork. First break down the fruit and then start mashing the rest of the ingredients with the avocado.
  7. Lastly add the lemon juice and mix some more.
  8. Voila - it's ready to serve with nacho chips.
Share this Recipe

Filed Under: Cocktail Parties, Snacks Tagged With: avacado, foodfad, garlic, glutenfree, goodfat, guac, guacamole, healthy, healthyfat, healthysnack, highfibre, mexican, nachos, nogluten, snack, tortillas, Vegan, vegetarian

Palak Kebab

March 25, 2017 By appu 2 Comments

Palak Kebab

Another shout out from my daughter, for this recipe. I had made it for their friends when they were here and it was polished off in no time.

Well, many a good news hovering around me. The daughter got into Yale, my cooking classes have taken off and this darned blog has got fixed. There were some major issues, so all those of you who tried to come back for your favourite recipes and found gibberish in the ingredient section, my apologies. My very profound and heartfelt apologies. It could have got fixed earlier, but as usual, I was travelling.

I was in Mahabaleshwar, a small quaint hill station a few hours from Bombay. I have a home and a farm there, so this time the 12 days I stayed there, I ate off the farm, played with the new pup and chilled with my best friend Nishi.

We cooked, ate and drank!

We would wake up in the mornings, sit in the sun, (it was cold there!), and sip our tea and coffee. Then after a leisurely breakfast, we would put face packs (moisturising ones – like I said it was Brrrrr!) and jabber away for an hour or so. By the time the watch thought of turning both its hands to 12 – we would be sitting with our afternoon drinks – again yakking away to our hearts’ content. It was the most idyllic holiday one can have.

I plucked fresh Spinach, from the field and made this ultra easy and very delicious recipe. It needs very little preparation time. I have cooked it on a non-stick, with very little oil, but if you have a large party you can easily fry it in oil. I did it for the kid’s 21st birthday party and it vanished into mouths as soon as freshly fried plates were put in front of them.

cocktail snacks

I have also made a video, for a quick look-see. The first video I made was not “good enough” and my niece and son insisted I work a little harder and produce a better one. Well, they are not all that happy with this one either, but I lack patience so there is for all to view.

Unfortunately, I am not able to load the video here because of (temporary – I will fix it asap) data restrictions. But here is the Facebook URL

FACEBOOK URL FOR VIDEO OF PALAK KEBAB

and there is the google drive URL.

CLICK HERE FOR GOOGLE DRIVE LINK

I hope you will see the video and try the recipe. It makes for great cocktail snacks, lunch box sides, or sides.

Promise to get back with a recipe soon. I’ve been tardy!


Palak Kebab
Print Recipe
Quick and easy, with minimum fuss and preparation. Great as cocktail snacks.
  • CourseSide Dish, Sides
  • CuisineIndian
Servings Prep Time
3 /4 Pax 30 minutes
Cook Time
15 minutes
Servings Prep Time
3 /4 Pax 30 minutes
Cook Time
15 minutes
Palak Kebab
Print Recipe
Quick and easy, with minimum fuss and preparation. Great as cocktail snacks.
  • CourseSide Dish, Sides
  • CuisineIndian
Servings Prep Time
3 /4 Pax 30 minutes
Cook Time
15 minutes
Servings Prep Time
3 /4 Pax 30 minutes
Cook Time
15 minutes
Ingredients
  • 1/2 Cup Whole Black Masoor Dal (Indian Brown Lentils)
  • 1 Bunch Spinach
  • 1/3 Cup Cottage Cheese (or Ricotta cheese)
  • 5 Cloves garlic
  • 2 pcs green chilles
  • 1 Inch Ginger
  • 1/3 Cup onion Finely chopped.
  • 2 Tbspn Cashews, crushed
  • 1 1/2 Tspn Garam Masala
  • 1 Tspn salt
  • 2 Tbspn - Plus oil for cooking and oiling hands
  • Water
Garnish
  • 1 Tbspn Chaat masala
  • 1 onion Sliced.
Servings: Pax
Instructions
  1. Soak the dal for 30 minutes.
  2. In a mortar and pestle, pound together the chilles, garlic and ginger.
  3. Wash and chop the spinach into very fine strands.
  4. Bring water to a boil, and boil the Spinach for a 2 / 3 minutes.
  5. Wash and grind the soaked dal into paste with as little water as possible. Preferably no water.
  6. In a non stick skillet, add a appx 1 Tbspn oil.
  7. Add the ginger, chilly and garlic paste. Fry till it is brown.
  8. Add the onions, and fry till brown.
  9. Now add the Dal paste, and again fry till it forms lumps and all the water has evaporated.
  10. Now add the spinach and mix and cook till incorporated.
  11. Add the cottage cheese/ ricotta cheese. Break it and sprinkle it all around for a better mix.
  12. Mix till incorprated.
  13. Add the cashews, garam masala and salt.
  14. Mix well and take off the fire on a plate to cool.
  15. Oil your hands and make small rounds, appx the size of a small lemon.
  16. Flatten it. Repeat with the entire mix.
  17. In a skillet add appx 1 Tbspn oil and cook the kebabs, pressing it and turning it till it browns on both the sides.
  18. You can also fry these kebabs in oil.
  19. Serve hot, sprinkled with chaat masala and garnished with onions. Serve with a corriander chutney.
Share this Recipe

Filed Under: Cocktail Parties, Sides, Snacks Tagged With: cocktail snack, healthy, quick and easy snack, snack, spinach, vegetarian

Kachcha Sambhar (raw sambhar)

August 25, 2016 By appu 4 Comments

kachcha sambhar

I was all set to meet the husband for a romantic lunch, but Bangalore being crowded, overpopulated, Bangalore, the traffic was such that it was either the lunch or the airport. And that airport had a plane parked which was going to take us to Goa! So really there was no dispute, the airport on time – it was.


I surprised our caretaker with a lunch request. She wasn’t prepared to make anything since I had announced gleefully about my romantic plans. So she hemmed and hawed, wondering what to make. (And I was feeling fussy about food that day!) Her husband (I have mentioned him before in my blogs. He is a complete foodie- for which I am eternally grateful!) Well her husband suggested “Kachcha Sambhar” in his typical local accent. It took him three repeats of the word before I realised that is what he actually meant. Raw Sambhar.

I have learnt to experiment and sometimes leave the suggestions to the experts. AND I WAS NOT DISAPPOINTED. In fact, I was in food paradise. Every spoonful going in was ambrosia. Now I love garlic, and I love spice, and the most fun part was it has not one drop of oil!! Perfect right??

We did take off to Goa, and we had an amazing time, caught up in that leftover romance and all that! 😛 But I raved and raved about the Kachcha Sambhar, and he finally told me to use other methods to turn him on!! ( 😛 we are a foodie family!!)

Here is the recipe — the tomatoes have to be burnt — burnt black on a high flame. Wait for it to cool, and skim the skin off. Please do wait for it to cool — this way the skin comes off and does not leave small pieces of black burnt skin behind. We don’t want any black stuff in the sambhar. Same goes for the green chilly.

This is a very spicy dish. Deseeding the chilly reduces the spice. If you want it less spicy, reduce the quantity of the chilly, but don’t delete it completely. That would be a SIN! and Karma will pay you back!!

Tastes absolutely amazing with rice and a bland veggie. I love it with chilla. You make your own combinations and message me.

I was on the floor worshipping this dish! Hope you like it too!

Ciao!!


Kachcha Sambhar (raw sambhar)
Print Recipe
Quick, elegant and earth shatteringly tasty!
  • CourseSide Dish
  • CuisineSouth Indian
Servings Prep Time
4 people 5 minutes
Passive Time
5 minutes
Servings Prep Time
4 people 5 minutes
Passive Time
5 minutes
Kachcha Sambhar (raw sambhar)
Print Recipe
Quick, elegant and earth shatteringly tasty!
  • CourseSide Dish
  • CuisineSouth Indian
Servings Prep Time
4 people 5 minutes
Passive Time
5 minutes
Servings Prep Time
4 people 5 minutes
Passive Time
5 minutes
Ingredients
  • 2 tomatoes large size
  • 1 Green Chilly medium spicy
  • 1 tspn salt
  • 1 tbsn + tspn onions very very finely chopped
  • 1 Tspn garlic very very finely chopped
  • 1 tbspn corriander roughly torn
  • 1.5 Cups Water Clean, filtered.
Servings: people
Instructions
  1. Burn the tomato over high flame. Tomato should be rotated. It should char completely.
    Burn the tomato over high flame. Tomato should be rotated. It should char completely.
  2. Burn the green chilly over high flame. Rotate and burn till completely charred.
  3. Let the tomato and chilly cool.
  4. When cooled, peel the black skin off the tomato and discard.
  5. Wash your hands so that no black stuff sticks back on the peeled tomato
  6. Chop as finely as possible. This reduces the time required later while pureeing with hand blender.
  7. Peel the black layer of the green chilly. Deseed the chilly. (This is very important)
  8. Chop the chilly into small pieces.
  9. To a pot, add the tomatoe, green chilly, salt and water. Mix well with a hand blender. No large pieces of tomato should be left.
  10. There will be a few small pieces of tomato floating around, let them be.
  11. Transfer contents to a serving bowl, add onions, garlic and garnish with corrinader. Serve cold.
Share this Recipe

Filed Under: Sides Tagged With: garlic, no oil, onion, puree, quick and easy, sambhar, tomatoes, vegetarian

Italian Tomato Sauce

August 13, 2016 By appu 2 Comments


italian tomato sauce

Apologies about the link —- this is the corrected version.

———————————————————————————————————————

I am super super excited about this recipe. It’s complicated (a little bit!) but it looked so brilliant. I saw a version of this on a cooking channel and I got up from my chair, headed to my bar, collected the vodka, (yup! It has Vodka!!) and all the ingredients and started making it, changing a little bit of the recipe here and there.

After 15 minutes into cooking, the fragrance wafting from the kitchen to the rest of the house drew many of the family members and a few neighbours into our kitchen. I tell you I am on my knees, worshipping this sauce.

It’s a thick sauce. Really thick. It’s not to be had on its own (but you might finish a lot of it while tasting it – I warn you!). You will have to mix it with some stock water, hell even mixing it in the water used to cook pasta lends it an amazing flavour.

Use it as a pizza base, as a base for Bruschetta, in a salad! Just make it, creative ideas will flow in.

I don’t want you to read all these descriptions and explanations. What I want you to do is get hold of all the ingredients and start making it. Let the family members walk in with appreciative sniffs and exclamations. Keep them waiting, and then hit them with a pasta made from this recipe. Lie back and bask in the glory!

PS: There is one very important thing that you have to follow, that’s – the instructions. There will be times while making the recipe you might think I am joking or that I have lost my mind. Have faith. I am very serious when I say what I say, and I am very sane and going to wait for your comments after you have made this recipe. You can advocate my sanity.

Without more blah blah – here is the recipe for Italian Tomato Sauce.

PS _AGAIN__and here is the link to the video —–

A shout out to my school friends who always have my back — hey there girls 🙂

Thanks to Brinda – for helping me with this video.


Italian Tomato Sauce
Print Recipe
An amazing base sauce. Let your imagination flow and get creative.
  • CourseMain Course, Main Dish, Sauces and Jams
  • CuisineItalian
Prep Time
15 minutes
Cook Time
30 minutes
Prep Time
15 minutes
Cook Time
30 minutes
Italian Tomato Sauce
Print Recipe
An amazing base sauce. Let your imagination flow and get creative.
  • CourseMain Course, Main Dish, Sauces and Jams
  • CuisineItalian
Prep Time
15 minutes
Cook Time
30 minutes
Prep Time
15 minutes
Cook Time
30 minutes
Ingredients
  • 1/3 Cup olive oil
  • 2 Tbspn Butter
  • 6 garlic pods large whole pcs
  • 2 Tubes Italian Tomato Paste I used Ardita Parma Italiana - available in all stores.
  • 1 tspn brown sugar
  • 1 large onion diced
  • 150 gram cherry tomato
  • 1/2 tspn Red chilly flakes coarsely ground
  • 1 tspn salt
  • 1 tspn lemon zest
  • 45 ml vodka
  • 1/4 tspn cayenne pepper
  • 2 tbspn basil minced
  • 1 tspn Red Wine Vinegar
Servings:
Instructions
  1. Heat a heavy bottomed non stick pan. Add olive oil and butter. Olive oil should completely cover the bottom of the pan. Let the butter melt
  2. Add garlic and saute till it's a bit brown. Take out the garlic and keep it aside.
  3. Add 1 1/2 tubes of tomato paste to the hot oil/ butter mix. DO NOT STIR. I kid you not - DO NOT STIR!! Just see to it that the paste is completely submerged in the oil.
  4. Cover and cook for 10 minutes in med/ high flame.
  5. Add Brown sugar, salt and pepper. Once the bubbles subside, add the diced onions and cherry tomatoes.
  6. Now you can stir and mix. You might see a little blackened sauce when you mix. Don't worry, its normal. Ofcourse the entire bottom shouldnt be burnt. This means your pan wasn't thick enough at the bottom.
  7. Cook covered till tomatoes get squishy and cooked.
  8. Add the left over 1/2 tube of tomato paste.
  9. Add lemon zest and cayenne pepper and mix.
  10. Add the pre cooked garlic.
  11. Mix
  12. Add the vodka and mix.
  13. Cook covered for 5 minutes. Then add the basil. Cook again for 2 minutes.
  14. Add the red wine vinegar and taste!!! Voila-- you are done.
Recipe Notes

Dilute with pasta water or stock and add to pasta.

Liberally coat a salad.

Layer your pizza.

Use in baked dishes.

Use for base of crostini or bruschetta.


Share this Recipe

Filed Under: Sauces Tagged With: base sauce, bruschetta sauce, italian, pizza sauce, salad, tomato sauce, vegetarian

Hummus Beiruti

July 26, 2016 By appu Leave a Comment

I had Hummus for the first time as an adult. It picked up as a rage, and every party had a bowl of Hummus, with Pita. Then came the Lavash. Crisp flat wheat savouries topped with seeds.

Hummus with Lavash.

Hummus with Lavash.

I had Hummus for the first time some 20 years ago, in a restaurant called Olive. They had the typical platter of Baba Ganoush, Hummus and Tzatziki. At that time – I thought it was made with magic. How could something so tasty, so creamy be so amazing and healthy? When I learnt to make hummus, I was amazed at how easy it was, but I never seemed to like it as much as I liked the ones in a restaurant.

The fact is – I used terrible shortcuts. Sesame instead of Tahini. Sacrilege!! (my logic – Tahini is made out of sesame right??) Too much garlic, not enough creamy texture — blah blah!

I thought I would never be able to replicate the hummus, we have in good Mediterranean restaurants.I love the Hummus Beiruti. Its creamy with a mild tang of spice. Polishing off a small bowl is no big feat.

Hummus Beiruti

Hummus Beiruti

I tried Hummus again, (after my many not so good tries) and this time I used the proper Tahini. Another thing a chef friend of mine suggested was using cold water.

In this recipe, I use a little leftover water after boiling the chickpeas. I like to soak the chickpeas at night, and cook it the next morning and make the Hummus a few hours later. The water left over from cooking the chickpeas and the chickpeas itself are cooled down and refrigerated.

The hard work is soaking and cooking, after that its the quickest recipe you can make.

Serve it with a Rocket and cucumber salad, over toast with Avocado, obviously with Pita and Lavash. So many ways!! Do write in and tell me how you like to present it.

 Hummus


                                                                               Hummus

I made Hummus for my son last evening, thinking he could have it with Avocado. Confidently, I also made a small olive oil, garlic and Sumac drizzle for the top. Failure of failures! – the Avocado was not ripe enough and we had to chuck it. (Once cut it turns black quicker than a piece of charcoal rubbed on a face!) Then he suggested that we caramelise some onions, and top it with the same. Bigger flop. I had no brown sugar with me, and any case something made in a hurry not always turns out good. It was sticky …. basically – a flop!! I was flapping around about what he would eat, but he said the Hummus was good enough to eat on its own.. YAAAY!! Hummus saved the day!

hummus

hummus

hummus


Hummus Beiruti
Print Recipe
A Meditteranean staple, creamy and yummy!
  • CourseAppetizer
  • CuisineMediterranean
Servings Prep Time
4 people 10 minutes
Cook Time Passive Time
15 minutes 12 hours
Servings Prep Time
4 people 10 minutes
Cook Time Passive Time
15 minutes 12 hours
Hummus Beiruti
Print Recipe
A Meditteranean staple, creamy and yummy!
  • CourseAppetizer
  • CuisineMediterranean
Servings Prep Time
4 people 10 minutes
Cook Time Passive Time
15 minutes 12 hours
Servings Prep Time
4 people 10 minutes
Cook Time Passive Time
15 minutes 12 hours
Ingredients
  • 1/2 Cup Chick Peas Soaked over night
  • 2 Tblspn olive oil Virgin if possible
  • 2 Tblspn Yogurt
  • 5 Pods garlic peeled
  • 2 Tblspn Tahini
  • 1 Tblspn Water left over from cooking chick peas cold
  • 2 Tblspn Cold Water
  • 1 Tspn salt
  • 1/2 Tspn Cumin Powder
  • 1/3 Green Chilly Deseeded and chopped
  • 1/2 Tspn lemon juice
Garnish
  • 1 Tspn parsley chopped fine
  • 1/2 Tspn Sesame Seeds Roasted
  • 1 Tblspn olive oil
  • 1/2 Tspn Paprika
  • 1/4 Tspn salt
Servings: people
Instructions
  1. Soak the chick peas over night.
  2. Wash and cook till its soft. It should not disintegrate. It should retain its shape. I like to use a pressure cooker for this.
  3. Drain the water, cool and refrigerate.
  4. Cool chick peas and refrigerate.
  5. After a few hours, add all ingredients in a blender and blend till you get a fine paste. Keep opening the jar and spoon the mixture stuck on the sides back into the jar. PS: if you use the Tecnora brand of mixie (available on amazon) which comes with a very handy stirrer in the jar. While blending, one can keep stirring the mixture, so that it blends easily. You don't have to keep opening the jar.
  6. Once you have the consistency you want, plate it and garnish with olive oil, sesame seeds, parsley and mint leaves.
  7. Serve with Pita, Crisp Pita and Lavash.
  8. NOTE ON TAHINI: When using Tahini, please stir well and take from the bottom of the jar, as the solids settle way down.
Share this Recipe

Filed Under: Cocktail Parties, Sides, Snacks Tagged With: Chick Peas, Lavash, Mediterranean, Vegan, vegetarian

Mexican Fruit with Tajin

July 14, 2016 By appu Leave a Comment

Peaches and Pineapples with Tajin

Peaches and Pineapples with Tajin

Another Mexican dish? I’m telling you – the last trip to San Diego, I really revved on Mexican Food. It was so very different from the typical Enchilada, Burrito, Nachos!

San Diego stands on the edge of Mexico. My son was told in his orientation, to be very careful while on the local train. One stop further and he would be in Mexico, and if he did not have his visa and college papers, he would land into big trouble. That’s how close Mexico is! Now you can imagine, the Mexican food influence in San Diego!

The Mexican Street Food, was so yum! Very close to Indian food in some ways, yet a different taste bud was touched with each dish. This particular Fruit Salad was and is my favourite. The only hitch is you have to get hold of the Tajin mix, available easily online and in supermarkets all over USA.

Tajin

Tajin

Mexican fruit salad was served to us in a broad glass. They stuffed in strips of Pineapple, Apple, Mango, (and when I made it in India, I used Alphonso — OOOH! the taste!!) Melon, and a dried spicy mango, easily available in Trader Joe. The bottom of the glass had a huge dollop of this Tajin mix, and it copiously laden on the fruits too. I wanted to shove my face into the glass and lick up all the Tajin, once the fruits were over. My son had a friend join us for lunch that day. Poor chap must have thought his friend’s mom is completely addled!

watermelon wit tajin

watermelon wit tajin

Eat it on a hot day – refreshing, on a rainy day – soothing, on a blustery windy day – warming. This dish just makes you upbeat! The sour, tangy, mildly spicy (it looks very spicy, but is not), will make you want to sing and dance – the happy tune emanating from your palate. It hits all the right spots in your taste buds, and sends a zing up your body, almost like an adrenalin rush.

Use it with whatever fruit catches your fancy. Strawberries, Kiwi, Apples, Oranges, Pineapple, Peaches, Dried Fruits etc.

Pineapple with Tajin

Pineapple with Tajin

It takes only minutes to make – the major task being cutting the fruits. We had it with drinks, and it went very well with Whisky and Beer.

Peaches with Tajin

Peaches with Tajin

Let me know if you went as crazy over this dish as I did.


Mexican Fruit with Tajin
Print Recipe
Easy and immensely satisfying dish to make.
  • CourseSalad, Sides, Snack
  • CuisineMexican
Servings Prep Time
6 people 15 minutes
Servings Prep Time
6 people 15 minutes
Mexican Fruit with Tajin
Print Recipe
Easy and immensely satisfying dish to make.
  • CourseSalad, Sides, Snack
  • CuisineMexican
Servings Prep Time
6 people 15 minutes
Servings Prep Time
6 people 15 minutes
Ingredients
  • 500 gms Pineapple Cut into thick strips 3 inches long
  • 2 Mangoes Peeled and cut into thick slices
  • 2 Peaches Peeled and cut into thick slices
  • 3 pieces Dried Mango (Trader Joe) Cut to equal sizes
  • 1 Orange Peeled and segments separated.
Tajin Mix
  • 5 Tablespoon Tajin Mix
  • 4 Tablespoon lemon juice
Servings: people
Instructions
  1. Cut all the fruits and Chill.
  2. Add Tajin and Lemon juice. Add the juice a little at a time. The mixture should be a thick paste and not runny.
  3. Tajin mix already has dried lemon in it, so you don't want to drown the Tajin in too much lemon.
  4. You can make more Tajin, if the mix is less than you need. If making less the ratio become 1:1 - Tajin powder : lemon juice.
Assembling
  1. Arrange all the fruits in a dish.
  2. Drizzle the Tajin mix over the fruits.
  3. Serve a small bowl of the Tajin mix with the fruits. Some people might want to dip in for an extra dose of this amazing mix.
Share this Recipe

Filed Under: Snacks Tagged With: amazing, fruits, mexican street food, salad, sour, spicy, trjin, vegetarian

  • 1
  • 2
  • Next Page »

Meet the Author

For the 21 years and some months that I have been alive, there has been this crazy, eccentric, always-charged-up woman with a full-time job of being a mother to 6 (2 children, 4 dogs).

In her spare time she blasts music on her DJ console, reads like a maniac, downloads shows (because God forbid she runs out of something to watch), runs an entire household, and to top it all off, manages a very successful catering business which makes the most delicious food in the entire world. Once you have her food, everything else will taste like stale socks.

This is what you call "Maa ke haath ka khana".

- Kanak

Subscribe to Blog via Email

RECIPE BY CATEGORY

Copyright © 2023 THE RECIPE LARDER